

Introduction: Making LCD Thermometer With Arduino and LM35/36


Hello, everyone !!! I'm going to show you how to make an LCD thermometer with an Arduino UNO and a LM35/36 analog temperature sensor with jumpers and a breadboard.
This project is very good for people beginning with Arduino, it doesn't require any special engineering nor programming skills and it will take you less than 10 minutes to build it, once you have all the parts of course. :)
Step 1: Gathering the Parts


These are the part you need to build the thermometer:
- 1x Arduino UNO board
- 1x Breadboard
- 1x 16x2 LCD display
- 1x LM35 or LM36 analog temperature sensor
- 1x 10k potentiometer - for adjusting the brightness of the display*
- 19x Jumpers - to connect everything
They are also met in the official Arduino Starter Kit which you can order from Arduino's official web page here. Also you can buy them separately from the following stores: Adafruit, SparkFun, Aliexpress, Banggood, etc.
*If you dont have a 10k pot you can use 50k like me !
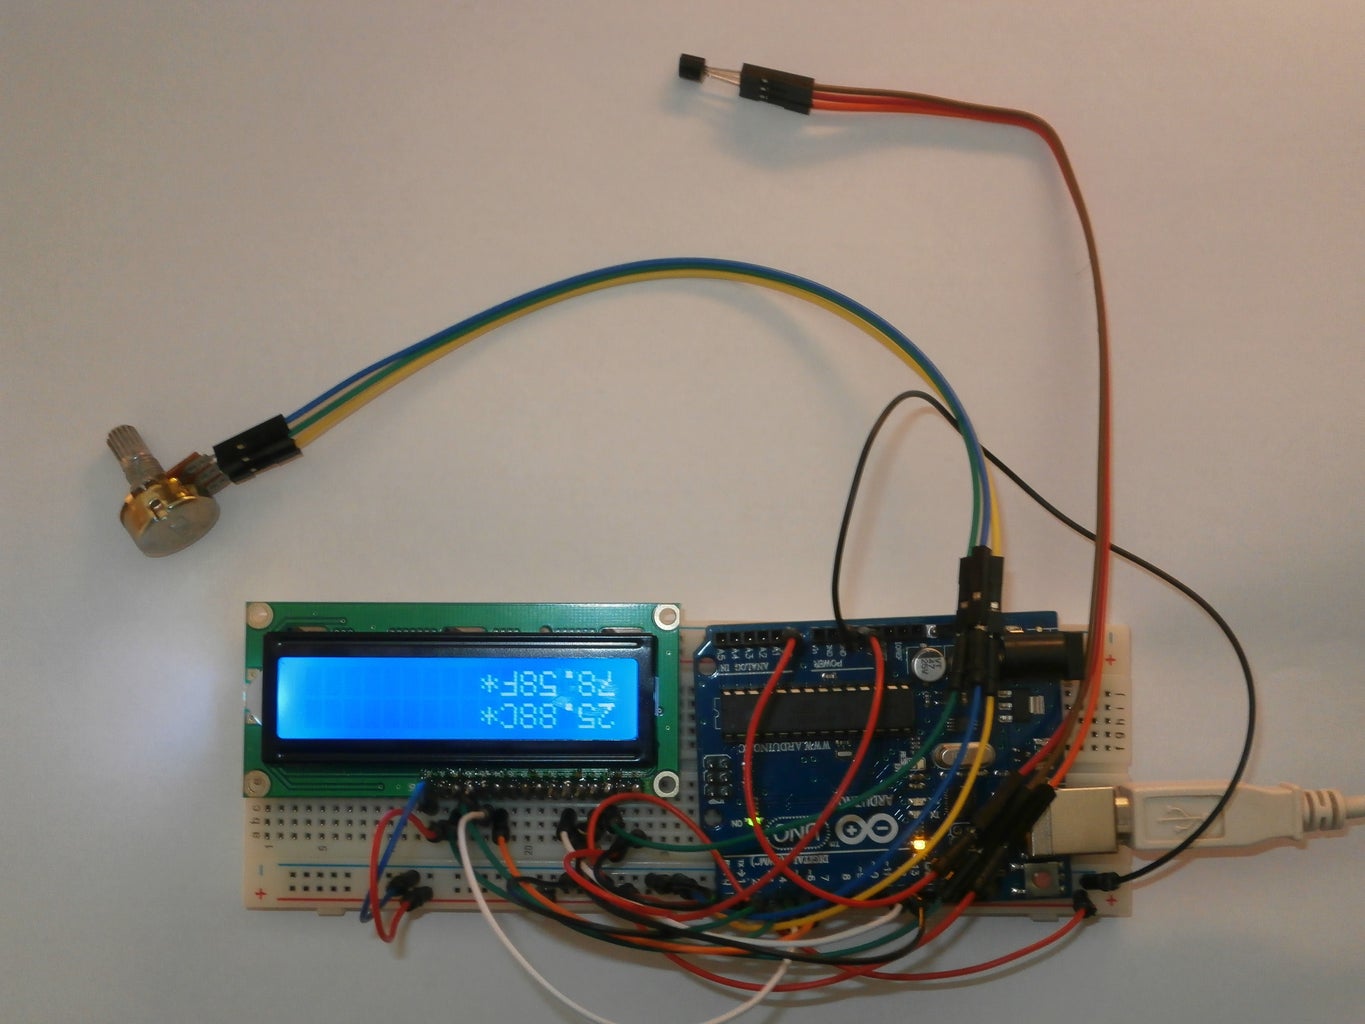
Step 2: Building the Thermometer

By following the Fritzing schematic above, plug the LCD in the breadboard and then connect it to the Arduino board with jumpers. After that plug the potentiometer and the sensor in the breadboard, connect the left and the right pins of the pot to ground and +5V and the middle one to the LCD display.
Then connect the sensor to ground and to +5V and to the Arduino but be very carefully, because if you connect it wrong the sensor will heat up to 280+ C(540 F) and might get damaged.
Once you have connected everything move on the next step.
Step 3: Programming the Arduino

To get it work you have to use one of the two codes below. Upload it to your Arduino using theintegrated development environment, for short IDE, which you can download from Arduino's official page and you are done !!!
If you don't see anything on the LCD or you see rectangles, turn the pot clockwise/anti-clockwise until you see the letter clear.
Now you have a thermometer and you can measure the temperature of the air around you, inside your house or outside.
The first code is from Gaige Kerns, and it can be used to read from LM36 or LM35. Thanks Gaige !!!
Also check out my new thermometer project here !!!
<p>// include the library code #include

// initialize the library with the numbers of the interface pins
LiquidCrystal lcd(12, 11, 5, 4, 3, 2);
// initialize our variables
int sensorPin = 0;
int tempC, tempF;
void setup() {
// set up the LCD's number of columns and rows:
lcd.begin(16, 2);
}
void loop() {
tempC = get_temperature(sensorPin);
tempF = celsius_to_fahrenheit(tempC);
lcd.setCursor(0,0);
lcd.print(tempF); lcd.print(" "); lcd.print((char)223); lcd.print("F");
delay(200);
}
int get_temperature(int pin) {
// We need to tell the function which pin the sensor is hooked up to. We're using
// the variable pin for that above
// Read the value on that pin
int temperature = analogRead(pin);
// Calculate the temperature based on the reading and send that value back
float voltage = temperature * 5.0;
voltage = voltage / 1024.0;
return ((voltage - 0.5) * 100);
}
int celsius_to_fahrenheit(int temp) {
return (temp * 9 / 5) + 32;
}</p>
#include <LiquidCrystal.h>
LiquidCrystal lcd(12, 11, 5, 4, 3, 2); //Digital pins to which you connect the LCD
const int inPin = 0; // A0 is where you connect the sensor
void setup()
{
lcd.begin(16,2);
}
void loop()
{
int value = analogRead(inPin); // read the value from the sensor
lcd.setCursor(0,1);
float millivolts = (value / 1024.0) * 5000;
float celsius = millivolts / 10;
lcd.clear();
lcd.setCursor(0,0);
lcd.print(celsius);
lcd.print("C");
lcd.setCursor(0,1);
lcd.print((celsius * 9)/5 + 32); //turning the celsius into fahrehait
lcd.print("F");
delay(1000);
}


