

Introduction: Eliminate Standby Power With a Desktop Power Switch!


We all know it's happening. Even when your appliances (TV, computer, speakers, external hard drives, monitors, etc.) are turned "OFF," they are still actually on, in standby mode, wasting power. Some plasma TVs actually use more power in standby mode than they do when in use! About 13% of household energy use is from appliances in standby mode. It has been estimated that Americans spend around $4 billion on standby power every year. Generating the electricity for appliances in standby releases 27 million tons of CO2 into the atmosphere (every year).
Seriously, standby mode sucks (power). So I decided to help out. By re-wiring the switch from the power strip under my desk up to a box on top of the desk, it is now easily accessible. Every morning I turn the key to deliver electricity to my computer, hard drives, speakers, and monitor, and every night, I turn the key the other way, cutting power to my appliances, thereby foiling their attempts to raise the energy bill. It works great! Please comment, rate, and VOTE!
Step 1: Supplies


Many of the parts I used are interchangeable with other similar parts. These include the type of switch, LED, project box, etc. If you want to be boring, you could just re-use the switch and LED from the power strip.
Parts
- Power Strip with LED indicator (that you don't mind hacking up a little)
- Key switch (Jameco #106650)
- 3 mm LED
- Small project box (Radioshack catalog #270-1801)
- Cable wrap (Jameco #1585531)*
- 115VAC-capable wire*
- Relatively thin wire for LED*
- Small heat-shrink tubing
- 2 small zip-ties
- Thin metal plate (fits where switch and LED were on power strip)
- Velcro strip
- Gorilla Glue and/or superglue
- Electrical tape
*needs to be long enough to go in between power strip and box location
Tools
- X-acto knife
- Soldering iron w/ solder
- Heat gun
- Wire cutter/stripper
- Desoldering pump
- Dremel
- Tin snips
- Large-ish clamps
- Drill with various drill bits
Step 2: Start on the Box


Begin by mapping out where you want your cable wrap (where the wires go in/out), LED, and switch. I put my cable wrap hole out the back center, my switch centered on top, and my LED in the upper right corner. I suggest marking where to drill by spinning the tip of an X-acto on the box. This helps guide the drill bit and provides a good visual reference. After marking the holes, hit 'em with the drill press, then make sure everything fits before moving on...
Step 3: Commence Soldering!


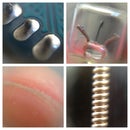
We'll start by preparing the wires. If you used a computer power cable like me, the first thing you'll want to do is cut the ends off, strip away about an inch of outer insulation, then about a 1/4 inch of individual insulation. You should also strip the ground cable (ignore the contradictory image note). Do the same thing to both ends of the cable. For now, we will only be using one end of the 115-volt cable. On that end, apply a generous amount of solder to tin it. Then insert the wires into the barrel connectors on the key switch. While heating up the connectors with your soldering iron, apply solder to the wires where they contact the connectors. Also, attach the ground wire to the switch's metal casing. If something fails, this will protect you from electrical shock.
For the LED wires, strip about 3/8 in. off one end of the set, and about 3/16 off the other. On the long side, solder on your LED, but not before you slide heat-shrink tubing down. I forget to do that every single time.
Step 4: Box Assembly


Now we will put everything in the desktop box. Start with the switch by threading the wire through the hole, positioning the switch, then firmly tightening the nut. Before installing the LED, you may need to cut away any ridges in the box with a Dremel to allow the LED to sit flush with the inside of the box. Then clean out the box of plastic shavings, insert the LED, and superglue it in place. Give it some time to dry and collect its thoughts.
After the glue dries, put the wires through the cable wrap. It might help to wrap both ends in tape to keep them together. Next, feed some cable wrap through the box and zip-tie it in place on the inside and outside. Schweet! Your box is done!
Step 5: Hacking the Power Strip


Before we solder the box's switch and LED to the power strip, we need to take out the switch and LED it already has. Find and unscrew all the screws in the power strip and open it up. If you bought a cheap power strip, the circuit should be pretty straight-forward. Examine the circuit and follow the tracks to figure out what each of the contacts on the switch does. You also need to find the LED.
Desolder all the wires from the switch contacts, but remember where they go because you will be putting them back later. Next, desolder the switch itself and remove it from the power strip. Then desolder the LED, making note of polarity on the circuit.
After the switch and LED are removed, feed the wires coming from the desktop box in through an open hole in the power strip's casing (like where the switch was). Solder the proper wires in the proper places. New switch wires where the switch was, new LED wires where the LED was, and switch ground to the power strip's ground. After soldering, position the circuit board where it was and close the power strip's casing back up. Test your modification by plugging the power strip into the wall, and a simple light into the power strip. Turn it in and off with the switch box, and try the light in all the outlets. If it works (it either does or it doesn't), move on. If it doesn't, examine your wiring and circuit board. If you comment with a picture and your issue, I may be able to help.
Step 6: The Little Metal Thing That I Can't Come Up With a Name For


To keep the cable wrap in place, and keep everyone else away from massive amounts of current, I figured I'd add a little metal piece to go over the open holes. You can use, metal, plastic, or maybe wood (but wood catches on fire). Cut your material to fit over any open holes. I made mine extend to the end of the power strip so it looks a little cleaner. Then cut a notch with a Dremel that the cable wrap will rest in. If you make the notch just right, it will sit in between corrugations in the wrap, locking it in place. Verify the proper fit, then apply small amounts of Gorilla Glue to the power strip where it will go.
Clamp the piece down evenly and let it sit for a few hours to dry thoroughly. Once it's dry, set up your new, improved anti-standby power strip!
Step 7: Secure the Area


To secure the desktop switch to the desk, you probably want to use Velcro strips. Put one part on the bottom of the switch box and the other on the desk where you plan on placing the box. I put mine right next to my computer. Easily accessible, but out of bumping distance. Before you plug in all of your stuff, test it out again with a light. If it still works, plug in your stuff and try it out!
w00t! You can now easily turn on and off your power strip and stop your appliances from eating up electrons! Fight the power! Comment! Rate! VOTE!
Participated in the
Earthjustice United States of Efficiency Contest


