

Introduction: Email Reading Reindeer


Rudolph uses a Propeller Platform USB to log into the email server, trigger animations, and generate the speech. An E-Net module handles the Internet connection. First, I'll answer a few questions, then I'll show you how I built it, and I'll give you a few ideas on how to customize it for your own projects.
Step 1: FAQ

How's it work?
Rudolph regularly connects to your email server via POP, logs in, and checks the number of emails in your inbox. If you've got a new email, it triggers an animation on the stuffed animal, retrieves the name of the sender and plays it back.
A Propeller Platform USB runs everything, using an E-Net module to handle the Internet connection. The 'Text-to-Speech' engine also runs on the Propeller; It's really a text-to-phoneme engine, but works well enough to read the name of the sender.
What about reading something other than email?
Rudolph can tell you the weather, read a sports score, or blink when you get a tweet! I'll show you how to use any data that's available on a webpage in your own project.
How do I make it work with a different stuffed animal?
It should work with any stuffed animal that has a switch to start/stop animation, and a speaker to play audio. You could also take emails and display them on a TV - Rudolph isn't a requirement.
Everything is open source. I'll go through the program, but if you're impatient, here's the code.
Step 2: Tools and Materials

Materials
1 - A stuffed animal
Look for one that has a switch that triggers the animations and a speaker.
2 - Propeller Platform and E-Net Module

You could also build this project on a breadboard, although it would be a bit unwieldy. The E-Net Module is based on the ENC28J60 chip.
3 - Audio amplifier

Here's the shopping list;
- LM386 (Jameco)
- A few screw terminal connectors
- A spare protoboard
- A 220 uF Electrolytic capacitor (Jameco)
- 10k Potentiometer (Jameco)
- Hookup wire
Tools
Assembly took me about an hour, and takes some soldering. If you've never soldered before, there are a bunch of great instructables to guide you, like this one. You'll need a few tools:- Soldering Iron and solder. Leaded solder is easier to work with, and a 15-40 watt iron is just fine.
- Dikes. Diagonal cutters are used to trim the excess leads from components after soldering them down. I use a pair I got from Ikea for two bucks.
- Multimeter. Any multimeter will do, you just need to make a single measurement.
Step 3: Preparing Rudolph

On Rudolph, the original assembly used hot glue, so I used a razor to cut the bell from the skin. Then, you can slide the skin back to expose the bell. The bell will usually be held together with some more hot glue or with screws, like Rudolph. Remove the screws and open the bell to expose the circuit;

There are two pairs of wires we'll need;
- one pair connects to the switch that triggers animations. The switch is usually in a limb - just follow the wires that go to the switch and cut them with a pair of dikes
- another pair connects to the speaker in the body. Cut those to disconnect the speaker from the circuit board with the original audio samples.

Step 4: The Circuit

Audio Amp
You can connect the Propeller Platform directly to the speaker in Rudolph's body, but the audio will be very quiet. So you'll need to amplify it to be heard. I've built the amplifier using an LM386, a common small audio amp. Here's how you connect each pin on the LM386;- Pin 1 (the pin closest to the notch on the chip) is unconnected
- Pin 2 is connected to ground
- Pin 3 is connected to the audio source, usually through a potentiometer so you can turn the volume up and down
- Pin 4 is connected to ground
- Pin 5 (diagonal to Pin 1) is the audio output. It connects to the speaker through a capacitor)
- Pin 6 is connected to the power source - 5V in this case
- Pin 7 and Pin 8 are unconnected

Animation switch
Of the two wires that were connected to the switch in Rudolph's body, one is connected to ground, and the other will be floating. You'll need to determine which is which with a multimeter. Switch your multimeter over to measure volts, and connect the black test probe to the negative terminal in Rudolph's battery box. Connect the red test lead to each of the wires that came from the switch. The wire that measures 0V should connect to Ground . Connect the other to P17 on the Propeller Platform.Connecting everything together
I build the circuit on a protoboard and used screw terminals to easily connect everything;
The screw terminal on the top right connects to the 5V and ground connections on the Propeller Platform. The top middle connector goes to the speaker in Rudolph. The top left connector connects to the animation switch in Rudolph, and the bottom left connector goes to the audio and animation pins on the Propeller Platform. Using screw terminals is handy if you want to reconnect things or use a different stuffed animal.
Assembly instructions come with the E-Net module - just drop it on top of the Propeller Platform. Then, connect your amp to Rudolph and the animation switch to the Propeller Platform and you're ready for the software.
Step 5: The Software

Download the software and unzip it into a new folder on you desktop. The top object is Pop_Santa_003. You'll need to adjust the settings in the beginning of the program;
Mail server

emuser, empass, and emserver are the username, password, and server URL for your email account. If your email provider is yahoo, that would be;

emIP is the IP address of your email server. You can find that out by pinging the server or just typing in the name in a site like ipchecking.com. emPort is the port your email server uses for POP mail. It's commonly 110 or 995.
IP settings
Rudolph doesn't support DHCP, so you'll need to configure it to work on your local network. There are four settings you may need to change;
for ip_addr, you should be able to choose an unused IP address on your network. Subnet is usually 255.155.155.0 and gateway and dns are usually the address of your router. If you don't know those settings, you can just copy your computer's config. In Windows, open up the command prompt and type ipconfig /all . In Linux, you can use route -n .
How it works
The program first starts the reading engine and networking. Then it enters the main loop. It logs into your email server every few seconds and reads the number of emails stored. If that number increases, it retrieves the newest email and sends the sender's name to the phoneme engine.The phoneme engine takes a crack at reading the sender's name. It's not a true text-to-speech engine, so playback can be hit-and-miss. But it can be useful for short strings. After the new email is announced, Rudolph goes back to checking for new emails.
This code is well suited for logging into email servers, but I've written a more general version that's suited to grabbing information. I'll show that to you in the next step with an Umbrella Alarm.
Step 6: Customizing It: Umbrella Alarm

Here's how to use it to grab a weather forecast off the Internet and remind you when to grab an umbrella;
1. Find the web page that has the data you want
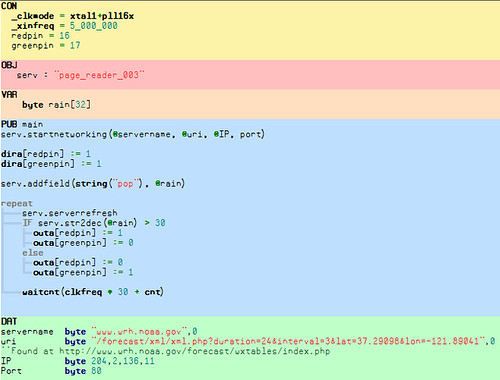
Small pages work best. For weather forecasts, I surfed around the NOAA site and found this page. This is what I entered;

Start the networking with:
startnetworking(@servername, @uri, @IP, port)2. Identify the data you want to use
On that page, the data element <pop> is the probability of precipitation for my area. For my Umbrella Alarm, I don't need the whole page - just the value stored in the pair of <pop> tags. The
addfield method is how you identify what parts of the page you want to use in your project. Grab the data between the first pair of <pop> tags with the line;
The first argument,
string("pop"), tells the program that we're looking for data within the <pop> tag. The second argument, @rain, tells the program where the data it finds should be stored. The search always stops when it finds the first tag that matches the criteria.3. Grab the web page!
Now we know what web page our data is stored on, what data we want to retrieve, and where to store the result. serverrefresh grabs the page and updates the values. Each time we call it, a request is sent to the remote server and the local values are updated with whatever the server returns.
Keep in mind the result is always returned as a text string. If the result should be a number (like the probability of rain), the str2dec method will convert it to a number for you.
This umbrella alarm grabs a web page that includes a weather forecast, parses it and returns the probability of rain. If the probability of rain is greater than 30%, our red LED turns on. Here's the complete program;
Step 7: Next Steps

PHP
If you have a webserver, you can use PHP to calculate data and return it to Rudolph. Have PHP query your database and return the number of users on your site or the server load. Or have it parse a remote page and return the result.Web Control
By having a page on your server modify a 'control' file that Rudolph pulls down regularly, you can control your projects over the Internet.That's it! I had a lot of fun putting Rudolph together - let me know if you've got any questions or comments!
Credits
A lot of effort went in to Rudolph - in particular, a huge thanks to;- Harrison Pham for PropTCP, the driver and IP stack for the E-Net Module
- kaffer for the tinypop client
- Phil Pilgrim for his Phonemic voice synthesizer
- Beau Schwabe for the SPI engine
- Deepdarc for his needle / haystack and string handling methods


