

Introduction: Empty Space Next to the Fridge? Make a Roll-Out Pantry


With some web-spiration, a 3D-Printer on hand and some empty space next to the fridge, I decided to make a roll out pantry.
Optional:
3D-Printer + filament
Supplies (as seen):
(2) 2x6x8 construction lumber
(1) 3/16x4x8 plywood
(1) 3/4x4x4 plywood (scrap used)
(4) Casters
(8) Dowel rods (as shelf holders and railings)
(3) 1/4"x6 Quarter round molding
(14) #6 3/4" Flathead Screws (for dowel railing holders)
(2) #6 32x3 Machine Screws with nut (for handle)
(38) 1" Wood screws (for casters and scrap pieces to hold backing)
(6) Scrap pieces of wood (can use leftovers from the 2x6x8 pieces)
(48) Finishing nails (guess, not sure how many used)
(2) Quarts of paint
Tools:
Drill
Hand Saw
Measuring Tape
Clamps
Straight Edge (square)
Painters Tape
Kreg R3 Jr. Kit
Dowel Rod Jig Kit
Wood Glue
Hacksaw Blade (off the hacksaw)
Sandpaper
Hammer
Chisel
Step 1: Measure Out Your Space
First you'll need to measure out your space, as everyone's may be a little different. I didn't want my pantry being taller than the fridge and I wanted the pantry to be flush with the fixed wall on the side, so take that into account as well.
In my case I had 6 1/2" x 29" to play with so I purchased two pieces of 2x6x8 construction lumber (as the measured size is 1 1/2" x 5 1/2") and cut them into (2) 26" boards and (2) 66" boards. My fridge is about 5" taller than 5' (66") but that gives me room for my casters.
Step 2: Cut Your Pantry Frame


I measure the distance from my hand saw blade to the edge of the base assembly. This will be your cut distance. Then I measure my actual size + my cut distance and set up a square and clamp it down for a straight cut.
Step 3: We're Starting by Making a Box


Now that we have our boards cut we need to make a box. I used pocket screws for a cleaner look. I use a Kreg R3 Jr. to make the holes, and just guesstimate where they'll be placed. Make sure to get the right size on the Kreg for your lumber thickness and use a clamp to hold it steady.
(3) holes on the same face of the smaller two 26" pieces will be used so that the outside 66" board will be clean of screws once the box is made.
If using regular screws (which I do) use the longest extensions for you drill so that there won't be damage to the wood and the screws get to where they need to be.
Tip: When I don't have a spare set of hands, I use scrap wood clamped on the sides of a vertical piece and then clamp that piece to the wood at a right angle. It's not completely secure but it's enough to get the job done.
Step 4: Pantry Backing


I used some 3/16" plywood for my pantry backing. Some scrap wood to hold it in place and some 1/4" quarter round molding to finish the edges. Using the same principle of hand saw cutting, I laid out some guides for my plywood and cut away.
Tip: to reduce tearing on the back side of the wood when cutting I like putting down some painters tape to keep everything together.
As I'm using all the space possible next to the fridge, I inlaid the scrap wood, inside the pantry, so that the 3/16" plywood would be flush with the back. The pantry was then flipped over and the plywood hammered into the scrap wood with finishing nails.
I then measured the edges of the pantry for the quarter round, cut the pieces needed and that was hammered into place as well. Now's a good time to put in your Kreg's pocket hole covers in, if you haven't done so. A dab of wood glue and they fit right into place.
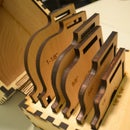
Step 5: Shelving


Measure out how tall you want your shelves to be (measure some items you'd like to place in your pantry). I came up with a total of about 6 shelves with the below heights.
Note: The distance for all shelves + (number of shelves X thickness of your wood) should fit inside your pantry.
So 6 shelves with the following final heights:
(1) 13" shelf - cereals and bigger boxes
(2) 9" shelves - smaller items
(3) 7" shelves - cans
13" + 18" + 21" = 52" + (6 x 3/4") = 56 1/2" total, which gives me some wiggle room and a small shelf space left as the total inside size of my pantry is 63".
Now we'll need to do some cutting. I cut mine out of some scrap 3/4" construction plywood I had on hand. Since I kept the 26" boards on the inside of my pantry box, I can easily make shelves this length. I wanted them inset a bit so I cut them to 5" widths which comes to a total of 6 boards at 5" x 26".
Once you have the shelves cut, you'll need to cut some grooves out for the 1/4" quarter round molding to fit. The way I did it was to line all the shelves up, mark my wood at 1/4" from the edge and move my saw blade to 1/4" deep. Made a few passes with the hand saw, broke the edges and used a chisel where needed.
A quick test fit with all my shelf heights (to make sure I didn't mess anything up) and then some sanding as you don't want sharp edges.
Step 6: Doweling


I'm sure there are better ways of doing this, as I messed up quite a bit, but here's what I went through. I had a small dowel jig that I had never used, so I thought I would give it a try. I stuck to one side of the pantry and measured out my shelf sizes while working my way up from the bottom. Put in dowels on that one side, then placed a shelf with a level to guide me to where the other side was supposed to be at. Worked out well once I got the hang of it.
There will be mistakes, but they're easily fixed with some glue, a hacksaw blade and some sandpaper. I would sand down the end of the dowel a bit to make sure it would take the glue, place the dowel, then use the hacksaw and a wet towel to clean things up. Sand as necessary afterwards and everything would be flush.
Once all the holes are in place you're gonna need to cut all your dowel rods. I cut my dowels at 1 1/2" as the jig I had cut 3/4" into the pantry.
Now is a good time to put the casters on and make sure everything fits in the space you have.
Note: The way I put my casters on the pantry made sense in my head but wasn't practical as the pantry, once loaded, became top heavy. I went back and widened the casters to fix the problem.
I went ahead and used this time to cut 7 dowel rods out for the pantry railings at roughly 26" as well.
Step 7: Hardware or Is It Software?


Using SketchUp I went ahead and designed a handle for the pantry and some dowel rod holders. Video below.
Here's the process I use. Once designed in SketchUp I export the model as an .stl (J. Foltz SketchUp extension), run it through NetFabb sudio (or the online version) to fix the file for printing and then port that to my 3D - Printer.
Print away!


Step 8: Paint!


Pick your colors and have at it. At the expert advice of my fiancee, I painted the handle, dowel rod holders and dowels alternating colors from the pantry to make things fun.
Step 9: Some Assembly Required


Put everything together and make sure you make good use of your new space.
The handle was fairly easy as I knew the distance to center for the screws. If you purchase one from a hardware store, just mark those points on your pantry, make sure they're not going to hit a shelf on the inside and use a drill bit that's about the same size as your screws.
The dowel rod holders were put in by measuring up from the level shelves the same distance on both sides of the pantry, this gave me a good level rail to keep things in place. Some of the dowel railing needed some trimming, as they were too long to fit, but after some touch up paint I put them in place.
Web-spiration from : http://www.classyclutter.net/2012/05/build-your-own-extra-storage-diy-canned-food-organizer.html

Participated in the
3D Printing Contest

Participated in the
Epilog Challenge V

Participated in the
Craft Contest


