

Introduction: Executive Stereo Audio Bluetooth Speaker


This Instructable is written on how to make an "Executive Stereo Audio Bluetooth speaker". It is great for any Desk, Bedroom, Kitchen or a backyard where space is at premium. The Bluetooth speaker enclosure is made with Kitchen drawer organizer (Bamboo material).
Materials required:
- Kitchen drawer organizer (Bamboo material - Container store) for enclosure
- 4 x 5W speakers @ 8 ohms (Connected in Parallel - from Banggood)
- 1 x Passive Radiator (eBay)
- Stereo Amplifier Board with Bluetooth (2 x 6W)
- Power switch
- D.C jack
- 5V 2A Power adapter for powering speaker
- Polyfill
- Connecting wires
- 1/4 inch MDF wood for covering the enclosure
- Speaker cloth - Hobby lobby get a black cloth with a slight stretch
- 1000uf 16V Capacitor add to DC In.
- JST connectors for speakers and power supply
Red ribbon tape for a touch of look
Tools required for the job:
- Forstner bit to drill 2 inch holes for speaker
- Jig saw & blade to cut for passive radiator
- Wood cutter
- Glue gun
- Scissors
- Wire stripper
- Drill press or Cordless screw driver
- Sander
- Wood files
Step 1: Cut the Wood


Cut the MDF wood according to the Inner markings of the enclosure so that it fits and is little loose so we can add speaker cloth in the end.
Step 2: Run Wood Glue on the Corners

Run the wood glue on all 4 sides to seal the enclosure from any leaks. Let it dry overnight.
Step 3: Start Your Markings


Start markings by Aligning speakers and Passive radiator as shown.
Step 4: Cut Holes for Speaker and Passive Radiator


Using Forstner Bit, make holes for Speaker and Passive Radiator.
Step 5: Which Amplifier ???

There are many Bluetooth amplifiers in the market, Just choose for your application and needs. I am using 2 x 6W @ 4 Ohm Amplifier for this speaker which is enough for a small desktop speaker.
https://www.banggood.com/SANWU-HF69B-6W6W-Dual-Cha...
Step 6: Test Your Amplifier Before Assembling

Perform a Test or a Dry run of your Amplifier and Speakers connected before Assembling. On this Particular board there was an issue with Li-Ion Charger, so I had to stop using that. So, it becomes mandatory you test all functions - Bluetooth reception and range, Li-Ion charging, Amplifier, distortion, Power needs (Like this Amp needs > 1 Amp current), I am using a 5V 2A Power adapter. This should be a on your checklist of to do things.
This Amplifier used JST type connectors. So, please be aware of that.
Step 7: Start Assembling Speakers


With wood files, please carve so Passive radiator fits snug and there is no leak of Air. Seal it with wood glue from the back. Also seal the Speakers as shown using Glue gun. Also wire the speakers in Parallel (2 x 8 ohm speakers in parallel will reduce down to 4 ohms).
Step 8: Add Polyfill and Hot Glue


Add Poly-fill type material as a backing to the enclosure and hot glue it.
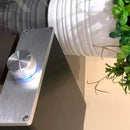
Step 9: Drill 2 Holes to Mount Power Adapter and Switch


Drill 2 holes on the bottom of the enclosure to mount power adapter and switch. The Positive terminal of the D.C Jack goes to switch and from switch to the main Power input on the Amplifier board. I added a 470uF Nichicon Fine Gold capacitor at the Power supply input for filtering. You can use a range upto 1000uF 16V.
Step 10: Prepare Speaker Cloth to Cover the Top.


Cut and Prepare the Speaker Cloth to cover the Top of the speaker board. Fold the cloth and hot glue it to the back of the board.
Step 11: Connect the Speakers to the Amplifier Board

First Secure the Amplifier board by hot gluing to the Enclosure back and Wire the speakers as shown.
Step 12: Final Look ...

Test and Glue all 4 sides and keep it clamped down overnight. Added thin ribbon line for looks. No need to add any stain etc. It looks great like in Natural wood. Great for any desk.

Participated in the
Audio Contest 2017

Participated in the
Hand Tools Only Contest 2017


