

Introduction: Fix an Electric Chainsaw Dripping Oil


If you have oil dripping out the bottom of your electric chainsaw, then a perished oil tube is the most likely reason why.
The oil is for the chain auto-oiling feature and is primed by the rubber bulb on the tank cap, the plastic tubing routes it under the casing to the oil pump underneath and onto the bar and chain.
Long story short, you need to almost completely dismantle the chainsaw to access the oil tube.
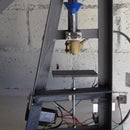
Step 1: Dismantling


You start by taking off the bar and chain with its tensioning cover, and then remove the flying circlip on the chain drive cog, slide the cog up with the shield and short spring underneath.
The main body side cover can now be removed, remove also the 3 screws on the black motor side cover where you access the brushes, the long one that goes through the handle and the 2 shorter ones.
There's a concealed screw behind the trigger under a clip on cover.
The 3rd pic Im using is an later complete pic to label the items to be removed.
Dont pull off the armature nut because we'll be pulling up the whole assembly and it probably needs an impact hammer anyway. The larger fiber plastic cog with its bearing came out with all my pulling and tugging, but can be left with the armature.
Step 2: The Damage


Perhaps it was an additive in the Reflo 68A compressor oil I used that perished the pvc tubing, the tech data says
- Excellent seal, paint and plastic compatibility.
- a full synthetic polyalphaolefin/alkyl benzene based ammonia refrigeration compressor fluid.
it contains a seal swell agent to help minimize fluid leaks.
...so who knows, maybe the seal swell agent, but fortunately I had some replacement silicone tubing on hand.
Step 3: Remember the Brushes


First thing before you start assembling is to pull out the armature brushes.
Now you can slide the armature back into position.
Use a coin in the cover slot when tightening up again, to avoid cracking the brush housing, finger tight will do.
Step 4: Complete the Assembly


Once the armature is seated properly indicated by a flush mounted cover, then the lock out safety lever and spring assembly can be reinstalled.
FInally the main side cover is reinstalled after which the drive cog and its flying circlip is reinstalled.
Tada!


