

Introduction: Flashing Multicolor Christmas Tree Star


So, my new wife and I moved into our new home, Christmas is here and we put up a tree, but wait ...neither of us had a decent star to put on top of the tree.
This instructable will show you how to make a really cool, flashing, color changing Christmas tree star using some flashing RGB (red, blue, green) LEDs, paper, tape and a few other things lying around the house.
The total cost of this project was about $20; the LED's were the most expensive part, at $2 each.
http://www.youtube.com/watch?v=dSvMnRAnM68
Here's a video of the star in action.
Note: This instructable involves electronics and electricity. Electricity is Dangerous; Be Careful!!! If you don't have at least a basic knowledge of soldering, you will probably have trouble with this instructable.
Step 1: Gather the Materials

For this project you will need the following Items.
1. 11 sheets of printer paper or other blank white paper
2. About 8 or more RGB LEDs. These LEDs are special in that they have three colors to them, red blue and green. They also have their own control chip that has a preprogramed flashing sequence that cyles through the entire spectrum, giving a good visual effect. You can find them at www.allelectronics.com for about $2.00 ea. or at other suppliers (the part # is YT-FS5N30N). You can also find them by searching for "RGB flashing LED's". They are special in that they do not require a limiting resistor and can be hooked directly to a power supply or to a couple of batteries.
3. Some hookup wire. Stranded or solid makes no difference just whatever you have lying around the house.
4. An on/off switch (optional)
5. Scotch tape
6. Electrical tape
7. Heat shrink tubing if you have some (optional)
8. A 5 volt DC power supply. I used an old cell phone charger that I wasn't using. You could also power it with 3 AAA batteries, but who wants to be changing batteries?
9. Basic hand tools, cutters, soldering iron, pliers, scissors etc.
10. Some solder and solder flux.
11. Some way to attach it to the tree, I used a gutter clip for Christmas lights.
12. A multimeter, if you don't know how to use one you probably shouldn't try this instructable.
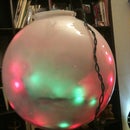
Step 2: Making the Outer 3D Star


This part is actually a modification of this person's instructable. https://www.instructables.com/id/Energy-Drink-Ornament/ This instructable shows you how to make a really great star that is fairly easy to make. Instead of using Rockstar energy drink cans, I made my stars out of plain white printer paper. All you need is a perfect five pointed star pattern that is the right size for your tree and cut out eleven exact copies of that star. You can get a five pointed star pattern here. http://www.ezartsncrafts.com/templates/5star.gif
To make the star.
1. Cut out 11 five pointed stars from the link http://www.ezartsncrafts.com/templates/5star.gif we only need 11 because we are leaving the bottom open to put it onto the tree.
2. Fold all of the star points into the center.
3. One by one, use scotch tape to join each of the edges of the points together, to create the star. It uses the pentagrams from the center of the flat stars to make a 3D ball star that looks really good.
Step 3: The Flashing LED Part


Warning, Do Not Use regular LEDs for this project; they will burn out. You would need limiting resistors in order to use regular LEDs. You will have to figure that part on your own if you want to use regular LEDs.
Ok, for the LED part, basically you just have to solder all of the LED's legs together, anode to anode and cathode to cathode. If you don't know what anode / cathode is, don't worry because most LEDs have a little flat spot on the side. Just solder all the leads closest to the flat spot together and all of the leads near the round part together. If yours don't have flat spots, one leg of the LED will be longer than the other, and you can solder the longs to longs shorts to shorts etc. Try to configure them in a radial pattern, beccause you want your LEDs to be flashing in all directions for maximum effect. Try to utilize as much of the LED's legs as possible so that you can bend and position them into position. One of the things I would have done differently was that (if you look on the 1st photo you will see) I made the bottom LEDs too close together and wound up adding three more at the end to get more light. IMPORTANT : make sure that no loose wire or anything metal is touching the anodes to the cathodes before applying power; check with a multimeter to be sure.
Now for the base of the LEDs, I used some red and black AWG 12 wire that I liked because it's stiffness would give it stregth, but you can use almost any kind of electrical hookup wire you have around the house. Cut 3 lengths of wire: 2 red and 1 black. Make the two red wires about 3 inches long and the black one about 6 inches long. Solder one of your red wires to each side of your switch, keeping your wires in a nice staight line. I used heat shrink on my connections, but it is totally optional, and electrical tape would work just fine. The cathode is the negative (-) terminal and the anode (+) is the positive terminal; hook the round parts of the LEDs to the pos(+) and the flat ones to the neg(-). Solder a red wire from your switch to the pos(+) anodes of your LEDs, noting how you want your switch oriented. Then solder a black one to the neg(-) cathodes side of your LEDs, making sure to keep your wires close together and in a nice straight line. So if you've done it right, you should now have a bunch of LEDs at the top, with 2 wires comng out, a switch in the middle and 2 wires at the bottom, one red and one black. Use electrical tape and / or heat shrink to make the whole package nice and neat.
This is the most dangerous part because we are dealing with electricity and electricity is dangerous! If you don't have a basic knowledge of electricity you may want to just use batteries. Whatever you do, don't put more than 5 volts across the pos(+) and neg(-) terminals, or the LEDs will generate heat, burn, or possibly cause a fire! I am not responsible for situations caused by modifications to this instructable. That being said, I utilized a cell phone charger I had lying around the house from an old phone that had long since died a horrible death. It was a motorola 5V @ .550mA output, as you can see from the 7th photo. Chosen for its light weight, its range of voltage, and its apparent total lack of use around the house.Typically on these power supplies, you will see 2 wires coming out, and if you're lucky, one of the wires has a line or dash on it. Typically the wire with the line or dash is the pos(+) terminal. With your charger unplugged, cut the old phone jack off, and then peel back and strip the wires. Then, with your charger plugged in, check with a voltmeter to be sure and note your pos(+) and neg(-) terminals, being careful not to touch the wires together while it's plugged in. At this point it would be a good idea to hook this guy up to your LEDs to make sure everything's working. Once you've hooked it up and turned it on, note any LED's that are not lighting up; these are probably installed backwards and need to be removed or replaced. If all of your LEDs are not lighting, you probably have a short across the pos(+) and neg(-) terminals, a bad solder point, or your power supply is connected in reverse. Troubleshoot as necessary. Once you have it all working, go ahead and solder the connections to the power supply, and you're done.
Step 4: Attach It to the Tree

To attach the LED part to the tree, I used a leftover plastic gutter clip for putting up christmas lights. I used the gutter clip by chance; I was walking through the garage and happened to walk past a box of the clips and said "hey, that would work." You could use zip ties, craft wire, string or anything that will make it stable.
I then plugged the LED contraption into the end of one of the light strings already on the tree, to power it. Once you power it up and place the 3D paper star over it, you're done.
Here's the video again.
http://www.youtube.com/watch?v=dSvMnRAnM68
One of the best things about this instructable is the LEDs. They are so easy to use, just hook them up to power no limiting resistor needed, and they look great. One of the things I like to do is turn it off for a second, and then turn it back on to sync all of the LEDs for a while. Then after a few minutes, they become a few msec off from each other and the whole star ball will be multicolored. These LEDs are great, and I would recommend using them in your next LED project.
This was my first instructable and I hope you enjoyed it.


