

Introduction: Fleece-Lined Upcycled Woolicious Mittens


These wonderfully warm, wonderfully comfy woolicious mittens are made from felted wool sweaters.
These are some of the reasons I love working with wool:
Wool is not only reusable but also biodegradable.
Sheep wool has an incredible natural UV protection built right in. The same cannot be said for manmade fabrics.
Wool is composed of the same protein that makes up the outer protective layer of your skin.
Wool is naturally mildew and mold resistant because it is a natural moisture repellent. Wool has natural fire resistance, water repellant, and climate control.
Upcycle your treasured wool sweaters - send them through the washer and dryer and transform them into a soft, dense material that can be repurposed without unraveling!
Step 1: Materials Needed

Deconstructed felted wool sweaters (I used three different sweaters. If you choose, you can use one or two sweaters - depending on how it is made; no rules here - be adventurous.)
Mitten pattern (will be provided) - it is comprised of three difference pieces
Fleece
Sewing machine (not shown)
Scissors
Buttons (2) (not shown)
Tape measure
Pins
Thread
Step 2: Laying Out Pattern Pieces

When laying out pattern pieces on fleece, ensure the give / stretchiness of the fleece is with the width of mitten. For example, for pattern piece #1, the width is the direction of the arrow for the 4 3/4" measurement. It doesn't matter which way you lay the pattern pieces on the wool - whatever appeals to you.
For the cuff - cut off the bottom of the ribbed sleeve plus 3/4" of the sweater.
Step 3: Assemble and Sew


For double thickness, turn material (both fleece and wool) inside out with right sides together. Pin each of the three pattern pieces to the wrong side of the materials (both fleece and wool). Cut.
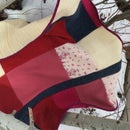
With right sides together, pin wool top back (pattern piece #3) and bottom back (pattern #2) together. Stitch together with a 3/8" seam allowance - see how the mitten was pinned in the picture. Pin to top front (pattern piece #1) - stitch all around the mitten leaving lower edge open. When stitching around - it will be necessary to stop stitching at thumb stitching (be sure to backstitch) and continue stitching to lower edge. See third picture.
Pin and sew the fleece pieces as described above - but with a 1/4" seam allowance.
Turn wool mittens inside out, taking care to ensure seams are nicely turned inside out.
Do not turn fleece mittens inside out.
Step 4: Inserting Cuff to Fleece Lining and Then to Wool Mitten / Completing

Insert sweater cuff inside fleece mitten. The right side of the top of the cuff will be pinned to the right side of the top of the fleece mitten. Stitch with a 1/2" seam allowance.
Insert fleece mitten into wool mitten.
Turn cuff to outside over the wool mitten. Sew a button in the middle of the cuff through the cuff, wool mitten, and fleece mitten. (Optional: whipstitch cuff to wool mitten - hiding stitching.)
Step 5: Other Sizes
Increase the pattern by 1/4" for each additional size - with the exception of the straight edges (opening for hand) on pattern pieces #1 and #2.
Step 6: Lots of Fun Mittens Made for Gifts

Lots of possibilities!
Thanks for your interest.

Runner Up in the
Reuse Contest

Participated in the
Sew Warm Contest

Participated in the
Holiday Gifts Contest


