

Introduction: Fused Fiber Neck Warmer


This felted buttoned neck wrap is a combination of the wet-felted scarf I did using a car buffer, and another easy elegant neck wrap.
I've come to love wet felting--which is the magic of whipping up lovely wearable art out of unlikely components. It is true alchemy.
I also like wet felting because it is an art rather than a science. The results are always a mystery to the artist. With practice, you can control your results better, but part of the fun is precisely its unpredictability.
The felted neck wrap in this instructable is made out of cheap mesh fabric (from a post-Halloween sale) and various loose fibers including merino wool, bamboo and silk. I didn't measure anything in the making of this neck wrap, but here are the approximate materials needed:
A piece of mesh fabric about 8" x 48"
Merino wool roving (less than an ounce)
Bamboo fibers for use in felting (a handful)
Silk yarn (about 60 inches)
Step 1: Laying Out the Fibers


Cut a piece of mesh fabric measuring about 8 inches by 48 inches. A natural fiber mesh (e.g. cotton or silk) is best for felting, but any open mesh will allow natural fibers to fuse through it. I'm using a metallic synthetic mesh for this neck wrap.
Lay the mesh over a piece of bubble wrap with the bubble side away from the mesh (although I've done it the other way also).
Spread several layers of natural fibers onto the mesh in alternating directions. For this felted wrap I put two layers of a variegated red merino wool; a couple layers of gray and white merino wool; a few shimmery bamboo fibers in greens and yellows placed here and there; and a length of teal silk yarn looped over the other fibers. To secure the silk yarn, I added an almost imperceptible layer of white merino wool on top of it.
Step 2: Wetting the Felt


Heat some water in the microwave to boiling point.
Add a teaspoon-ish of dish soap to the hot water and stir.
Slowly wet the felting project with the hot soapy water.
Cover the fibers with another layer of bubble wrap and pat down until you can see that all the fibers are wet.
If you want a cleaner edge, flip the project over, open the bubble wrap up on the underside and tuck any loose fibers over onto the fabric.
Wrap it back up to begin felting.
Step 3: Felting the Fibers


Now, for the fun part. To felt the fibers you need to agitate them in some way. You could do it with a car buffer as I did in my first felting project (see video here), or follow the directions below.
Put a rolling pin on one end of the bubble wrap and roll the felting project around it until it is one big roll. For easier handling, wrap a towel around the roll. Felt by rolling the whole thing back and forth under pressure from your arms. Do this for at least twenty minutes, unrolling it once in a while to straighten out any warps.
Step 4: Fulling the Felt


The next step in felting is called fulling. This is where you tighten up the network of fibers by tossing it around in a sink. Some people through the felt in a washing machine, but there is less control over the results when this method is used.
To full, remove the felting project from the bubble wrap and begin tossing it lightly into a clean sink. It should still be soapy. If it isn't, dip it in a bit of soapy hot water. Keep tossing, increasing the vigor until the project is the size you want.
You will want to open up the felt as you go to pry apart pieces that want to felt together in places you don't want them to (such as the edges).
While the felt is still wet and soapy, stretch out any areas that you want to stretch. I stretched out this neck wrap to follow a curved shape and also stretched out the very edges to give it a fluted look.
Step 5: Rinse, Dry, and Finish


Rinse the fulled fibers and pat dry inside a towel.
Allow to dry completely overnight. If this were a flat project (like my other felted scarf), you would speed up the drying process with a hot iron. But I didn't want to mess up the fluted edges, so no iron on this project.
To add buttons, place the neck wrap around your neck and mark where you want the buttons to go.
Sew on buttons.
Wrap it around your neck again and mark where the buttonholes should go. Cut openings for the buttons with a scissors.
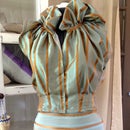
Your felted neck wrap is done!

Runner Up in the
Fiber Arts Contest


