

Introduction: GUIDE TO LED PROJECTS


INTRO.
I had to do this project for many of my young friends who are interested in LED’s but do not know how to go about it.
I also had the same problem but was fortunate enough to get HELP from my friends at www.Instructables.com.
This is not about any calculation or study but a set of proven rules to follow and get results,
which anybody can do if he has the mind to.
Here I have shown you many types of power supply which can be used to glow a LED.
I have also shown here how different types LED's can be made to glow and use it in you project.
Step 1: KNOW YOUR LED

A 15 mm LED has two legs, the long one is the Positive and the short one is the Negative.
It consumes 15 milli Ampere of current and can glow on 3 Volts DC Current, or a 3 volt battery.
LED’s are Diodes and the current can only pass through the POSITIVE side.
Always remember to maintain the POLARITY of the LED, that is (plus to plus) and (minus to minus) otherwise it will not work.
LED is a one way street. Now you know how to connect an LED in your circuit.
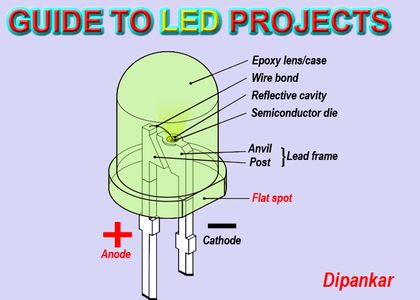
Step 2: KNOW YOUR LED

If you are interested, here you can see the different parts on an LED.
Step 3: RESESTORS TO BE USED WITH LED's

This set of rules will help to build a Project, follow them.
Here I have shown the Resistors to be used with 6 volts, 9 volts and 12 volts DC.
You can go on adding any numbers of LED's.
Remember that the first line of LED should be in series and the second line onwards should be in Parallel.
Step 4: USING LED's WITH AC TRANSFORMERS.

LED can be run on AC or DC current.
If you want to run it on DC that is Battery Then you must use Resistors.
If you want to run it on AC then use a Step down AC Transformer. (220VAC to 12 VAC)
Here we will deal with AC Transformer
Now what is the load the AC Transformer will take? For that you will have to measure the output voltage of the AC Transformer with a Multimeter, say it comes to 14volts.
The subject transformer was 14VAC 500mA output without load.
First, we have to be aware that the 14V rating is known as the RMS voltage, and is the effective average power of the sine wave. The maximum voltage, which we will subject our LED’s to, is about 1.4 times higher.
So we should expect a peak voltage of 1.4 x 14v =19.6
So, we will be using 19.6 volt as the basis of our calculations.
We know that most white and blue LED’s range between 3 and 3.6 volts. So by dividing our PEAK voltage by an average LED voltage, we get an idea of the number of LED’s our transformer can support:
19.6 / 3.5 = 5.6, which we round up to 6 LED’s.
But remember, that AC has an identical NEGATIVE cycle! Which means we can add a mirror circuit that work on alternate phases,
that is 6+6. The advantage of using voltages to start our calculations is that, as long as we stay with similar LED’s, and stay within
its operating voltages, the current will stay within safe limits. So, by adjusting the number of LED’s in use, we can handle most AC
transformer outputs. We can multiply the light output up to 15 times just by adding chains of 6+6 LED’s arranged the same way
across the supply! 15 times means 90+90=180 LED’s.
Step 5: LED's CAN GLOW DIRECT ON 220volts or 120 Volts AC MAINS.

You can use LED’s directly on 220 volt or 110volt AC.
Same principal applies, one line opposite to the other while using AC.
The value of the Condenser and Resistors are given in the diagram for 220 volts and 110 volts.
The condensers must be non-polar.
You can use 30 + 30 LED's on a string, after that if you start adding more LED's the light starts to get dimmer.
Step 6: USING 1 WATT LED’s

Here you can see the various types of 1 watt LED’s.
Their polarity are marked on the legs or body.
They glow on 3 volt and consume 350mA of current,
so you must calculate the power source to be used with this LED.
Step 7: USING 1 WATT LED WITH BATTERY.

Every thing is explained in this Diagram.
Step 8: RESISRORS TO BE USED WITH 1 WATT LED.

You can use different types voltage and resistors with this LED as shown in the Diagram.
Step 9: USING STRIP LED IN YOUR PROJECTS

Everything is clearly explained in the Diagram and it is very easy to use strip LED's.
Now you can make your own LED projects.

Participated in the
Epilog Challenge V


