

Introduction: Gaming CD Holder


I am always super lazy and I never want to go and put my discs back in it's case. This is the perfect solution, you can just stack your games on this holder and never lose a game. It also is able to hold up to 8 batteries for your controller. Its a really simple design and is easy to print.
Step 1: Designing the Base


The base is the hardest part to design. It is actually really easy. Just create 2 planes 2 inches away from each other. On each plane sketch a circle. On the bottom plane, dimension the circle to be about 3.5 inches(diameter). The circle on the top plane should be about 1.5 inches in diameter. Then loft the two circles together to create a solid part.
Then you have to make the holes to hold the batteries. The diameter of a battery is about .60 in.. So sketch a hole slightly bigger on the top plane. Then create a circular pattern to go all the way around the part. (do not overlap your circle!!!!). Then just cut that into your part.
Step 2: CD Post


This is the piece that you rack all your discs on. its just a simple circular extrude from the base. Just make the height of the post about 3 inches (that brings me to max distance on the Z axis on our makerbot). The diameter of the post is 1/2 inch.
You can slso round of the edges for a sleek finish.
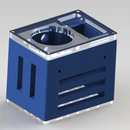
Step 3: Hollowing


You can hollow out your part by clicking the shell feature. Doing this saves plastic and time. You have to leave at least .125 wall width to ensure that your part will print out correctly.
Step 4: Files


Participated in the
3D Printing Contest

Participated in the
Epilog Challenge V


