

Introduction: Glass With Accelerometer Controlled Light


I have started this project as a bed side glass with lighting feature. When I have moved forward I explored different usages in different contexts.
Bed side glass scenario:
When the user wakes up and needs to drink water, he/she turns the glass. When the glass flips over, it lights up, thanks to the accelerometer which is positioned at the bottom of glass. Once the LEDs under the glass light up, it becomes easier for the user to pour water from a carafe in the dark. It turns off when the glass is turned upside down. This position also protects the glass from dust and dirt.
For this scenario, one color light would be better. Low red light works well.
Some other scenarios:
It can be also used as both tealight and glass during dinner times at both restaurants and homes. Since it uses NeoPixels, depending on the usage scenarios when it is used, the desired colors can be arranged(customized) by using the USB port and open source Arduino coding.
And it might be fun at the parties, too!
Adem Önalan
School of Visual Arts
MFA in Products of Design
Twitter: @ademonalan
Step 1: Materials and Tools
Materials:
1 Toyo Sasaki HS Stackable Glass Tumbler
1 Lithium Ion Polymer Battery - 3.7v 500mAh
1 Adafruit Pro Trinket Lilon/LiPoly Battery Backpack
1 Adafruit MMA8451 Accelerometer
1/8" clear acrylic
Translucent filament for 3d print
Glue
Tools:
Makerbot Replicator 2
Soldering iron
Wire
Step 2: Coding
Before soldering all components I suggest you to try the code on Arduino Uno with breadboard first. If everyting works properly you can switch to Adafruit Pro Trinket.
NOT: In order to use accelerometer, pro trinket and neopixel ring, you have to set up some files. Please visit the pages of the products on Adafruit's website.
Attachments

Step 3: Soldering Components


Solder the components together as seen on the circuit diagram. Make sure that you keep wires long enough to give a little bit flexibility to your circuit so that you can embed it into your enclosure with ease.
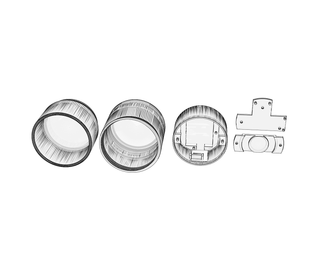
Step 4: 3d Printing and Laser Cutting


1) You should use translucent filament for a better light diffusion.
Print it on standard resolution. Make sure that you have supporting materials. (You can break them when print is done)
2) Laser cut 1/8" thickness 2.3" diameter circle from clear acrylic.
Attachments
Step 5: Assembly


1) Embed components into 3d printed enclosure. It might be a little bit hard.
2) Make sure that everything fits its place properly.
3) Control the switch and USB outputs. If they work well, then you can glue acrylic part to the top of the enclosure.
4) Assembly all part together
Step 6: Enjoy
Without glass it can be used as both tea light and mood light. See how it is easy and fun to change the color thanks to accelerometer!
By using micro-USB output it can be customized with endless possibilities!
Enjoy!

Participated in the
Make it Glow!


