

Introduction: Good Enough for the Bush Australian Version of Tahitian Ukulele


http://youtu.be/mUyXrpY58lo
I like this guys work
http://www.asonu.com
Given the shortage of coconut trees where I live and some cheap hardware store bought dimensional pine (pinus radiata) sitting in my garage I thought to myself – can I make something useful out of this. One of the things I noted was that many of the Tahitian ukuleles I saw on the web were made from lots of little bits of wood joined together, then shaped, hollowed out and a thin sound board glued on top. So I thought to myself - a few feet of 2 by 4, or 2 by six and hollow the wood out first sideways and there should be no need for a separate sound board. Great Idea!!!– into my garage I go, fiddle with a couple of bits of scrap wood and my circular saw and I think to myself – this is looking practical. Then I look at my pile of “free” wood and shifted my thinking just a little because I had two sticks – one about about 1200 mm (4 feet) of 3 by 1 dressed (19 by 68mm actual) and 1500mm (5 feet) of 2 by 1 dressed (19 by 42mm actual). Instead of boring sideways I can make a sandwich type construction and chisel out a flat thin top and a curved hollow bottom with a sound hole which I can then stick together.
The picture above is of the finished product next to a standard ukulele - you can probably guess which one I made. (the one on the left).
Here is a video of me playing it
Step 1:

First off I cut my top pieces into the configuration I think is going to give me a nice shape, stuck my pieces together using a yellow carpenters glue. Didn’t bother with dowels or biscuit joins or anything like that. Just made sure it was clamped tight and held strait by using a clamp on the top and bottom with some scrap wood onto the table (protected by an old plastic bag – after all I want to glue the sticks together – not to the table). Here is the finished product – about 600mm long (2 feet) and 210mm wide (8 ¼ inches)
A few tips on gluing –
- If glue does not squeeze out of the joint then you have not added enough
- Do not rub off the excess glue when it is wet because the glue shrinks as it dries and a little bit of that glue will get sucked back into the joint.
- Carpenter's glue (PVA) needs to be clamped as tight as possible for maximum strength
If kept dry, Carpenter's glue (PVA) is just about the strongest thing you can glue wood together with (stronger than epoxy).
- Never ever put something in the sun to dry – wood gives off gas as it warms up and the glue will get pushed out. If anything do the reverse. Glue things together just around dusk while the temperature is falling and the glue will get sucked into the pores of the wood.
Step 2:


Now I marked out roughly where I want the nut and the bridge to be and the circle I wanted for the sound board. The centre of the circle, where the bridge will be, is around 150mm (six inches) from the bottom and the nut will be exactly 400 mm (close to 15 inches) up from that. The “circle” is kind of an oval 9 inches long and around 7 ½ inches wide. It was drawn by tracing around the bottom of a small bucket for half the size and then the other half and joining them up.
Then I patiently and calmly started chiselling out the wood, being careful to take a small amount at a time and not break through the boards or break them apart. After many meditative and productive hours (slight exaggeration) I looked at the surface I had chiselled out and thought to myself – this is going well but it is a little uneven and I am about half way to a 6mm (¼ inch) thick top. So I grabbed my angle grinder and attached my 40 grit sanding flap wheel to it. I sanded the surface smooth in about 15 seconds. Then I sanded a little more, and a little more and 2 minutes later had reduced the thickness of the top board inside the circle to about 6mm (1/4 inch). An angle grinder with a sanding disk on it is the finest way I know to turn wood into sawdust. Given the speed at which the angle grinder worked I then just hand sanded the inner surface a bit smoother to make the soundboard as even as possible. There were a few small highish spots which I took care of using a small hand rasp and the sandpaper. A rotary planing bit in a pedestal drill might be the best / most accurate tool for the job but I don't have one. I could also have also possibly used a router (with or without a sled for the hollowing out and if you don’t have an angle grinder these tools might be easier and probably more accurate than the grinder. A sanding disk on a drill might take a little longer.
Warning - it is important before you decide to stop sanding grinding or chiselling to test if the top is sufficiently resonant at this stage to make a nice noise with a string (preferably the string you are going to finish up using on it in the end) stretched over it. Just hold one end of the string at one end with a clamp / heavy brick or whatever, use 2 small scraps of wood for a temporary nut and bridge, pull the string tight over them and see if it makes a nice loud-ish noise. On my next prototype I made the mistake of leaving the top too thick and it made a very dull noise. This was fixed by planing the surface of the top away from the front because I had already been stupid enough to glue the back on.
If Stradivarius had owned an angle grinder with a sanding disk he would have made a few more violins than he did. Of course it might have made him deaf and he may not have felt the wood as he went and made worse violins as a result but he would have made more.
Step 3:


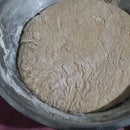
Then I did something similar with the bottom – matching my wood as I was cutting it to the top shape in a very rough and ready manner. Marked out the same circle for the bowl/ cone/resonating chamber as the soundboard, bored a 2 inch hole in the centre of it using a hole saw and then scooped out the rest into a bowl shape using the angle grinder/ sander. Because I don't think accuracy is required here and it is hard to get curves using other methods, I think the angle grinder is actually the best method to use here. Then I sanded the top and bottom a little flatter than they were, where they were going to join.
Now – spread lots of glue and clamp together tightly – a few 30 mm drywall screws would have worked just as well (if not better) –you might even like to arrange them into a decorative pattern as well! If you don’t want to leave them in you can take them out and fill the holes with small dowels/bamboo bbq skewers. As you can see here there is plenty of spare and possibly wasted wood around that resonating chamber so there is considerable room for creative shaping of the body or playing with the size of the resonating chamber.
Step 4:

The headstock I cut on an angle and glued the offcut (reversed) to make the headstock a more even shape. The angle is required so there is downward tension on the nut, keeping the strings in place. There are plenty of other (and prettier) techniques for doing this. Cutting an angle like this into wood that is at the same time at an acute angle and at right angles to the end is quite tricky. If you think this might be a bit tricky for you, you can leave the headstock straight and use a tunnel nut, made either by drilling holes through your nut material or by cutting the grooves and putting a cover on top – OR, use a string retainer behind the nut to hold the strings down. (also known as string trees). http://en.wikipedia.org/wiki/Headstock Alternatively, just grind an angle onto it and add some more material on the back and grind that down too. This headstock is roughly 19mm (¾ inch) thick a standard ukulele headstock is about 12 mm(1/2 inch) thick. I am doing my own tuning pegs but if you are sensible and going with factory made pegs you will need to know how thick you need the headstock to be.
Step 5:


Mark out and cut out the front shape of the neck and the headstock ( I used a jigsaw) The odd shape at the top /left side of the neck next to the body is a little affectation based on some of the Tahitian ukuleles I have seen on the web. I am not quite sure what it is doing there.
The nut is fashioned from a bit of bamboo chopstick, with grooves cut using a mini hacksaw blade. The string should be about 1/16 of an inch or 2mm from the tops of the frets.
Fret placement is a key playability issue and is one area where accuracy is needed. This ukulele might look rough and ready but the aesthetic I am looking for here is good enough for the bush. The handle on an Aussie bushmans axe might be a bit grubby but the edge is razor sharp. Type fret calculator into your web search engine of choice and enter in the exact measurement between your nut and bridge (or at least where they are going to be). In the photo above you can see how I used a plastic vernier caliper I bought a few years ago from a super cheap store.
This site is pretty good for explaining it better than I can.
http://liutaiomottola.com/formulae/fret.htm
Here are the measurements I used
Scale length: 400
Distance from front of the nut
(or zero fret) to fret
1: 22.45
2: 43.641
3: 63.641
4: 82.52
5: 100.339
6: 117.157
7: 133.032
8: 148.016
9: 162.159
10: 175.508
11: 188.107
12: 200
13: 211.225
14: 221.82
I made my frets by sanding down bamboo toothpicks till they were half thickness and flat on one side and glueing them on with woodworking glue. Make sure there is plenty of glue on the toothpick and hold in place with even pressure for about 30 seconds to a minute and then put the spring clamps on for another five or ten minutes. If you are sensible you might invest in proper fret wire and read up on how to fit it.
Later experiments found that splitting the toothpicks with a knife was easier and that superglue both glued the fret down and hardened the bamboo.
Step 6:

To anchor the strings onto the body is a point where you can become a little individual. To make my Tahuke aesthetically “good enough for the bush” I used some 2 inch galvanised clouts – you can get away with much smaller thinner nails and / or even just put in some through holes. That is up to you. Mine are nailed in so that they hold the strings in line with the nut, so the bridge does not need grooves but other people have used anchoring methods that do need grooves in the bridge, because the strings anchors will not line up with the nut and the strings would drift out of alignment otherwise. With 8 string versions the paired strings also need to be held in close alignment, making a grooved bridge more necessary. A bridge on one of these ukuleles can be knocked up out of any bit of spare wood (hardwood preferred) or plastic laying around so don't feel too wedded to the one you start with. On a subsequent prototype I used a single 1/2 inch long screw as the anchor for all the strings and used a grooved bridge.
I am still fiddling with my bridge height and debating whether I should put grooves in it to stop the the top or bottom string occasionally falling off. For ease of play it needs to be as low as possible and so that the frets will not buzz it needs to be high enough. Anywhere from a minimum of 6 mm (¼ inch) to 12 mm (1/2 inch) – mine is currently sitting at about 10mm and quite playable. I had a bridge made from the same chopstick as the nut, about 6mm thick. I got just a little bit of fret buzz with this setting that might have been fixed by dressing the frets(sanding them level) but I have gone for a taller one made from a bit of scrap meranti. Hey it's only a ukulele – don't worry about it so much. Since the photo I have sanded some more wood off the side of the bridge and drilled some holes through it to get the weight down to improve the sound transmission to the sound board.
Step 7:


Tuning Pegs
This little bit is how I made the wooden tuning pegs – you can skip this if you are sensible and go for store bought machine heads- so far my expenditure is zero – all of his stuff was what I had lying around in my shed. A sensible person would have gone for machine heads and fret wire in any case.
Wood tuning pegs are a traditional and craftly way to tune string instruments. Sometimes I get just as much enjoyment from making a jig or a tool to do a job as I do making the the thing itself and I had a ball making these. I got these tips from various cigar box guitar and luthierie based forums, not to mention a few instructibles.
Tuning pegs are not straight – they have a slight taper (1 in 25 traditionally and 1 in 30 more recently) I began my process by making a 1 in 30 reamer out of an old kitchen knife. To mark metal accurately for cutting and grinding, a good tip I heard was to use a permanent marker to make a wide black line and then use a scribe (a sharp strong needle) to scratch a clear accurate distinct line in the black. This knife was 8 mm across the handle and the blade was 90mm long so a 1 in 30 taper means the end should be 5 mm across. This reamer is what we will use to make both the holes to put the pegs in. It will also make the tool to make the pegs, that way even if the reamer itself is not 100% accurate it will be the same shape as the pegs so there should be no problems. I cut it out roughly using an angle grinder and straightened it out, sharpening the edges slightly with a file.
I started out using the reamer as is, without any aid and this was taking too long. That knife handle is narrow and provides very little grip to spin it. So I then used it in combination with a power drill, which was fast, but accidentally turned the reamer into a twisted one. So I had to hammer it flat, file it straight and temper it over the BBQ burner (didn't bother measuring the temperature just held it in the gas flame for a minute or two, pulled it out and let it slow cool- it's only a kitchen knife, not a tool steel for goodness sake). After this I switched to using a short handle made out of a bit of offcut pine. Marked a rectangle the size of the handle, drilled it out and bunged it on with a bit of glue. Occasionally rubbing it with a file to put an edge back on it while in use seemed to help (made me feel better anyway).The tape on the blade marked my desired “uniform” depth.
Step 8:


The peg is first shaped roughly by hand (using the reamer as a template to draw the first cut out shape).
By a steady process of whittling with a sharp knife, sanding and turning the peg in the shaping jig with a sharp blade held up against it, the final shape is arrived at. The peg shaping jig is fashioned from a bit of hard wood, a hole is drilled through and then reamed with the reamer used to make the hole in the headstock. A “quarter” is then cut from the jig and a blade is then used pushed into the cut out bit of the shaping jig to gently scrape away at the peg so that it matches the profile of the hole in the jig, which because it is made with the same reamer as the hole in the headstock, should match the hole in the headstock. (See below for some links to sites that use similar but slightly different techniques.)
http://https://www.instructables.com/id/Cookie-Tin-Banjo-Part-1--Make-a-Tuning-Peg-Hole-R/
I first used a bit of meranti to make a test peg but it did not last long so these ones were fashioned from a bit of Victorian Ash floorboard (also known as Tasmanian oak). Meranti might work if the pegs were thicker.
Step 9:
Here is the point where I had to spend money – I paid $8 for 300 meters of 10 kg (0.41mm) fishing line. Given I used about 2 or 3 meters of line my actual expenditure is about 8 cents. All my fishing gear is fitted with 3kg or 5kg line so I may use some of that 10kg line for my next trip down the coast. Tying a knot to hook over the nail was a simple overhand loop http://en.wikipedia.org/wiki/Overhand_loop . Securing the line to the tuning peg was a simple matter of putting the line through the hole and twisting it back over itself and then tightening the peg while holding the loose end till the winding had well and truly jammed on the loose end, preventing movement- easier to just do than explain.
The tuning is GCEA like a standard Ukulele except that the two middle strings are an octave higher than the standard uke tuning so the chord fingering is the same. Playing melody or lead Uke, like you might be used to on a regular Uke is a bit different as the two middle strings are an octave higher but that is what is part of making it fun. Swapping to a lighter string (3kg fishing line form one of my old fishing reels) for the top A string and tuning an octave higher extended the range marginally and made nurdling out a bit of a tune easier, but the lighter line I had broke easily and it smells faintly of lake water so you pays your money and you takes your chances on this one.
Here is a link to a youtube of how it sounds
http://www.youtube.com/watch?v=oYkrFnWkrYk&context=C4050bc0ADvjVQa1PpcFM61f7tLwKBWndfvTYrC_C9wdeFJxVLqiA=
The shape can be played with quite extensively I am sure without having too many problems about the tone – This example is a very rough prototype. A small amount of effort would raise the finish standard to “all right as long as you don't get off your horse”. Given the uniqueness of the object you will probably not get a “good as a store bought one” but perhaps with a little more effort and attention to detail “that's craftsmanship that is” is probably attainable.
All in all if I were to buy the materials I would have spent less than
$10 for the wood and
glue is about $10 to$20 a bottle depending on which you buy .
4 or 8 tuning pegs and some fret wire set you back another $15 to the skys the limit
After a bit of hard work you will have have a truly beautiful and wonderful instrument you have made yourself. Mine is however made, is easy to fiddle with and good enough for the bush ( I may even invest in an RM Williams bumper sticker for it or get my soldering iron out to do a bit of pyrography (pokerwork) on it.) If you don't make one for yourself at least enjoy the concept of a cheap easy to make and fun instrument to bring just a little more joy into the world.
Recycling shipping pallets is a goods source of wood normally but will need selectivity as they tend to be made from very low grade materials and finding enough clearish straight wood for the neck and face/soundboard could be tricky.
More Ideas
Why does the resonating chamber have to be round? Why can I not make it pineapple or Ukulele shaped even? What difference would that make to the sound?
A set of f holes like on a violin or a few scattered small circular holes like on an ovation guitar on the front might direct the sound out the front better than the hole in the back.
If I have a solid lump of wood can I bore a hole the size I need using a machining tool of some sort, to making a small entry hole and a large resonating chamber and soundboard all in one go? Possible on a bowl turning lathe I think, but a lot of care would be needed to balance the swing of the neck. Alternately a two stage process with a standard straightish router bit followed by a bit on a right angled dremmel is the other possibility.
Acknowledgements:
The guys on the Duckworks wood boat building Yahoo group/forum who provided lots info wood mangling, glue strengths, metal working and getting on with it over the years.
http://groups.yahoo.com/group/dwforum/
These guys have a pile of info on their site as well:
http://cigarboxguitars.com/
If there is a patron saint of home made musical instruments made from any and all available materials it is this dude:
http://dennishavlena.com/
Step 10:

OK OK so I did a bit more experimenting - Single piece of wood from a discarded shipping pallete and a bit of time - seems to make a sharper slightly thinner sound. Looks like a kind of a cricket bat ukulele - the cruke!! Tried to make holes only in the front - not much noise put hole in back - still not much noise. Planed a few millimeters off the face and suddenly more noise! Not as much volume as the first one I made but seems almost to be a sharper sound. I should have done that string test I mentioned earlier.
The scale length on this one is the same as the first one.
Step 11:
Here is a Sopranino size I made as well.
The scale length here is 220mm or about 8 1/2 inches.
The tuning also has to vary. I currently have this one tuned to C F A D
Because the scale is so much shorter the tolerance for fret placement and the impact of string stretch are very fiddly.The main problem i had was that my nut was too high and I had to make it so low the strings nearly buzzed when open to make it playable.
Yes I cheated and bought tuning pegs off Ebay.

Participated in the
Woodworking Challenge


