

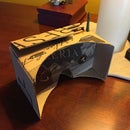
Introduction: How to Make Google's Original Cardboard VR Viewer (2.0)


I've posted a simpler version herethat I've used with middle school students and older that uses less cardboard and is overall easier to cut. This version is sturdier, more complex to cut and assemble, and best built by adults.
The plans for this Google Cardboard VR viewer are based on a freebie sent to NY Times subscribers in November 2015. This version fits larger cell phones and uses a conductive button as the touch trigger rather than a sliding magnet as in Google's original.
You will need:
- the equivalent of a 2'X3' sheet of thin (2mm) corrugated cardboard. I have used a shoebox, pizza box (parts without grease), and the backing from a 3M chartpaper pad.
- a pair of 45mm focal length biconvex plastic lenses, either 25mm in diameter (GC 1.0) or 37mm (GC 2.0). I haven't noticed a real difference, but 25 mm are easier to get and cheaper-- less than a buck a set from China on ebay (if you don't mind the 3-4 week shipping times). Expect $6-8 a pair on Amazon.
- copper foil for the conductive touch screen button
- a tiny piece of dense foam/sponge (about .25 X .25 X .1 inch), like what some electronics come packed in.
- cutting tools. I recommend sharp scissors and/or a razor blade for straight/outside cuts and an Exacto knife for curves.
- glue
- fairly weak velcro (about 3 inches, cut into 3 pieces as below)
- a rigid metal edged ruler.
- a cutting board or mat is a wise option as a work surface.
The printable template is attached on the last step.
Step 1: Glue Template to Cardboard and Cut Outside Outlines Only.


Cut out and glue the template pieces onto cardboard, noting the "grain" (corrugation) to maximize strength. A glue stick will let you peel the template off the cardboard at any point (like folding) and when you're done. You will end up with 2 large pieces (1 and 2), two small (3 and 4), and the button, as shown folded in step 2 below. Hold off on cutting out any of the inside pieces, like the lens holes.
Step 2: Fold Each Piece


Score (lightly gouge) the folding lines using a metal edged ruler and a dull pencil or coin, then, pressing the edge of the ruler into the scored line, fold the cardboard toward you unless instructed to fold a piece under (like on the button).
Step 3: Test Fit and Adjust

...your folds and cuts to make sure everything matches. It doesn't need to be perfect to work well. From this point on, I'll refer to the "lens face" (with 2 holes for the lenses and a cut out for your nose) and the "phone face" (the goggly looking side where your phone will be placed).
Step 4: Cut Inside Parts

I suggest that you first cut the holes in the outermost layer and make sure those holes line up with the other layers while folded and assembled in their final position. Depending on the thickness of your cardboard and your transferring, measuring, and cutting skills, holes cut only from the templates while the cardboard pieces are flat may not line up when the layers are folded and put together.
Step 5: (OPTIONAL) Add Touch Screen Button Part A

The button is a "pyramid" stuck to a moveable flap that you'll be able to press down. The top of the pyramid will have a sponge (for the soft touch) laid over with conductive copper foil tape to bring the slight current from your finger to your screen. If you want to skip this, you can just reach through the nose hole and touch your screen manually. Glue the button with the front flap tucked under and the back flap behind. The front of the pyramid is the shorter side, which makes it stand straight up. Make sure it is about a 1/4 inch back from the cell phone face of your viewer, or the sponge will be in contact with the screen all the time.
Step 6: (OPTIONAL) Personalize Your Viewer

If you want to decorate your viewer, this stage is probably the best time, before gluing pieces together and inserting the lenses. It's better not to add paint, duct tape, or other non-cardboard materials to surfaces you’ll be gluing; bare cardboard to cardboard surfaces set very quickly with Elmers.
If you don’t paint it, you should put a piece of clear packing tape above the nose hole on the inside face (I put tape on this entire piece). No matter how clean you think you or your friends are, you will end up with an oily stain from your forehead on the lens face of your viewer in no time. Or you could just point out it was made from a used pizza box.
Step 7: (OPTIONAL) Add Touch Screen Button Part B


Cut a piece of copper foil tape the width of the sponge and attach it as smoothly as you can. Then cut a two inch strip and wrap it from below the sponge, over the top of the pyramid to the base. (Tip: Copper tape is best handled by peeling the backing as you need to, rather than all at once. It tends to curl, wrinkle, and stick to itself.) Then cut another piece about 5 inches long and attach it from the base around the top of your trigger flap, where your finger will touch.
Step 8: Insert Lenses


Glue the inner (piece 3) and middle (2A) layers of the panels that will make up the lens face together and insert your lenses curved side forward (toward the phone face or inside of the viewer). Then glue the outer panel (1B) on, checking before the glue sets that they still match well when in their folded positions.
Step 9: Final Assembly


Next glue piece 4 (the inner layer of the phone face) inside piece 1B (the middle layer), making sure not to glue or otherwise bind the button flap (photo 1 shows me pressing it down). If the flap doesn't depress freely, trim around the 3 edges with scissors as needed. The entire viewer will then look like photo 2 above, with all 4 sections connected. [not quite-- the button piece is not attached at top]
To do the final folds and gluing, fold down the top section of the phone face in photo 2 to line up behind the outer layer of the phone face (2A) and glue it. Fold in and glue the two pairs of small side flaps (my finger is holding the right one out so you can see it).
The big side flaps of 2B and the phone cover 1A don't get glued as they will use velcro to be held closed.
Step 10: Install Rubber Band and Velcro


Velcro holds the front flap over your phone and the foldable side flaps down. If you don't want your viewer to fold back into a basic box, you can glue down the side flaps. If you trace your velcro piece and cut a slot for it in the cardboard as shown, the flaps will sit more flush.
The rubber band functions to provide some traction to prevent your phone from sliding out sideways.
Now search your app store for Cardboard VR. Even though Google stopped promoting Cardboard in 2018, in 2023, there are dozens of providers still maintaining and creating VR content for this platform. Download the app, fire it up, and pop your phone in your Cardboard viewer, making sure to align the center line in your device.
A headstrap and headphones are optional but a plus.


