

Introduction: Great Halloween Yard Decoration for Under $20.


Here's a great little project which uses scrap objects, such as pallet wood, plus a cheap bargain store skeleton. Mine cost £12 (around $15).
The led light strip had been in my garage but broke. All it needed was the wires soldering back on to repair it.
Step 1: Here's What You Need

A bargain store skeleton
Some scrap wood, e.g. Pallet wood
An old wheelbarrow -the rustier the better
Leaves (I got plenty from my damn neighbour's tree)
LED light strip (optional)
Step 2: Unpack Your Skeleton

There are lots of skeleton in wheelbarrow decorations on the web, but many are literally just components pushed into a pile of leaves.
Where this design wins hands down is that you build a simple wooden "armature" to hold everything in place, then cover it in leaves after.
It means if can't get disturbed by the wind (or prying little fingers). And when Halloween is done, you can just hang it up in your garage.
So first unpack your parts, and plan your layout. My skeleton had spikes for fixing it into a lawn.... so in this Instructable we are going to keep those and take advantage of them.
Step 3: Cut Wood to Fit Wheelbarrow


You need to cut several pieces of wood as follows (I'm not giving sizes as it depends on the size of your wheelbarrow, and they want to be snug)
1. Upright neck bone, to lie on the sloping front of the barrow
2. Spine to lie in the base of the barrow
3. horizontal for shoulders
4. Horizontal for pelvis
5. I also added upper arms (not in this photo.... they were a late afterthought!)
Step 4: Assemble the Wooden Armature

You can be as rough and ready or as professional as you like here...
I'm hoping to use this year after year, so I used glue & screws to fix most pieces. You could just use nails, but your more likely to split the wood.
I used a small hinge I had in stock, to connect the spine to the neck.
I just drilled holes and used a cable tie to fix the upper arms to the shoulders.
Step 5: Get Drilling

You need to find a drill bit that is just a bit smaller than the lawn spikes on your skeleton, so you can drill holes which the spikes will push into and be a tight fit. I used a ½" spade bit. You need to drill through the pelvis on each side, through the upper arms on both sides, and the hardest part.... drill into the end of the neck.
Step 6: Painting (optional)
If you do this right, your wooden armature will be totally hidden by the leaves, but I painted mine anway, by mixing some red and black to make a brown, and just quickly brushed it onto the armature.
Step 7: Assemble Your Skeleton

This part literally takes seconds! As long as you've drilled the holes the right size, the parts just push into place.
Step 8: Leaves...
Finally I covered the armature in leaves (just tipped in loose, so they can be scrapped and replenished next year).
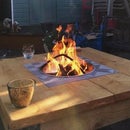
Then I curled an old led light strip around, and tipped more leaves on top.
Step 9: Thankyou

I hope you enjoyed reading this and give it a go.

Participated in the
Halloween Contest 2017


