

Introduction: H8 Mutation 1 : Accro Mode


Hi !
We'll see how to upgrade the great H8 mini, from the tiny little drone to a light and low cost fpv nano racer !
Tools we need :
- H8 mini
- ST Link v2 programmer
- Screwdriver
- Soldering iron, tin, wires ...
Step 1: Software Preparation
Ok first, we need to change the firmware to get accro mode and also break the current limit. The builder firmware will be lost forever (but the new one is better ^^).
Softwares :
Download and install all following softs :
- ST link v2 driver : http://www.st.com/web/en/catalog/tools/PF260219 or
https://pan.baidu.com/wap/shareview?&shareid=41048...
- Quadcopter MDK -> http://www2.keil.com/mdk5/legacy/ (Version 5.15)
- GigaDevice GD32F130 CPU pack for Quadcopter support https://app.box.com/s/h5d51zr9x4dfqsu4p96bk9wi46l...
- Keil µVision http://www.keil.com/uvision/
- Download the ZIP file for Acro Firmware or Dual Mode Level/Acro Firmware, personally I prefer the dual mode because you can switch and have the choice to use firmware or self leveling mode :)
Step 2: Hardware Preparation


Disassemble the H8 and extract the motherboard, you have 8 scews : see this video if you are affraid
Well now see the 3 soldering dots in the red circle that I do with paint ? You have GND, DAT and CLK.
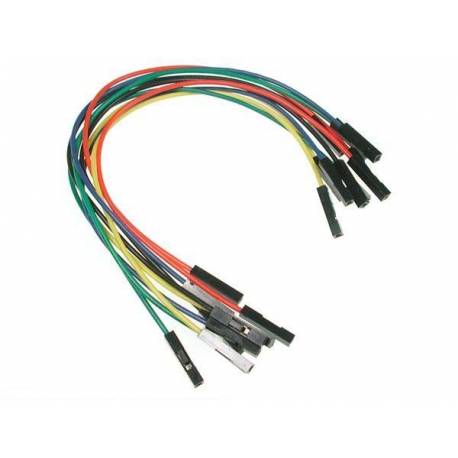
We have to solder 3 wires with connectors to plug them on the ST Link V2, wires like those :
http://www.arobose.com/shop/163-large_default/kit-...
We should to heat brievly to ensure that we don't damage any electronic components.
Once wires have been solded on GND DAT and CLK connect them to the ST Link in this order :
- CLK → SWCLK
- DAT → SWDIO
- GND → GND
Pretty easy right ?
Step 3: Flash It !

Launch Keil µVision, import the project Project.uvprojx
Ensure that the ST Link is well selected in FLash → Configure and also in Flash Tools → Debug.
We'll chose the destination device in Project → Device for Target and we'll put Gigadevice GD32F130 if that's not already done.
If everything's good, do Project → Build and if threre is no errors then connect the battery to the H8 motherboard and the the ST Link to the PC (with wires in the right order as see in previous step).
Now, we can erase the actual firmware ... Flash → Erase. If there is an error message, just ignore it.
At this moment, there is no firmware on the quadcopter, let's put it the new one !
Last step : Flash → Download to put the new firmware in the H8, accro mode or dual mode (accro + self leveling).
PS : If you follow my advice and took the dual mode firmware, for changing mode do LEFT-LEFT-DOWN with the right analog joystick in mode 2 (translation joystick) and pass in accro mode. To go back in self leveling mode just do RIGHT-RIGHT-DOWN.
Step 4: H8 Mutation 2 : Soon

I think I'll make an other instructable to see the second upgrade of the H8 :
- New frame : https://www.thingiverse.com/thing:1662742 awesome works by Kolergy
- New motors
- FPV
It is light fast and cheap :)
... just need a little bit time
I let you train. Have fun and good flights.
See ya !


