

Introduction: HANG .10 Coffee Table - Version II


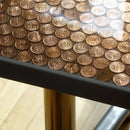
Well, here is version II of my original HANG .10 surfboard coffee table. This time around I used pennies, with copper/chrome maple leafs on a white background.
Which one do you like better?
Step 1:


*Take your paper template and trace its shape onto the wood that you will use for your jig. I used 1/2" MDF but you can use 1/4"
MDF, Masonite or plywood.
*Use your jigsaw now to cut out that shape from the MDF. Once cut out, I took a belt sander and cleaned up and smoothed all the edges around the jig. This will be your main jig now. This jig is what the router bit follows to cut out your perfect ellipse.
*Select your wood to make your table from. I chose pre-finished birch.
*Put the wood template onto the wood you've selected and clamp it down.
*Route around the jig with the router bit riding against the jig. I used a 1" pattern bit with a ball bearing. This is what rides against the edges that I smoothed out earlier on the jig.
*Now the table top is ready for your design.
*I masked off the edges and painted the top white. I left the edges exposed to show the different plywood layers similar to the
Herman Miller/Eames surfboard table.
*Lay out the location of the stripes with painters tape.
*Now start adding your pennies!
*I used white glue and Q-Tips. Type of glue doesn't really matter because the whole table will be getting covered with epoxy resin later.
*When you are done, remove the painters tape and now you can lay out your copper/chrome maple leaf decals or whichever
design you prefer.
Step 2:

Ok, now its time for the epoxy resin coating.
*You will need enough for a minimum of 2 coats.
*I mixed my epoxy in a 1:1 ratio. This maybe different with other brands though.
*I poured the epoxy, and waited 10 minutes for all the
bubbles to come to the surface.
*Now you can take your plumbers torch and wave it over the surface of the table popping all the bubbles.
*Keep the torch moving at all times and about 6" away from the surface to avoid burning the epoxy.
*I waited overnight and did a second pour of the epoxy.
*You have to try your best to avoid airborne dust and grit
from getting onto the top.
*You should wait about 4 days for the epoxy to cure. Then you can move it around and finish it off.
Step 3:

I attached these nice 13" powder coated hairpin legs from CreamStreetShop. These are really popular right now.
Step 4:


And voila'....
the finished product :~)
Step 5:
I would like to thank CreamStreetShop for providing the legs:
http://www.creamstreetshop.com/
http://www.etsy.com/shop/CreamStreetShop?ref=si_shop
As well, I'd like to thank the following Kamloops businesses for their help and support:
-Rich at Platinum Autosports.
-Josh and Cory at Kamshine for providing the much needed pennies.

Participated in the
Epilog Challenge V


