

Introduction: Low Tech HELIOSTAT. How Do I Attach the Suntracker?


I recently made a solar accumulator which is a limited heliostat, I guess. It can only send the light to somewhere on the axis of the equatorial mount.
The new heliostat is different. It should be able to send the light just about anywhere you want and keep it on that spot as long as the sun shines.
This feature could be massively useful for solar cooking (multable heliostats shinging light on one area) water heating or solar lighting, (shining the light into dark corners or northern windows).
I want low tech ones that poor people who do not have computers can make.
I am pretty sure this works now after making a little model. I am using gimbals on the real thing having seen a problem on the model. Thanks to all who helped me choose gimbals for where it joins to the equatorial mount!
The theory follows on the next couple of pages.
Brian
Step 1: Basic Optics
When sunlight hits a mirror, it bounces off at the same angle as it hit the mirror.
The plane of the mirror is exactly at right angles to a line bisecting the bouncing lightrays. I think we should focus on the bisecting line!
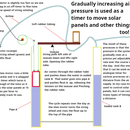
If we allow the mirror to swivel on its centre point, and tie the corners of the mirror to somewhere on that line and keep it taut, the mirror will point at the correct angle to send the light to the target!
Step 2: Like a KITE
If we get 2 similar elastic bands and tie them together, and tie ones end to the sun pointer and the other ones end to the target pointer, where the bands are tied to each other will define a point on the bisecting line.
Furthermore, the kite mirror will now be pointed in the right direction as long as the sunpointer follows the sun.
Step 3: Put It on Equatorial Mount!
If the bands do not work, you could try a spring loaded spool of thread with 2! threads coming off the spring in the middle. One thread in place of one band and one in place of the other. This will keep the "kitemirror" taut.
Here is what it might look like on equatorial mount.
It might work better if the fixed target pointer comes up through the middle but it makes for a more difficult to build device.
The sun pointer moves during the day, the bands move as it does so, and the centre and the mirror is moved as the bands move too.
Perhaps a device with 2 pointers was used by The Archimedes Heat Ray to aim it and keep it on target?
Archimedes was a whiz with parabolics too so his heat ray mirrors might have been concentrating mirrors.
Step 4: Gimbal the Start of a Practical Heliostat


I have been hunting for ways to turn the idea into reality. Many thanks to people who answered my forum question. The universal joint answer led me to a gimbal as my solution!
While searching for a metal ring to make a gimbal, I made one from wood.
I stuck mylar to a rectangular piece of plywood for the outside and used stiff wire and screws to attach the gimbal section. I hope that it is close to equatorial mount.
Since taking the photos, I have added a target pointer.
I have not yet decided how to attach the sunpointer.
Step 5: How to Set Up and Adjust Equatorial Mount?
If the equatorial mount is pointed exactly north (in the northern hemisphere) and in line with the axis of the earth, then all is rosy.
How can we get it to this state? It is hard to find exact north! I suggest the first thing to do is get the heliostat set up pointing up at exactly at your latitude no of degrees. Point it approximately north.
Over the course of the day, as it turns the reflection will move a little. You can use this movement to readjust the mount until it is perfect. I have not yet figured the movement out because I have not yet made one! Perhaps this work can start tomorrow!
Brian
Participated in the
Let It Glow!


