

Introduction: HackerBox 0029: Field Kit


Field Kit - This month, HackerBox Hackers are exploring various miniature and mobile tools for agile field operations. This Instructable contains information for working with HackerBox #0029, which you can pick up here while supplies last. Also, if you would like to receive a HackerBox like this right in your mailbox each month, please subscribe at HackerBoxes.com and join the revolution!
Topics and Learning Objectives for HackerBox 0029:
- Assemble a small electronics toolkit for mobile field operations
- Prepare micro-grabber clip leads for hardware hacking applications
- Configure the ATmega32U4 Pro Micro platform in the Arduino IDE
- Apply simple I/O and bus operations to exploit hardware targets
- Understand programming and dumping contents of EPROMs
- Experiment with a Processing based Logic Analyzer tool
HackerBoxes is the monthly subscription box service for DIY electronics and computer technology. We are hobbyists, makers, and experimenters. We are the dreamers of dreams. HACK THE PLANET!
Step 1: HackerBox 0029: Box Contents
- HackerBoxes #0029 Collectable Reference Card
- Exclusive HackerBoxes Zipper Case
- Portable 5V Soldering Iron
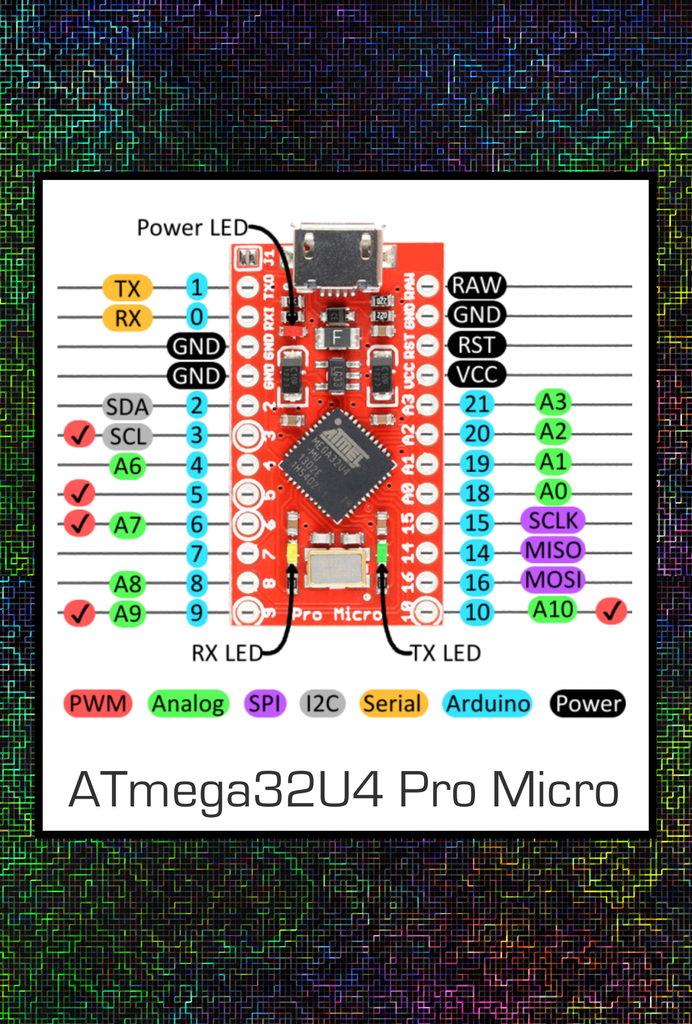
- ProMicro ATmega32U4 5V 16MHz
- OLED 0.91 Inch Display 128x32 I2C
- Four Key Pushbutton Module
- Six LED Debug Module
- AT24C256 I2C EEPROM Module
- 400 Point Solderless Breadboard
- Jumper Wire Bundle
- Set of Mini Grabber Clips
- Solder Wick 2mm by 1.5m
- MicroUSB Cable
- MiniUSB Cable
- Precision Driver Set
- Exclusive Phone Phreak Decal Exclusive
- Exclusive 8bit Dragon Keychain
Some other things that will be helpful:
- Computer for running software tools
Most importantly, you will need a sense of adventure, DIY spirit, and hacker curiosity. DIY electronics is not a trivial pursuit, and HackerBoxes is not a watered down version. The goal is progress, not perfection. When you persist and enjoy the adventure, a great deal of satisfaction can be derived from learning new technology and hopefully getting some projects working. We suggest taking each step slowly, minding the details, and don't be afraid to ask for help.
Note that there is a wealth of information for current, and prospective, members in the HackerBox FAQ.
Step 2: Field Operations
As a Hardware Hacker, you never know when or where you might need to mod the flash on a router, dump the ROMs from a video game system, toggle some I/O pins, unsolder an ailing battery, or otherwise save the day.
The HackerBoxes Field Kit is a first pass at your electronics first aid resource. Once developed, you can keep your field kit at the ready in your backpack, briefcase, or bug-out bag.
Example Scenarios:
Step 3: Arduino Pro Micro 5V 16MHz

The Arduino Pro Micro is based on the ATmega32U4 microcontroller which has a builtin USB interface. This means that there is no FTDI, PL2303, CH340, or any other chip acting as an intermediary between your computer and the Arduino microcontroller.
We suggest first working with the Pro Micro without soldering the pins into place. You can perform the basic configuration and testing without using the header pins. Also, delaying soldering on the module gives one less variable to debug should you run into any complications.
If you do not have the Arduino IDE installed on your computer, start by getting it form arduino.cc. WARNING: Be sure to select the 5V version under tools > processor prior to programming the Pro Micro. Having this set for 3.3V will work once and then the device will appear to not ever connect to your PC until you follow the "Reset to Bootloader" instructions in the guide discussed below, which can be a little tricky.
Sparkfun has a great Pro Micro Hookup Guide. The Hookup Guide has a detailed overview of the Pro Micro board and then a section for "Installing: Windows" and a section for "Installing: Mac & Linux." Follow the directions in the appropriate version of those installation instructions in order to get your Arduino IDE configured to support the Pro Micro. We usually start working with an Arduino board by loading and/or modifying the standard Blink sketch. However, the Pro Micro does not include the usual LED on pin 13. Luckily, we can control the RX/TX LEDs and Sparkfun has provided a neat little sketch to demonstrate how. This is in the section of the Hookup Guide entitled, "Example 1: Blinkies!" Verify that you can compile and download this Blinkies! example before moving on.
Step 4: Pro Micro Scenarios for Field Operations

To read and write sets of eight I/O lines from the Pro Micro using a simple serial interface, try out the Serial_IO.ino sketch included here. This is one of the simplest embedded tools that we might use to manipulate or interrogate any target system that we are working on.
Either simple jumpers or the tactile button module can be used to demo the digital inputs at pins 10,16,14,15,18,19, 20, and 21.
Similarly, the LED module can be used to display the digital outputs at pins 2, 3, 4, 5, 6, 7, 8, and 9.
In practical use, these I/O lines would interface to the target system.
Slightly more advanced than this example, the Processing platform may be used to implement a basic logic analyzer using the Pro Micro.
We can experiment reading and writing the AT24C256 serial EEPROM (datasheet) module using this demo code.
The 128x32 OLED display can be used when a computer may not beavailable for displaying output. There are various SSD1306 Libraries available online.
For an advanced challenge of using the microcontroller as a debug/hacking platform take a looks at the Bus Ninja project. Note that this will require the avr-gcc toolchain and avrdude as opposed to using the Arduino IDE.
Attachments

Step 5: Putting the Field Kit Into Practice

Since we all have different backgrounds and different use cases for various tools, we'd love to see folks sharing some of these details in the comments below.
Consider sharing your thoughts on some or all of these points:
For your specific needs, what might you pack in your Field Kit that was not included here?
In what situations do you envision possibly needing your Field Kit?
Where will you keep your Field Kit?
Over the coming months, please post back here about when and how you ended up using your Field Kit.
Step 6: Hack the Planet

If you have enjoyed this Instrucable and would like to have a box of electronics and computer tech delivered right to your mailbox each month, please join the HackerBox revolution by SUBSCRIBING HERE.
Reach out and share your success in the comments below or on the HackerBoxes Facebook Page. Certainly let us know if you have any questions or need some help with anything. Thank you for being part of HackerBoxes!


