

Introduction: High Chair Table for Twins


While searching for an alternative to having two high chairs, I stumbled across this fantastic setup. In the original, they sacraficed a table, in my case I built a special leaf for the table instead. The original can be found here: http://jared-krystal.blogspot.com/2010/11/ultimate-twin-high-chair.html
The chair inserts are designed for toddler feed and play tables let the one below.
Step 1: Gather Materials
If you don't have a table that you can cut into, you'll need a sacrificial leaf. If you don't have a sacrificial leaf, you'll have to make one. I spent quite a bit of time trying to find a partial sheet of Wilsonart, or Formica or other laminate surface to use for the project, but could not find one easily accessible. Online, they suggest seeking out cabinet maker's shops to search for scraps. With twins, free time does not exist, I ended up buying a whole sheet. These run ~$80, and you won't even need 1/2 of it. As you can see, I got close, but not quite right on the pattern/color.
If you intend to make a leaf for you table, first make sure you table opens up wide enough. Our table came with leaves that are less than 9" wide. The seats themselves have an overall width of 14", so you will need at minimum 28" and more reasonably 30" to do this. Alternatively, you can add one seat to each side, in which case you will just need 15-16" (to leave some surface outside the seat).
The table we have isn't ours, so I couldn't cut it. I also had to add new extension slides as the table originally didn't open up to the 32" overall I used. This also wasn't a cheap way to go. The pair cost me $70, but I had already ordered the seats and the laminate sheet, so I was in it until the end.
The seats were bought online through a link in the original post. They come in a set of six, which means I have four seats I need to sell ($20 each, send me a message). I remember it breaks down to $16 a chair before shipping. Originally, they were super discounted, but when I got there, it cost me ~$100.
You will also need 3/4" plywood, some dowel pins to match you existing table, and some scrap wood to widen the table leaf to the correct thickness along the edges (and over the extension slides).
You will also need contact cement, wood glue, screws or staples, a drill, a jig saw and a circular saw/table saw. A self centering dowel jig is also a great idea.
If you are counting, material cost assuming you have to go all the way is ~$250 if you have to buy a set of six seats and don't buy mine instead. If you have a leaf to sacrifice, your table extends far enough and buy my extra seats, it drops to ~$50. The high chairs we were looking at were $110 each, so I will be over. But, when they start eating PRIMARILY solid food, I will be able to cut the leaf down to 16", and make an insert in the middle to hold supplies and have it double as an activity table too.
So yes, I still lost, but the grand vision was there. That grand vision was two less things to buy and trip over. It is definitely worth doing in some cases.
Step 2: Cut Plywood and Glue Laminate

This was my first time ever using contact cement/laminate. I was apprehensive and looked over the directions multiple times, but it was just as easy as it sounded. I did not buy a weighted roller and used a rolling pin instead. Be very wary of the edges, if you push too hard on an unsupported edge it will crack. After it is down/dry it is basically indestructible.
I cut the plywood a few inches over the final size so I could trim it to final dimensions after the laminate was set. It my case, the table top not including the curve was 48", and the laminate 96". I trimmed it down before trying to glue it.
This is a video that really helped me :https://www.youtube.com/watch?v=qGr5GIhnebQ
Step 3: Add Endcaps and Support Rails
For the end caps which are half-rounds on my table, I glued and stapled a rabbeted piece that was over the final dimension. This shape will make sure the edge never lifts about the table top, or pinch and little fingers/toes. For the edges that will received pins and holes, I carefully cut boards that when glued to the plywood were the same as the existing leaves.
Finally, I added support rails that matched with thickness that lay perpendicular to the edges and sit on top of the extension slides.
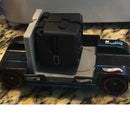
Step 4: Shape Endcaps

I shaped the endcaps with a plane and a sander (with an aggressive grit). It didn't take long. I matched the leave to each 1/2 of the table and traced the shape I needed.
The sample profile is exaggerated to show the basic setup.
Step 5: Drill Holes

The holes and pins are one of the most important safety aspects of the project. Without them, the leaf could tilt as weight was applied (Ie: a baby). If you do this, make sure you use dowels and holes, and maybe a brace for good measure. There ARE plenty of reasons to overthink safety on a project like this.
Measure from the top and bottom to find out if your holes are centered or not. In my case they are not. I drilled to accept all five dowels, and drilled for three dowels on the corresponding pin side. If you get it right, the leaf will sit flush or nearly flush with the rest of your table.
Step 6: Measure and Cut Seat Locations


The holes I cut were 9-3/8" x 11-1/2". They are rectangular with rounded corners with the intention of being reversible. I did not discover until the first one was cut that the extension slide was too close to the seat leg holes to allow safe seating on one of the chairs (you can see it in the picture). The other side is fine, hence the reason for cutting the leaf down in the not too distant future.
I traced out the lines with a square and checked my pencil lines several times. There is no point to rush this part.
The cuts were started with 1/4" drill bit and then cut with a jigsaw. You can put down tape to minimize chipout, but the seats have a lip anyway, and it is minor.
Step 7: Stain, Seal, Then Sand All Edges

I found out the hard way, the Wilsonart laminate I used have a few spots on it where my stain soaked fingers touched it. So be very careful and mask off where you don't want the color to go.
After a could coats of polyurethane on the rounded edges, sand every sharp edge you can think of. I used a small plane then sandpaper of each edge I thought a foot, hand or anything else might ever touch.
Then, set it up and feed those babies!
SERIOUSLY, I do have four of the seats left. Send me a message before I think up some other project. Save me from myself!


