

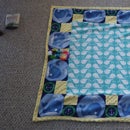
Introduction: Hobbit in a Box


This Instructable will show how to make pajamas to look like Bilbo's clothes from The Hobbit. I have a tutorial for the pants, shirt, and (my favorite) the feet. I had more Ideas for this pajama set but it was a Christmas gift and I ran out if time. However, If you are giving it as a gift you could paint the box to look like Bilbo's home and you could add a little hand made sting that doubles as a back scratcher/ cat toy with the one ring. I had also intended on buying or making a robe in the mauve color to go with the set but I couldn't find enough material or a pre-made robe so I just purchased a very warm blanket. Tutorials for the finishing touches( painted box and sting) may come soon but for now lets make some Hobbit Jammies!!
* You will need: fleece Material or fleece blankets in the correct colors , Sharp scissors, pins, matching thread, a sewing machine, hand needles, a measuring tape, velco, elastic, upholstery foam, contact cement or hot glue, acrylic paint, paintbrushes and sponge brushes, mask latex, patience, and imagination ENJOY!!
Step 1: A Vest Is Best: Making the Shirt


There will be a lot of information and a lot of photos in this tutorial. If you know how to sew and make patterns it may be a bit dulled down and redundant. If you don't know how to sew I hope its understandable and helpful.
I was trying to make this project simple and affordable so for the pants and shirt I bought Light fleece blankets in the colors I wanted. I got my blankets at Gabriel Brothers I only needed one of each for the set and the blankets were 2 for 5.00. The shirt appears grey in my photos but it is actually a dull green color.
So, to start lay the material out on the floor or on a table and fold in half. You would want right sided touching but with blankets either side is fine. For the pieces you can buy patterns or make patterns, In my case I just took measurements off of his clothing and then mapped it out on the material with pins.
* The first photo with pins is the front of the vest. For the front you will need two separate pieces of material. Fold the material in half and map out your pins or pattern then cut both pieces completely out of the material leaving a half inch seam allowance from the outside of the pin line, set these pieces aside.
*The next photo with pins is the back of the vest. The back is one big piece and can be cut on a fold to avoid a center back seam. Fold the material in half and map out the back piece using the fold as the center most point of the vest. Again, using a half inch seam allowance from the pins cut piece from material Do Not Cut Fold Line and set aside.
*I decided to add sleeves to the vest for a little more coverage and added warmth.The last piece to be cut are the sleeves, you will need two sleeves so this piece will need measured and cut twice. The sleeves can also be cut on a fold line. To determine how much material I needed I measured for the widest (widest = armhole) and longest part of the sleeve. The width of the armhole can be found by measuring the armhole of the vest (this measurement is easier to get once the front and back pieces are pinned together). The sleeves armhole must fit within the vest armhole and be sewn in without causing any wrinkling or folding so this measurement is pretty important. The length of the sleeve and the cuff (end where hand meets) can be determined by taking measurements from a sweatshirt. Once your pins are in place cut on the outside of the pins leaving a half inch seam allowance . Sleeve is one big piece Do Not Cut Fold Line.
*The last stage in cutting the pattern pieces is pinning them together. Start by pinning the front to the back, it is fairly easy to tell what goes where by the width of the pieces. Pin both fronts to the back and ensure that the lay correctly. Next, we sew!
Step 2: Fire It Up! Sewing the Shirt


* Start by sewing the shoulders and sides of the vest together, use a straight stitch a half inch in from edge of material and follow with a zigzag stitch or surged edge for extra strength. I do not have a serger so I did a zigzag which can be seen in the second and third photos. Once stitched cut edge of material so there is s about a 1/4 inch left from edge of zigzag (3rd pic)
* Next are the sleeves, Pin sleeves together along unfolded edge and only stitch the straight line up using a straight and zigzag stitch ( do not stitch either end closed). once stitched finish cuff by folding under a 1/2" and sewing (pic 5) I used a zigzag stitch for the cuff as well to give it a little more decoration but you can use whatever.
* To attach sleeves to vest, with right sides(outside of material) together Pin sleeve seam to vest side seam then pin around armhole trying to avoid folding and wrinkling(photo 6 and 7). sew as before with a 1/2" seam allowance using a straight and zigzag stitch.
*To finish vest fold 1/4" of material all along the outside of the vest over and sew using a straight stitch to make a finished edge(photo 8 and 9) To close the vest I decided on Velcro. If you are using velcro make sure to put the stiff part facing outward so it doesn't scratch and the soft facing inward. You could also sew the two front pieces together overlapping or use buttons. Whatever you choose pat yourself on the back because one piece is done.
Step 3: Dressed for Adventure: Making Pants


For the pants I again used a blanket in the appropriate color. I folded the material in half then to make a pattern I used an old pair of pants and cut them along the top bottom and center so that I had one big piece (pic 5). If you fold a pair of pants length wise with the two legs touching and the butt part outside you will notice that the butt has a larger curve and is a longer(pic 4), keep that in mind when making pants.
* To start a pattern make a pin line around the pants. The pants I used for my pattern had and elastic waist and elastic leg cuffs, I cut the elastic out to get the full width of the pants for the pattern. If you use this method make sure to make the waist band longer to accommodate elastic and make the pant leg as long as it needs to be. I used the full length of material to make the pants because he likes his pants long.
* Once the pattern is mapped out cut out your pant legs leaving a 1/2" seam allowance and creating something that looks like photo 7. Once the pants are pinned together they will look like photo 8
* To sew the pants fold each individual leg seam in half to make two separate legs. Once you have the leg seams pinned sew them together from bottom to crotch using a straight and zigzag stitch starting with the straight stitch 1/2" from edge. Next, match the crotch seams of pant legs with right sides touching and sew from waist front top to waist back top. Sew using a straight and zigzag stitch 1/2" in. trim seam allowance so that edges are about 1/4'' thickness(pic10)
When the pants are sewn together finish bottom edge like you did the sleeves(pic 11 and 12) and put elastic in the top edge for waist(pic 13 and 14). For the elastic I made it 10" shorter than the width of the waist, so if the waist is 40'' make the elastic 30''. The last thing I did was put two zigzags down the back of the waist band. This was to secure the edges but also to help tell the back from the front like a tag.
Congratulations! If you have made it this far you are dressed for an adventure and just need tougher tootsies.
Step 4: My, What Big Feet You Have: Making Slippers


For my slippers I decided to use upholstery foam from Joann Fabrics. I purchased 1" thickness and 2" thickness the 1 is for the top the 2 is for the bottom. However, I cut the 2'' in half length wise to make 1'' soles so you could use 2 pieces of 1" and forgo cutting. If you choose to cut the foam, an electric turkey carving knife cuts best and most evenly.
* To start use a pair of shoes to decide to length of slipper you will need and trace around. Once shoe is traced draw a more exaggerated foot shape around shoe outline and add toes to top. It takes a little doing but these feet shapes can be cut out with sharp scissors, it helps to curve the edge around the toes and once cut snip between. Once you have the feet, cut the 1" square foam in half, this will be the top.
*Next, Glue the foot tops and bottoms together. I used hot glue which works okay but you have to place the glue and hold tightly until hardened. The best type of glue would be contact cement or any similar adhesive. Begin the gluing process by gluing the back edge together (pic 6) Once the back is glued work around both sides bit by bit holding firmly and letting dry completely in between each section. once back and sides are glued and secured glue top foot curve section to bottom toe section.
* When finished gluing and drying clip top section to match bottom creating toes (pic 13 and 14) Once toes are clipped between curve edges of toes and sides of feet by snipping with scissors to give rounded edges and make less squared. at this point you also need to cut a foot hole, I made the foot hole to the foam larger than the material to make getting in easier. I also added a piece of elastic to make the slipper tighter.
* Once you have a foot shape you like try them on the take a walk to see if they are comfy. If you like the shape and feel it is time to wrap them with fleece.
Step 5: Fleshing Them Out


To make Hobbit skin I used ivory fleece material I purchased from Joann Fabrics.
* I started by tracing the foot onto the material with a dark chalk pencil ( this can be done with a marker or whatever you choose to use) Once I had my outline I folded a piece of material under the drawn outline and cut the bottom most piece (which is actually the top of the foot) about an inch bigger then I cut the top ( which is the bottom of the foot) with a 1/2 " seam allowance. (pic 1)
* Once your pieces are cut pin them together around the foam shape making darts at the top and bottom to contour the material to the foam. (pic 2 and 3) As shown in the photos the pins are on the outside of the material. In order to make the cover for the foot you must gently remove it from the foam shape pulling the material off from the heel to the front. While pulling be sure not to rip the foam. if it is attached to the foam take the pin out while holding its place with your fingers then replace it. Once the material is inside out you must transfer the pins to that side. Once you have all of the markings on the side that needs sewn, sew around entire edge going slightly between the toes and leaving the back heel open wide enough to put the foam inside. (pic 4) Before placing the fleece over the foam cut the foot hole on top material big enough to get foot in.
* Once you have both feet covered the should look like pic 5. The next step is hand stitching. With the tread doubled over start by pulling the needle from the bottom of the foot between the toes (pic 6) Once through make a couple of stitches through the material for strength then wrap the thread around the top of the toe web to create individual toes (pic 7,8, and 9) Repeat this process until you have 5 toes on each foot.
* When you have ten toes close the back of the foot by hand creating the heel (pic 10 and 11) Then finish the foot hole by whip stitching around the hole and creating a braided look.(pic 12 and 13)
Step 6: These Feet Were Made for Walking: Finishing Touches


* To make the feet look furry I used a stiff brush and dry brown acrylic paint. To start I used small amounts of paint in a swirling motion with the brush. I painted the top of the foot and around the side and back of the foot hole. The last place I added paint was to the top of the toes where toe hair would be.(pic 1)
* To give thicker toe hair I made crocheted loop braids with a thread and needle and sewed them in place. Once I had all ten toes covered I went back in with paint and made darker spots at the toes and gave the illusion if thicker hair on top with paint layering.(pic 2,3, and 4)
* To make toenails I used mask latex. I did a thin layer of latex slightly tinted with brown paint and let it dry then I stippled a thicker layer of latex with no color with a sponge brush to give a thick misshapen look.(Pic 5 thru 8) Let the latex completely dry then wrap in a box together with the pajamas and blanket.
* Now you can start your adventure!

Participated in the
Sew Warm Contest


