

Introduction: Home Alarm Model 2


Like I promised a more clean cut version of my homemade alarm! This still isn't where I want it to be so keep looking for the third model!
Step 1: Materials


You will need 2 led lights Duct and electrical tape An alarm/buzzer Connecting wire A 9 volt battery A battery snap or band A chip clip 2 paper clips And an on/off switch
Step 2: Led Placement


Cut out the cardboard as big as you want it and poke four holes where you want the LEDs to go. Next put the 2 LEDs in.
Step 3: Battery Placement


Find where you want your battery and poke two holes right in front of it. Next connect 2 wires to the battery and stick them through the holes
Step 4: Alarm/buzzer Placement


Poke two holes right in front of where you want your buzzer and stick the wires through. Next tape down the buzzer.
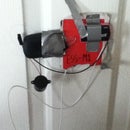
Step 5: Switch Placement


Find where you want your switch and poke out a rectangle a little bit smaller than the switch. Next squeeze the switch through and your alarm should look some thing like this.
Step 6: Wiring Phase One


Take one of the wires from the battery and connect it to one end of the switch. Next attach a wire to the other side of the switch and lay it off to the side.
Step 7: Wiring Phase Two


Take the other wire from the battery and connect it with two other wires. Next connect one wire to the LEDs and the other to the alarm.
Step 8: Wiring Phase Three


Attach a paper clip to each end of the chip clip with the tape. Next attach the wire from the switch to the top paper clip and lose wire to the bottom one.
Step 9: Final Wiring Phase


Connect the lose wire from the chip clip to two other wires. Next attach one of those wires to the other part of the buzzer and the other one to the other part of the LED.
Step 10: Remember


Be creative with how the alarm is triggered. I put cardboard between the clip and find ways for the door to pull the clip away. Also remember their will be yet another version of this alarm in the future.


