

Introduction: Home Baked Gel (Rechargeable) Battery


Right now there are over 20 different types, of future battery power being developed all over the world as we speak. It has literally been a few decades since we have see anything more powerful than lithium ion in mainstream usage. Lithium has also received bad press lately as the new technologies are so power thirsty, that lithium discharges too fast and literally turns into a volatile device capable of catching fire or even exploding. Lithium is also biologically, economically and environmentallly costly. It is an element used in medicine to manage depression and also powerful reducing agent - this is why it is utilsed for batteries, its oxidation/ reduction potential is very high when combined with other chemicals in a galvanic cell.
The instructable, focuses on a different take - yes everyone has probably heard of the lemon or potatoe battery which can be easily made - using a copper penny and a galvanised nail. You need a few cells for an L.E.D. to even think about lighting up!!! - Even homemade aluminium air battery's do not pack enough punch. Voltas pile may be able to at a push or with a joule thief attached.
Step 1: Tools and Material

An old 35mm Film Pot or something alike with tight fitting lid and plastic.
Dextrin - Or follow instructions for turning starch into dextrin.
Fine Aluminium Powder 250 mic
Aluminium Foil
[Any of these] Charcoal, Pencil Lead, Carbon Brush, or Purish source of carbon (Activated Charcoal).
Kitchen Roll or Jays Cloths
Cardboard Thin Bog Roll Tube
Sea Salt
Water
Wire thin Any Colour Tined or copper
Sharp Pin or long wood screw
Locktite 454 super bond glue
Step 2: Construction Essay


I have made many batteries for fun in my spare time and most recently a Carbon Aluminium, this time not an air battery but a sealed chemical based battery.
First of all I made several packages which worked well without being sealed. I found however degraded the Aluminium quickly, resulting in pitted breached packets with electrolyte leaking out. I could have hermetically sealed them if I had wanted but this is only experimental - and they still work well even after a week...
I then had a great idea!!! - I thought about how commercial batteries work and are constructed so I thought I would do some investigation & experiments oh my own.
Step 3: Battery Electrode Construction (Part 1)


Let's Begin.
Gelling Agent (Dextrin) is made by heating Starch gently on a grill or In a pan. I started off with a dessert spoon of Corn Starch. Heat for (15Mins) on a Medium hob Setting, stirring every min until it starts to turn a Straw colour and there is a noticeable odour of cooked toast. I found a combination of agitating the pan and scraping the bottom, all helped, as it can stick firmly to the bottom of the pan.
leave to cool for a while as the pan will be very hot!!! -Then take 20mls of water and a pinch of rock salt, dissolve salt in water to make strong saline solution, this is our Electrolyte.
Now mix gradually the solution with the cold powdered dextrin, until we have a medium grease / gelled appearance. Next take 5ml medium spoon of Aluminium powder and mix into the Dextrin Paste. See [images] for reference.
Step 4: Battery Electrode Construction (Part II)


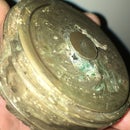
Take Your Container and Judge the Depth as we have to allow a 1/4" Air Gap for our contents and lid. Using a doubled piece of kitchen towel // Roll with a pen an 8mm tube now glue along edge- then take container and draw a circle then cut it out [image 2] . Now we glue tube to base.
Take a piece of foil, glue inside container with a few dabs of our mix, as it is a kind of adhesive too! Always maintaining 1/4 inch gap from the top.
Once we have a skin of foil in the bottom and side of our pot we can now proceed , with placing and filling of the tube - [Image 3 shows Some Graphite powder from a motor brush- Now the Tube can be filled and compacted. Once this is done our Anode is complete....[use images as ref]
Step 5: Combining Gelled Electrode to Pot


Once we have foiled the inner part of the container and placed the Kitchen towel Electrode with base inside and filled with Carbon, we now apply the gell between centre post and wall of the container.
Taking the back of a small teaspoon handle scoop a small amount of the paste (Ali/Dextrin) and pulling the centre post slightly on one side to increase the gap and aid the filling of the outer portion between the wall and centre Electrode. See images (1-4) stop filling when you are slightly below foil and avoid air gaps.
Step 6: Finishing & Sealing Electrode


We now take our container and draw around the bottom-onto a piece of cardboard, cut out disk and then try it's fit inside. Remove and fold disk in half and cut a small hole in the centre along folded edge, roughly 8mm - See images
- The next step is tricky -imagine putting your head through a tight jumper? The disk now resembles a washer, place this over the Centre Electrode so it pokes through the washer, then press down to meet the gel.
The Electrode is now capped and sealed.
Following from this step, we have a small piece of cardboard we have just cut from the center of our disk. Now we use this to cap the centre Electrode . Firstly we need a tight fitting hole with a diameter that suits the diameter of our wire, so it can go through, with a tightish fit!. I used lock-Tite 454 to stick it -as it bonds anything together..See (image 4) .
Before we seal the contain just put a few drops of Electrolyte on the carboard.
Step 7: Finishing Lid and Electrode Wires


Now we have all of our compartments inside are caped with cardboard - it is necessary to make a very small hole in our lid as this keeps the Electrode Wires steady. Needing to be reasonable careful, with a steady hand and some judgement - Make small centre hole in the Containers lid and pull wire through, it should not be too loose or too tight.
Make another hole the same way 1/2 in from the centre - I used a screw but you can use a hot needle. See images
Now before closing the lid, the central wire (+)slides into the small cap on the carbon Electrode and the outer wire goes between the outer foil and gell, this is the (-) Electrode. Close the lid taking up the wire slack as we do not want them to bottom out!
Step 8: Testing of the Cell


Now using a multimeter set on --....----....DC volts 1-2 - we should have a good reading - if you have nothing, gently take off lid and adjust Wires - I have always managed a reading of .650 - .805. ######Now~~~~~~~ for the interesting part ###### if we now take a low voltage DC supply/ wall adapter and touch the terminal together for only 30 secs we can triple this voltage for a few mins until it settles its voltage to a volt. I had a 2Volt led operating for nearly 10 minutes. I used a 12v 900ma DC wall adapter.
We can combine many cells for increased voltage and current, as the current is still quite low in one unit.
This is by no means ground breaking but it does show you what can be achieved with better materials and better methods
Please enjoy rate and comment all constructive criticism is welcome I G


