

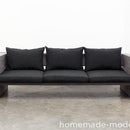
Introduction: HomeMade Modern DIY Puzzle Stool


The DIY puzzle stool shows off the RYOBI 6.1 Amp Variable Speed Jig Saw’s abilty to smoothly cut curves through 2 layers of ¾” plywood. These stools are great for children and can go in a playroom or nursery.
Step 1: Supplies + Tools

¾” Plywood
Purchase at Home Depot
There are many types of plywood with different laminations and surfaces. I used ¾” furniture-grade plywood with a sanded finish. I had 12” wide scraps left over from another project, but if you are going to buy plywood I would recommend doing it at Home Depot and having them cut the plywood into strips that are the width you want. A single 4’ by 8’ sheet of plywood cut into 12” strips is more than enough to build 2 puzzle benches.
Screws
Purchase at Home Depot
1¼” wood screws are ideal. It's possible to use longer screws and connect multiple pieces at a time, but you have to be careful to avoid gaps.
220 Grit Sand Paper
Purchase at Home Depot
1” Diameter Dowels – 48” Long
Purchase at Home Depot
1/2” Diameter Dowels – 48” Long
Purchase at Home Depot
Wood Glue
Purchase at Home Depot
RYOBI 18 Volt Cordless Drill
RYOBI 6.1 Amp Variable Speed Jig Saw with Speedmatch™
Step 2: Draw the Puzzle Pieces

I drew some nice curves on what would be the underside of the stools. Draw the pieces so they will interlock, but make sure the curves are not too tight for the jig saw. It might be a good idea to make some experimental cuts before finalizing the layout. I made my stool with 5 pieces, but you could easily get 6 or 7 stools out of two 8’ long strips of plywood.
Step 3: Align the Plywood and Screw the Two Pieces Together


Align the plywood strips and screw them together. I used 4 screws in each stool segment. Put the screws in on the same side that you drew the lines (i.e. what will be the bottom side of the stool) so that the screws won't be visible.
Step 4: Cut the Puzzle Pieces

A jig saw is a pretty easy tool to use. However, if you don’t have much experience, go ahead and make a few practice cuts before attempting to cut out the pieces. Go slow and steady and don’t be afraird to stop and brush away dust if you can't see your line.
Step 5: Trim the Corners

Cut off the sharp corners to make nicely rounded edges for the stools.
Step 6: Sand the Edges


I used a sanding drum attachment on my RYOBI Cordless Drill, but hand-sanding with 220 grit sand paper works just fine.
Step 7: Unscrew the Stool Tops + Drill the Leg Holes

Unscrew the layered stool tops.
Drill 1” diameter holes for the legs in just the bottom piece of plywood. I used 4 legs on the smaller stools and 5 on the bigger stools.
Step 8: Screw the Top Back Together

Screw the stool tops back together.
Step 9: Cut the Legs


Cut the 1” diameter, 4’ long dowels into four equal 1’ long pieces.
Step 10: Make the First Two Crossbars


The ½” diameter crossbars give the stool its stability. 3-4 will be adequate, but a few extras can make the stools sturdier and give it a more charming aesthetic. I lined up the legs two at a time and drilled ½” diameter holes through both. I then put the legs in the top and glued in the first 2 cross bars.
Step 11: Mark, Drill, and Glue in the Next Two Crossbars


Let the glue for the first two crossbars dry before marking and drilling the holes for the next 2 crossbars.
Step 12: Glue the Legs to the Top


Once the glue for the 3rd and 4th crossbars have dried, glue the entire leg assembly to the stool tops and put a board and something heavy on top to weigh it down.
Step 13: Sand and Check for Levelness

Once the bases have been glued to the tops, do a little finish-sanding. If the stools are not quite level, flip them upside down and sand down the longest legs until everything is level.
Step 14: Paint the Stools

Painting the edges of the stool tops can affect the ability to interlock them together. If you want to paint the edges, I recommend a little extra sanding to make sure the stools fit together loosely before painting.
Step 15: Done!


Good luck making your own puzzle stool and please email or tweet photos to @benuyeda or ben@homemade-modern.com. For more detailed instructions, dimensioned drawings and different variations of the project, check out our soon-to-be-released book.


