

Introduction: Laser Cut Hooey Stick


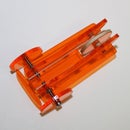
This Instructable describes how to make this ancient toy with a modern laser cutting.
For those among you asking: “what is a hooey stick”, I refer to this excellent Wikipedia article. You might know this toy who’s origins are lost in time under another name like Gee-haw whammy diddle, Ouija Windmill or a VooDoo Stick.
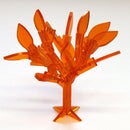
Rubbing the ridges with a pen or similar round object makes the “propeller” spin. Just a little practise suffices to make it work. Controlling the direction it spins is in the way you hold the hooey stick and is a somewhat more tricky.
Here is a short video of my youngest daughter Imme making it spin:
I dedicate this Instructable to J, for setting us AIR’s up quickly to do some laser cutting and always being ready to.
Step 1: Materials and Tools


Sheet material:
The hooey stick is part of a series of laser cut toys and gadgets that are supposed to make a one-sheet (or two-sheet) advent calendar. Only elastic bands and machine screws + nuts are to be added. For this project I chose 3mm thick acrylic sheet. But the design for this hooey stick is largely thickness independent. The minimum thickness is determined by what is needed to hold the screw and nut. I guess 1.5 mm should still do. And as long as the “propeller” does not become too heavy it will still work with a larger thickness, probably up to 5 or 6 mm will still work. I expect it will also work when cut out of plywood.
The minimum sheet size is about 13 by 3,5 cm or 14 by 2 cm with an alternative design included in the next step.
Axle:
The axle is made with an M3 machine screw (or bolt if you like), minimum 16 mm long (I used a 20mm one). A regular M3 nut is used to keep it in place.
Tools:
Obviously the main tool is a laser cutter connected to a computer. I had the luck to be able to use a new 120W Epilog laser cutter in the new workshop at Pier 9.
A tool to tighten the machine screw (like an Allen key in my case) proved to be optional as tightening by hand is sufficient and even preferred not to crack the acrylic.
Step 2: Design and Cutting


As usual I made the design in Inkscape. This Scaled Vector Graphics software is free and available on most platforms and as a portable app for windows. I save the design as a pdf to go to CorelDraw on the computer connected to the laser cutter.
I took the main dimensions of the ridges from another hooey stick build I learned from Allard. This type is made by stringing minimum 8 large pearls over a skewer. An elegant way to avoid cutting when making hooey sticks with young children.
But in this project obviously we use the laser for cutting. Very important is that sharp notches are avoided in the design, in particular at the ridges and at the cutout for the nut and machine screw. Otherwise the acrylic will break when using the hooey stick.
The trick behind a hooey stick relies on the “propeller” being unballanced. This is simply realised by over sizing the hole for the axle. Hanging on an oversized hole the “propeller” is actually out of center.
The way to make the axle is inspired by this Ible. The most important dimension is the opening holding the nut. It should hold the nut on its flat sides and not let the long diagonal from the hexagonal shape pass.
In the original “advent calendar” design I added some spanners, thinking of using hex head bolts through out the advent calendar. But actually these turned out rather fragile for practical use. So I switched to Allen hex head screws so I could ad a cheap Allen key when wrapping the advent calendar. For the hooey stick, a tool is actually not needed, as tightening by hand is sufficient.
Among the files added to this step, you will find an alternative design meant to save material and one continuing on that saving on cutting lines (and therefore cutting time) when making several hooey sticks at once.
The cutting parameters will depend on the material, the thickness and the laser cutter used, but for a common material like acrylic sheet (sometimes referred to as Plexi), the parameters are readily available in the manual of the machine.

Step 3: Assembly and Use


Both the assembly and use are simple.
First remove all protective layers from the laser cut parts.
Put the machine screw through the hole in the “propeller” and put on the nut on the end sticking through. Just screw it on for a couple of mm. Bring the nut and screw in the slot and tighten by hand. Done!
To use the hooey stick, hold the “handle” firmly by hand. Holding it firmly is the key. Again it is best to hold the utensil firmly and close to the part you rub on the hooey stick. You can actually rub it with your finger, put it will probably hurt more or less. Try and see what rubbing speed works best. You shouldn’t need excessive speeds.
Making the propeller turn is fairly easy. The “magic” is in controlling the direction it spins. This is actually determined by the way you hold the hooey stick. Experiment with fingers to the side of the stick and see how that works for you.
Have fun!


