

Introduction: Hooking Up a Kinect to Your Computer (Using Ubuntu)


I've been watching the Kinect hacks online for the past several months and really enjoyed them. I started thinking recently that I would kind of like to work with it myself, see what kinds of things I might be able to make and do, and decided to get a Kinect to play with.
The first thing I found was that there are a lot of different development platforms that all connect the Kinect to the computer in different ways. I also found out that all of these platforms were in different stages of development, and I don't think any of them are finished.
In the end, I found a lot of information about Kinect 1.2 running under Ubuntu, and felt that this platform gave me the most initial options for immediate enjoyment.
Trying to install, I found that the instructions that are given on the webpage (which are incredibly difficult to find), aren't really helpful in installing them on a computer, so after spending two weeks with google and three computers, I finally feel I've figured out the best way to install the working application. This instructable will be my attempt to convey that information I learned to you!
Step 1: An Operating System


For the purpose of this instructable, I installed all of my applications on the current version of the Ubuntu Operating system. So If you head over to ubuntu.com, and download the desktop version of Ubuntu 10.10 either 32 or 64 bit depending on your system hardware and you'll be ready to begin!
[Note: I have not tried this with Ubuntu 11.04 and can therefor not guarantee any of this will work within that OS]
Follow the directions on their page for installing either via a usb thumb drive or a cd (or your own preferred method). Once Ubuntu is installed on your computer, you're ready to move on to step two!
Step 2: Updating Your System

Now that Ubuntu is installed on the system, let's update it. It's no good trying to install thing while there's things being installed in the background. If the option doesn't come up automatically, go to the "System" drop down menu at the top of the screen, scroll your mouse over "Administration", and click on "Update Manager"
After all the updates have been installed, make sure you have whatever graphics driver is required for your graphics card. If you don't have the specific driver for the card, the default recommended by Ubuntu should be fine. A menu should automatically pop up in the upper right hand corner of the screen letting you know there's drivers to install. If that doesn't come up, click the "System" drop down again, "Administration", and then click on "Additional Drivers".
Step 3: An Intro to Terminal

Now that all of the system basics are installed and updated, let's get to the good stuff, Terminal!
If you click on Applications (in the top left corner of the main Ubuntu User Interface), drag your cursor down to Accessories, and then click on the Terminal application that pops up, you'll get a window that pops up with the text of your name, the computers name, and a :~$ afterward. This screen is where we're going to install all of our stuff.
apt-get is one of the main commands we're going to us, we use this to get applications over the internet and have them installed for us.
sudo gives us admin privileges on whatever command it precedes. To install things in Ubuntu, you need to have administrative rights, this allows us to have that.
Type, or copy and paste any commands I have in this instructable into Terminal, and hit enter after each one.
The $ indicated a new line.
Don't copy or write the $ in your code, it's already there!
Don't copy anything that has [ ] around it, these are notes to let you know what the code is doing.
Step 4: Time to Get Everything Ready to Build Your Application


I don't think you need to update your apt-get unless you add repositories (which I'm not going to cover here), but on my first run of a system, I like to run it for just in case purposes.
$ sudo apt-get update
[updates your repositories]
$ sudo apt-get install build-essential
[installs a set of applications that allows you to build your own programs and do many other things]
$ sudo apt-get install zlib1g-dev mesa-common-dev libgl1-mesa-dev libglu1-mesa-dev
[Reference Only! In case you're curious the functions of the programs I'm telling you to install, I plan to include a list of links to each application/library/package in each step so you know exactly what it is.
build-essential
zlib1g-dev
mesa-common-dev
libgl1-mesa-dev
libglu1-mesa-dev]
Step 5: Dependancies

Now that all the prerequisites to building programs are on your computer, we can work on installing all the specific things that are required by the Kinect and Vrui Programs.
Before I give you the commands, I want to let you know what each library is that you're installing.
The lib prefix on each of these items your installing indicate a library. You're installing the libraries associated with specific file formats so that you can use them on your computer.
The -dev at the end of each library let's you know you're installing the development library, each of these has a version without the -dev, but for our purposes, we need to have development access.
Imaging:
png12
jpeg62
tiff4
theora
Audio:
asound2
speex
ogg
openal
General Data:
dc1394-22
bluetooth
I don't think it matters in what order or how many of these you install, but to play it safe, I kept with the original directions.
$ sudo apt-get install libpng12-dev libjpeg62-dev libtiff4-dev libasound2-dev libdc1394-22-dev
$ sudo apt-get install libspeex-dev libogg-dev libtheora-dev libbluetooth-dev libopenal-dev
Step 6: Dependancies Part II


To build programs yourself in a Linux environment, you need to resolve dependancies first. The dependancies are those libraries and packages that the program you're installing depends on to be there. Everything we've done up to this point was to resolve all of those dependency issues so that we can do a nice clean install without running into any problems. Now that everything that will need to be resolved is, let's download the programs we're going to use.
Download Vrui-2.0-003.
[Sadly, I was working on this project pre-version 2.1, which you're welcome to try - but if you do, read the directions that come with it]
In Ubuntu, go to your home folder. If you click on the Places drop down at the top of the screen, you'll see a link to Home Folder.
Create a new folder titled: src [that's src in all lowercase] [right click - and click "Create Folder" to make a new folder]
Double click the downloaded Vrui-2.0-003.tar.gz [it should be in your downloads folder]
This will open up the archive in Archive Manager, you want to unpack what's in the archive into your src folder. So either go back to your folder screen in the background, and find and open your src folder and drag the Vrui-2.0-003 folder out of the archive into that folder. Or, click extract, when the dialog comes up asking were to extract to, locate your home folder (should be your log in name), and once there, double click on src. When Archive Manager has the src folder open, click extract. When it's done, quit.
Step 7: Building and Installing Vrui


From here on out, Terminal will need to be in different directories to do different things. To navigate in Terminal, you use cd (which stands for change directory). You can also use ls (list) to see what's in the folder you're currently at.
When you open terminal, it will default you to your home directory. Type in "ls" and you'll see a list of folders and documents that are in your home directory. Since we want to be in the src directory type "cd src" and your directory will change. If we type "ls" again, we'll see that there's only one folder here, let's open it, "cd Vrui-2.0-003". Finally, lets type ls again and see what we have.
If you want to read the read me, you can use the gedit program, type "gedit README". This read me file goes into some of the instructions I have given you here, and tells you how to do some other things you might be interested in (Like linking multiple Kinect's together).
From Terminal, if you ever need to go back to directories you were at, there's two methods. First, you can type "cd" with nothing else, and it will take you back to your home directory. The other method is to type "cd .." and it will only take you back one directory, a nice way of backing out if you several folders in and don't want to have to wade through all the directories again.
So, Now that we have the first program unpacked and in the correct folder, and we know our way around Terminal a little bit, it's time to build the application and install it.
Before we can start though, there's one last library to install. If we don't install libglu-dev we'll get a fatal error when we try to make.
[$ make
error:fatal error: GL/glu.h: No such file or directory]
$ sudo apt-get install libglu-dev
Now that that's complete, it's time to install everything. Go to the /src/Vrui-2.0-003 directory in Terminal, and use the following two commands.
$ make [builds the package that will be installed onto your computer, checks to insure dependancies and workability]
$ make install [installs the package you just built]
Step 8: Check Your Install


That's it! Vrui is installed! Now let's check it out and make sure it works. Make sure you're still in the /src/Vrui-2.0-003 directory before continuing.
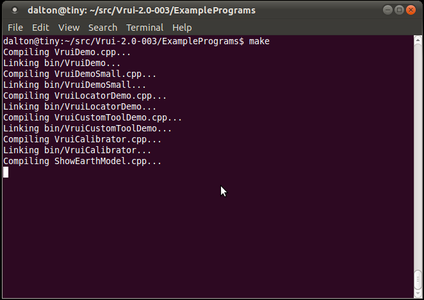
$ cd ExamplePrograms [change your directory to one that has example programs]
$ make [builds the programs so you can try one out]
$ ./bin/ShowEarthModel [opens one of the programs you just built]
Now we can see something, so let's test and ensure Vrui's working!
Controls within the application are as follows: [each command also requires the movement of the mouse]
left mouse - spins object on center of screen
z - pan
z+left mouse - zoom in out
z+left mouse+shift - dolly in and out
Use them to make sure you can navigate throughout the program.
Step 9: Install Kinect-1.2


Step 1:
$ sudo apt-get install libusb-dev
$ sudo atp-get install libusb-1.0-0-dev
Step 2:
Download Kinect-1.2 [Scroll to the bottom of the page]
Unpack Kinect-1.2.tar.gz to src folder [if you don't remember how to do this, look at the last paragraph in Step 6 - Dependancies Part II]
Open Terminal
Go to src, then Kinect-1.2 folder
$ make
Step 3:
$ sudo ./bin/RawKinectViewer > CalibrationData.csv [if you don't run sudo - can't open USB device - permission denied]
The commands here are the same as they were in Vrui.
Now that they are talking, you just need to calibrate things. There's an excellent video created by the author of this software, detailing exactly how to do that, following this link.
Step 10: Finished!


Now everything is installed, and should all be working. You're Kinect and computer should be talking and you should be able to see what your Kinect sees on your monitors display.
Now you know how to install one type of Kinect Software, but there's a whole lot of other ones on the market. If you managed it through this, and understood why you were doing things, you should have no trouble with any of the other packages if you want to try them out.
With all of this completed, and talking back and forth, now you just have to figure out what you want it to do! And for that, I leave it up to you. Though I'll leave you with some things that the author of this software has worked on/is doing.
Best of luck!
Step 11: Additional Information


Since figuring out how to do this, I've installed several different versions of Kinect software on different computers.
OpenKinect (I made another instruction talking about this) and a Processing extension have both been incredibly helpful to me. Both have excellent installation instructions and detailed information on what you can do once installed. I learned a lot about the functionality and what I could really do with the Kinect through the Processing extension.
When I originally started working on this project, I wanted to use multiple Kinects to create 3D rendered models. I choose this application because the author had already used it for such a purpose and provided instructions on how to hook multiple Kinect streams together. I've since found a fantastic demonstration of someone streaming kinect data in real time to Blender.
OpenNI and OpenCV both came highly recommended by friends, though i never got around to using either of them.
If you have any additional suggestions on software or resources, please leave a comment. I'll do my best to add them to this step so people stumbling upon this in the future have some useful information.


