

Introduction: How to 3d Print Key Copy From Photos

So Im Going to show you how to d print yourself a new key, either for fun or practical reasons.
Can be used to print off a snapped key (Looking at All the Motorbikers out there with half a key in their petrol tank)
You will Need:
A decent camera with macro or good up close quality
A CAD Program, I show steps for solidworks but the same principle works on most programs.
And a 3D printer or a friend with one (To have something printed try ebay for a printing company, saved 75%)
and of course a key.
Step 1: Take Good Photos of Key

This is the photo i used, as you can see it is a small padlock key as an example.
To save yourself hasssle later try and get even light and have the camera direcly pointing down over the teeth,ie not at an angle.
also try and get all shadow away from teeth so there is a nice sharp edge.
Step 2: Open Solid Works an Import Photo


Start a sketch on the top plane and goto the search bar and search "sketch photo" and import your photo.
Press F and the photo should resize.
From here you need to scale it.
the best way is to either have something in the photo like a ruler, or have something to reference,
you can see I reference the length of the indents.
the important thing is to have a good reference and angle of the photo, try using a coin and then you can use the cicrumference if you dont have good calipers, google for circumference
Step 3: Trace Outline


there is a good tool in solid works to do this automatically, but for the sake of people using other prgrams, just out line the teeth as well as possible using sketch tools. The more detailed you are the better but try and keep all lines parrallel with the bottom. you also need to account if your photo was at a bad angle of any perception, you can avoid this entirely if you scan the key with a printer/scanner
Step 4: Now Extrude


Extrude your sketch to hight, mine was 2mm high so click boss/ extrude
Step 5: Add Indents


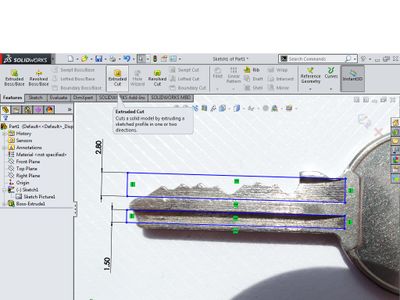


Draw 2 rectangles over the indents in photo, measure hight and input using smart dimension, move reca#tangles as needed.
Now click extruded cut and measure the depth of the cutouts, mine were 1mm so input that and make sure the cut direction is correct.
check preview and click ok.
Step 6: Fillet Corner


I had 2 rounded corners so i Select those 2 and click fillet, i did this visually till it looked good as it doesnt have an effect on the working of the key
Step 7: Double Check


Have a look and verify it ll looks ok, Mine Didnt!
I noticed a thin wall that wont be good to print,
so i went back into the original sketch picture that lets you edit the outline.
This is why i love solid works, Pull out the small inperfection and the rest of the model gets updated automatically.
Step 8: Export As Stl


Make sure When exporting you select the correct "Working Units"
Click save as and select file type as .STL
Click options and under units make sure that is set as whaat you were working in, for me i work in metric MM so select that and click ok
Then Click save
Step 9: Ready to Print

Either Send your final file to a company or load it into your 3d host program (repetier for me using a davinci 1.0a)
verify it all looks ok slice and click print!
NOTE the key i have has 1 flat side, if yours has 2 sides with indents follow the same process but indent on the othe side of model and you will need to edit your print settings, i would recommend slicing it in half and gluing after the fact.
Step 10: Done


take your key off the print bed and clean it up.
All i needed to do was take off the brim and it worked like that.
Printed at .2mm layer hight 90% infill with black ABS.
and Yes It did work, you can see how the edge is near enough spot on just a little less sharp due to my printer calibration.
Try it it could save you have to call a lock smith if you leave one in your garden, or if you have snapped the key place the pieces side by side and get yourself out of a jam.
The print took 7 mins and used 30cm of 1.75mm abs

Participated in the
3D Printing Contest


