

Introduction: How to Germinate Lilies


Sorry, some of the photos aren't mine because I started this process last year and
didn't know I'd be doing an Instructable. The photos are only to aid in the
process.
Lilies are perennials that grow from a bulb. But you can force a lily to grow a
seed pod filled with up to 100 seeds you can plant and have a whole bed of
beautiful lilies. It's really not a difficult thing to accomplish. So let's help
out the bees and start pollinating!
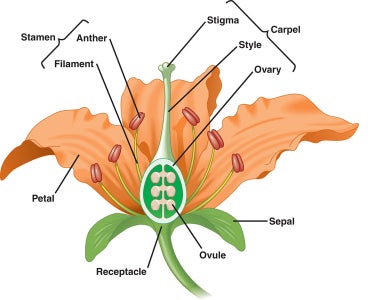
First, you need to know the anatomy of a lily. You can see all the reproductive
parts of the flower in the picture. The main parts you need to recognize for this
is the anthers which hold the pollen, and the stigma which is where you're going
to put the pollen.
Step 1: Tools


You need to start off with 2 healthy lilies like the ones shown below. They should
already be established and disease free. Also a pair of regular old tweezers, a
butter knife or similar, a pencil, a 1" square of tin foil, some vermiculite (can
be purchased at Home Depot, Lowes, Garden Center, Walmart etc.) and a plastic zip
lock bag.
Step 2: Decide Who's Who
Decide which flower is going to be the mommy and which is the daddy. You will use
the pollen from the anthers on the daddy to pollenate the stigma of the mommy.
Hopefully it will catch and you will grow a seed pod!
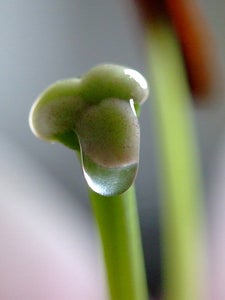
Step 3: Pollination
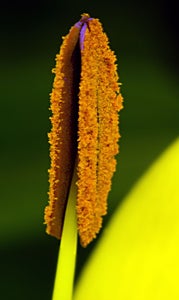

Very carefully with a pair of tweezers, pull an anther off of the dad flower.
Scrape off some of the pollen onto the stigma. The stigma should have some sticky
clear nectar coming out of it to help the pollen stick.
Step 4: Protect the Momma
Mold the foil over the eraser of the pencil so you have a little foil cup. Place
the cup over the stigma. This step helps to insure the pollen you have placed
there won't blow away or be carried off by an insect. It also helps the stigma to
be free of contamination or other pollens entering. You can leave the foil on for
the rest of the season, it will not hurt or effect the growth cycle.
Step 5: Pluck the Pod


After the season is done and the petals have fallen off, you'll notice a second
growth. It will kind of look like a deformed bud. The first time, I thought it was
a second flower growing but it was the seed pod. Leave the pod on until the end of
the summer so the seeds get as much nutrients as possible. When the pod is ripe
pick it off the flower and bring it in the house. Very carefully open the pod and
extract all the seeds and put them into a labeled paper bag or envelope. Put them
away in a safe place until next spring. :-( I know, waiting is hard but it will be
spring again before you know it.
Step 6: Start the Process
Miraculously it's spring again! Take out your seeds, vermiculite, and zip lock
bag. Put a few handfuls of the vermiculite into the bag and moisten it. Take care
not to put too much water. It should be like if you wet a sponge and squeezed all
the water out. Not dry, but not exactly wet. Throw the seeds in there and zip it
up. Place in a warm dry place preferably with some sun light and check on them every day for sprouts.
Step 7: Plant the Sprouts

When your seeds have sprouted, and after the last frost, take each one and plant
it the way you would any other new plant. The sprout should be above ground to get
light so the bulb can start growing. It would be a good idea to add compost to the
area for extra nutrients. You don't want to fertilize this year they're too
fragile.
Step 8: Enjoy!

Enjoy your beautiful, FREE lillies.
Participated in the
Get in the Garden Contest


