

Introduction: How to 3D Print Onto Fabric


You can combine 3D printed designs with fabric to create exciting new textiles. It's a really interesting process that has a lot of possibilities still to be discovered. In this Instructable, I will show you how to print on three different kinds of fabric: power mesh, heat-sealable nylon, and cotton/poly broadcloth. 3D prints on power-mesh can be seen in contemporary projects. The heat-sealable and woven cotton/poly is what I chose to experiment with, I particularly wanted to figure out how to print on a woven fabric. Some things didn't work but some worked beautifully. I show you what did and go over some of what did not.
The printer I use is a MakerBot Replicator 2 with TPU (flexible) filament from Sainsmart. PLA can be used for all of these techniques except I found that it did not stick to the heat-sealable fabric I used. I encourage you to try it out on other heat-sealable fabrics and report back. :)
It's a technique that has been explored all over the world and has been discussed and experimented with for longer than you may think. There is still much to be explored so follow along and get hooked!
Step 1: Choose Fabric


Here is what I have found to be true - in order for the 3D filament to stay on fabric it either needs to be perforated or be coated with a hot-melt polymer (although not all coatings work with all filament).
Netting and Meshes
The perforated fabric can be a mesh or netting. The fabric is placed in between layers of printed filament making contact and bonding with itself through the holes in the netting or perforation. The fabric then gets locked in and your print stays on the fabric. In this Instructable I use power mesh. I link to other fabrics that will also work, some may take some experimentation.
Heat Sealable
Heat-sealable fabrics are coated with a polymer that bonds to itself when heated up. This is for creating clothing and soft goods without the used of a sewing machine. It's especially good for items that need to be air or water tight. Since the fabric has a hot-melt polymer coating on it the hot filament heats up the coating and bonds with it when printed on top of it. In this Instructable, I use Seattle fabric's 30 denier heat-sealable coated nylon. They have other heat sealable fabrics that may work.
Woven Poly Blend
The only way I have been able to get a print to stay on a fabric that is not a mesh or that has a coating is to create holes with a laser cutter. This is best done with a poly blend so as the laser cuts it seals the edges, preventing the newly created mesh from fraying over time. In this Instructable, I use a cotton/poly broadcloth.
Step 2: Choose Filament

TPU is used in this Instructable but PLA, ABS, and NinjaFlex have also worked well except PLA doesn't work with the heat-sealable fabric I used. TPU is a nice flexible filament in contrast to a hard PLA. TPU is used for the snap design I include. The flexibility of the TPU is needed so the socket half can flex to allow the stud to snugly fit. I believe the design can work with PLA if the tension allowance is adjusted or the walls are thinned out to allow for flexing. The .step files are included in under Materials in case you want to modify the design.
Step 3: Gather Materials

Attached is a snap design for you to use throughout the instructable. Alternatively, you can follow along with your own design. Included in the download are the printable .stl files, .step files if you would like to modify the designs and .x3g files if you would like to go straight to printing on the MakerBot. When you download the file and open it up you will see there are two endings on each half of the snap design: Snap3 and Snap3C. The design is made of three snaps spaced one inch apart and the "C" means coaster which is the design for the laser-cut woven Cotton/Poly fabric, I explain why later on. The illustrator (.ai) file is the cut file for the laser.
Materials
- TPU, PLA or another filament
- Mesh, netting, broadcloth or heat sealable fabric
- blue tape
- scissors
- ruler
- laser cutter (if using broadcloth)
- desktop 3D printer (MakerBot's Replicator 2 is used in this Instructable)
Attachments

Step 4: Settings and Export


Open a design in the MakerBot software and plug in the settings below depending on the filament you are using. Everything is a default setting unless mentioned below.
TPU
- Infill: 75%
- Temp: 220 ºC
- Speed while extruding: 80 mm/s
If using PLA, ABS or MakerBot's flexible filament you can choose MakerBot's default settings.
Export the design file and put it on an SD card or connect your computer to the MakerBot via USB.
Step 5: Cut Fabric


Cut a piece of fabric that is a little smaller than the printable area. The MakerBot Replicator 2 has a printable area of 9.7” L x 6” W. I cut my swatches to the dimensions of 4.5" x 6".
Step 6: Laser Cut (Woven)


To create a mesh I cut holes with a 1.5mm diameter placed 1.5mm apart. The snap design for the woven fabric gets a raft at its base in order for it to properly bond to itself. The small diameter of each snap did not stick with various laser designs I tested which you can see below. The successful design is on the far left which was the only one that was able to hold onto the fabric. When creating the perforated design make it span the whole footprint of your 3D print design. If working with small diameters you too may need to create a thin raft for the design to sit on.

For a 120-watt laser cutter use these settings to cut your perforated design:
- Speed: 90
- Power: 15
- Frequency: 500
Step 7: Print and Sleep


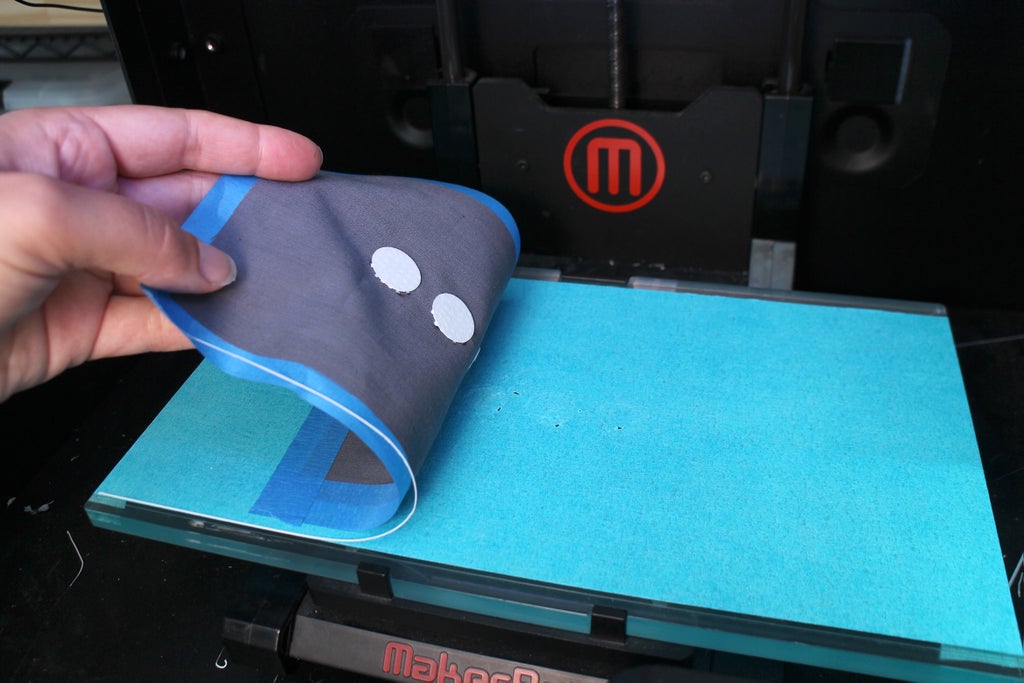
Fire up the printer and get your design onto the printer either by using an SD card or connecting your computer to the printer via USB cable. Grab your fabric swatch and blue tape and keep them close by. You will need them shortly after the print starts. The trick is to pause the print and put the fabric on top and resume the print.
Start the printing process and watch closely. A soon as your design starts printing navigate to the Sleep(Cold Pause) option in the MakerBot menu and be poised and ready to select. Wait until the print is on its 2nd layer or about 1 - 2 millimeters thick the hit the M button to Sleep.
Sleeping the snap with coaster design.

Step 8: Place Fabric


Place your fabric on top of the print. If placing a laser cut woven, center the print base with the laser cut holes.


For a stretchy mesh, like the power mesh, tape one side down then slightly stretch the fabric while you tape down the opposite side. Repeat and stretch it in the other direction to make the fabric slightly taut. Once you start printing this may take some experimenting with to get right. 
Step 9: Finish Print


When the fabric is in place choose to Resume Build. Be ready to tweak the platform distance from the nozzle by twisting the three knobs under the platform a quarter turn at a time to lower it. Whether you need to and how far will depend on the thickness of the fabric you are using. You will get a feel for this as you do it more. I usually do a quarter turn or less with the power mesh if I feel like the filament looks like it doesn't have much room to extrude properly.
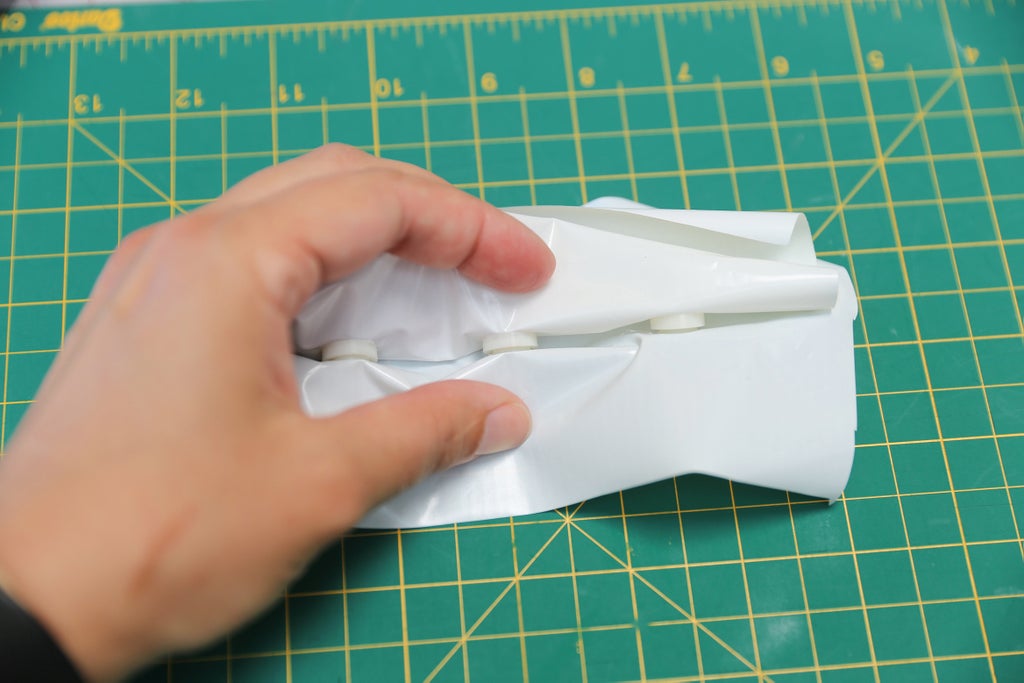
Allow the print to finish. If using the snap design repeat the printing process for both sides. When finished, remove the tape and print. You may need a sharp spatula or paint scraper to free up the bottoms of the print.

Step 10: Finished!

If you used the snap designs you now have your very own snap fabric!


Step 11: Printing on Heat-Sealable Fabric


Printing on heat-sealable fabric is even easier than printing on a perforated fabric. This is because the step of printing before laying the fabric down is not necessary. The filament bonds to the polymer coating on the fabric. The TPU bonded beautifully and created a very strong connection. However, when I used PLA it did not bond with the polymer well enough to use in the future.
Tape down the fabric onto the platform and adjust the height of the platform a smidge to compensate for the thickness. Load your print and hit go! The print stays really well on the 30 denier nylon I link to in this 'ible from Seattle fabrics.

Step 12: Experiment!


This technique has the potential to make beautiful and practical pieces. I'm certainly still exploring and I hope it sparks your creativity too! What will you make?


