

Introduction: How to Build a "Cheap" Gaming Computer

Have you ever been interested in getting involved in PC gaming, but been hesitant to drop $2000+ on a top of the line gaming rig? PC gaming truly is a magical world with far more customization, better performance, and cheaper games when compared to typical home consoles. However, buying a brand new PC that's strong enough to run the latest games can be incredibly expensive and off-putting to the average person. Luckily it isn't hard at all to simply build your own. This instructable will walk you through the process of building a relatively inexpensive (sub $1000) gaming PC that can max out any current video game. This guide is intended for beginners and it shouldn't take any more than 3 hours to complete the build from start to finish.
Step 1: Components and How to Choose Them


First things first, you actually need the required components in order to start assembling your system. There are multiple retailers where you can buy separate computer components. Some of the biggest retailers are Newegg, Tiger Direct, Amazon, or Microcenter.
In order to start building you need the following parts:
• Computer Case
• Motherboard
• Processor
• RAM
• Power Supply
• Hard Drive
• Video Card
• Optical Drive (optional)
You'll also want a few tools around as well:
• Magnetic screwdriver
• Anti-static wristband (recommended)
If you simply want to follow this instructable to the letter and use the same parts as my build, I have them all listed below
• Antec 900 Case
• MSI Z68-GD55 (B3) Motherboard
• Intel Core i5-2500K Processor
• 8GB GSkill Ribjaw RAM
• Corsair TX650 Power Supply
• Samsung Spinpoint F3 1TB Hard Drive
• EVGA Geforce 570 GTX
However, if you want to actually customize your own PC, there are a few rules you want to keep in mind when selecting parts. Make sure to take a look at the socket type on your motherboard, and also whether your motherboard is Intel or AMD. Make sure that these specs match those on the processor you're looking at. Also make sure that your power supply meets the minimum wattage requirement for your video card. Ars Technica's system guide and the Falcon Guide both do an excellent job of showing various parts that fit together for various price ranges. I recommend consulting these if you need help choosing specific parts for your build.
Step 2: Installing the Processor


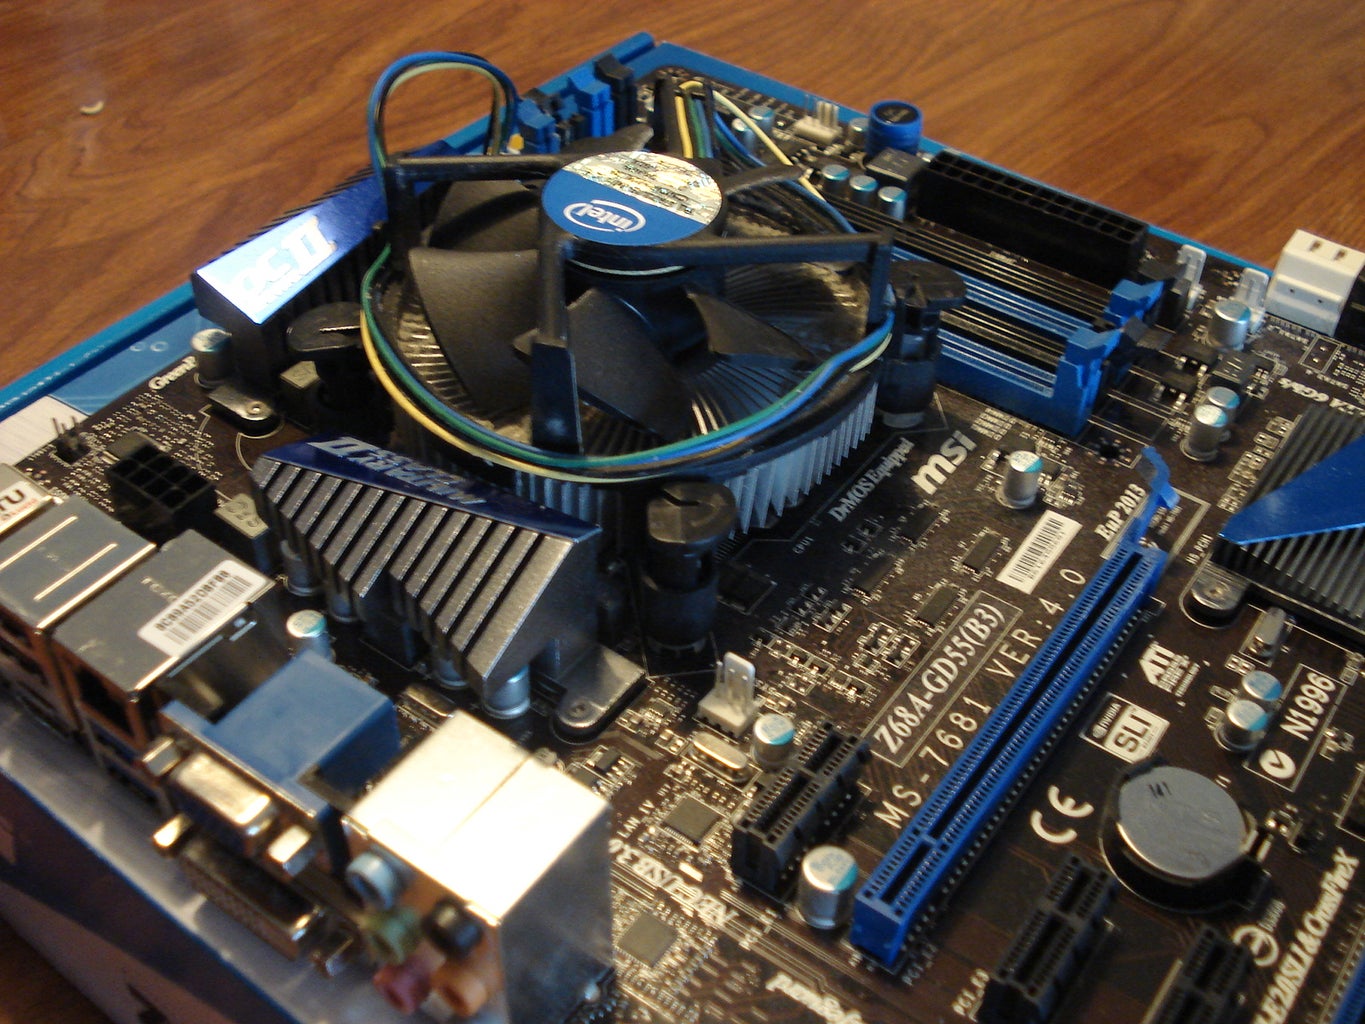
It's easier on your fingers if we start by installing components into the motherboard while it's still outside of the case. The first step is plugging the processor into the motherboard.
CAUTION!!!!: Avoid working near carpet or anything else that is notorious for building up static charge. Static electricity will cause problems and will ruin your expensive components if there is a discharge into electrical components.
TIP: Keep your computer case or any other metal object nearby. Touch the case to get rid of any small static buildup you have accumulated before working on any of your parts. You may also choose to wear a anti-static wristband or anti-static gloves to alleviate this problem.
1. Lift up the motherboard's processor crossbar and open the processor shield.
2. Seat the processor over the pins on the motherboard.
Most modern processors have a symbol (in this case an arrow) that tells you how the processor should be oriented. Consult your processor's manual for further information on how it should sit in the motherboard.
3. Close the processor shield and lock the crossbar into place.
TIP: When you are trying to lock the crossbar you may find you have to put large amounts of pressure on it to move. This is normal. It may seem like you are putting too much pressure on the processor, but the shield is designed this way so the processor has no chance of falling out. This doesn't mean you should excessive force when locking the shield down however.
Now that the processor is correctly seated and in place we need to attach the heat sink.
4. Seat the heat sink over the processor shield, with all four pins over their respective openings.
Note: In this guide I am using the stock heat sink that came with my processor. The stock intel heat sink has a cooling pad underneath. If you are using an aftermarket heat sink you will most likely need to apply thermal compound over the processor. Consult your heat sink's manual for further information.
5. Push all of the pins down until you hear a distinctive click.
6. Connect the heat sink fan wire to to the motherboard.
If the fan pin isn't in the same location on your board check the manual to see where it plugs into.
Step 3: Installing RAM


Next we install the RAM modules onto the motherboard. You can continue to work with the motherboard outside the case for this step as well.
1. Open the tabs on each RAM slot.
2. Look at the small gap on the bottom of your RAM module. Make sure that this slot matches up with the small bar in the RAM slot before seating the sticks.
3. Insert the RAM module and push down on both sides until each tab clicks into place.
4. Repeat steps 1 through 3 for each stick of RAM you purchased.
RAM is usually purchased in pairs of dual channel modules. When installing RAM, keep any pairs in slots of the same color on the motherboard.
Step 4: Installing a Hard Drive


We're done working with the motherboard for a moment. We're actually going to be installing parts into the case now so you'll want your screwdriver ready. Next is installing your hard drive.
1. Locate a 3.5" bay inside of your case.
TIP: When choosing which bay to use keep in mind how many hard drives you plan on using. Try keep at least 1 empty bay slot between hard drives to reduce heat build up.
2. insert your hard drive into the bay with the connectors facing the inside of the case.
3. Insert screws on either side of the bay to lock the hard drive in place.
Step 5: Installing an Optical Drive (optional)


With the prevalence of both USB and digital distribution, optical drives are hardly necessary. Installation is fairly simple and can add some extra utility to your computer, so I will cover their installation anyways.
1. Locate a 5.25" bay inside of your case
All CD and DVD drives are sized to fit inside of these bays.
2. Insert the drive with connectors facing towards the inside of your case.
3. Insert screws into both sides of the bay to lock the optical drive in place.
Step 6: Installing the Motherboard


Now we are finally going to be installing the motherboard inside of the case.
1. Remove the side panel from your case.
Side panels are typically connected with thumbscrews so a screwdriver is unnecessary for this step.
2. Line the screw holes on your motherboard with the standoffs inside your case.
The case should have standoffs already in a position that fits the screw holes on your motherboard. If they don't match up, or don't come installed in your case, use your hands to install standoffs into the proper locations inside your case.
TIP: When putting the motherboard inside of your case, space may be tight. Try angling your motherboard down and lining up the ports on the motherboard with I/O shield on your case, then tilt the other down into place.
3. Insert screws through the holes in your motherboard, into the standoffs inside your case.
TIP: It isn't necessary to insert a screw into every motherboard hole, but I recommend using at least 6 screws to be safe.
Step 7: Motherboard Connections


At this point there are a few things that can be connected inside of your case. It's much easier to perform this step now instead of later. The video card and power supply take up a lot of room and make it much harder to work inside the case. There are 2 different kinds of connections we'll complete in this step.
SATA Connections:
SATA is an interface that is used to connect some components to your motherboard. The two components that are connected via SATA in this build are the hard drive and the optical drive. First find where the SATA ports on your motherboard are located by checking with your manual. Your motherboard comes with a few SATA cables and they are pretty easy to use. Simply connect one end to the SATA port on the motherboard, and then the other end into the SATA port on the component you want to connect.
Case Jumper Connections:
Jumper cables are used to connect certain features on your case to the motherboard. For example, one jumper connection is used to connect the case power button to the power feature on your motherboard There is no standard that's used with jumper connections, so it's best to consult your motherboard manual to see how they should be connected. Typically you only need to connect the power button jumper, and then jumpers for additional usb ports located on your case.
Step 8: Installing the Video Card


Video cards are quite bulky these days. Now that almost all of the components are installed, we'll go ahead and put this in too. All modern graphics cards use PCI-Express as the slot type, so that's what this guide will be following.
TIP: Try to keep the video card away from any other components or expansion cards inside of your case. Video cards can build up a tremendous amount of heat, more so if they are near other components.
1. Find a PCI-E slot on your motherboard.
2. Remove the back plate on your case that corresponds with the slot you have chosen.
3. Line up the connectors on your video card with the slot. Gently push down until you hear a click.
Most video cards have a locking mechanism tab that makes the clicking noise. If you want to uninstall the card, make sure to pull the tab back before removing the card.
4. Reconnect your case's back plate.
Step 9: Installing the Power Supply


The power supply is the last component that you have to install before your build is complete.
1. Find where the seat for the power supply is inside of the case.
Some cases have a slot towards the top where the power supply sits. Many modern cases have moved this spot to the bottom like in the case I am using.
2. Line up screw holes in case with holes on power supply.
3. Screw power supply to case.
After these steps you'll want to gather up all of the loose cables and place them outside the case. This makes it far easier to make connections in the next step.
Step 10: Power Supply Connections


At this point your computer is almost complete. What you have should look similar to picture 1. All of the components are installed, all you have left to do is make all of the power supply connections. All of the cables on your power supply are labeled so all that remains is to plug them into the correct locations. There are four main connections that you absolutely have to make.
• CPU connection
• Motherboard connection
• Video Card connection
• SATA connections
These components all require power from the power supply to function. The pictures below show some examples of where these connections are located. Considering that no two parts are exactly the same, you should consult your respective manuals for information about where the power input is located.
Depending on your case you may have extra fans that require power to work as well. For these connections you simply use the auxiliary power connectors on your power supply.
Note: Auxiliary connections are completely optional and are not required to get your computer to run.
TIP: Full tower computer cases allow for much better cable management. In a mid tower you can only really stuff cables into unused bays, but full towers have slots that allow you to run cables behind the motherboard for a much cleaner build.
Step 11: What's Left to Do?

Congratulations on assembling your first computer. The hard part is over but you aren't quite finished yet. You still have to install an operating system onto your hard drive in order to actually use your brand new computer. The steps on how to accomplish this will be covered in a future instructable that walks you through the process of actually setting up your new gaming PC. For the moment you are one step closer to leaving console gaming behind and joining the PC gaming community.


