

Introduction: How to Design and Laser Cut Display Shelves for Miniature Models


In this tutorial I show how to design three different types of display shelves in Adobe Illustrator and cut them on a laser cutter. I talk about how to fuse acrylic, and how to create a design portable shelves that can be assembled without using glue.
Step 1: Tools and Materials


Tools:
Access to a laser cutter
Design software (I use Adobe Illustrator)
Saw and sander (for acrylic rod)
Solvent cement (I use Weld-On)
Acrylic polish (to clean and remove static from finished shelves)
Materials:
Clear acrylic sheet (1/4" and 1/8")
Acrylic rod (1/2")
Step 2: Design Pedestal Shelves


The first of my three types of shelves are pedestal shelves designed to highlight a small group of models. This example has five pedestals, with a center focal point that is lower than the other four.
The base can be a variety of shapes; this one was created using a pen tool, but a simple rounded corner rectangle would do just as well.
I put blue engraved 1/2" circles in the correct locations, to make it easy for me to fuse the pedestals in the correct places. The engraved circles are easier to lay out if you turn on the grid and use smart guides to manage the spacing.
I designed a single pedestal top to be slightly larger than a standard 35 mm mini-figure base, and it too has the blue engraved circle. I always design a single element and use the laser cutter's multi-cut option to create multiples because that let's me lay out the multiples to get the best fit on my acrylic sheet. I am often using acrylic that has been cut in a prior project, and this flexibility helps me get the most out of my acrylic inventory. I also always cut an extra part for every small piece, just in case.
Both the base and the pedestal tops are cut out of 1/4" acrylic sheet.
Step 3: Design the Standard Fused Shelves


The design of the fused shelves is a basic tab and slot system. The only complication is the variability of the thickness of a sheet of acrylic; a single sheet's thickness can vary significantly from one spot to another. I use cell cast acrylic, and it is superior to extruded in many respects but its greatest weakness is its thickness variability, which is greater than that of extruded sheets.
This means that experimentation is required to find the best slot size, and every sheet needs to be measured to see how well it conforms to the target thickness. Expect to run into some issues, and be flexible in addressing them. In my experience, if you get a decent fit between the tab and the slot, you can successfully fuse them together and have a very sturdy structure.
I always make the tab a little longer than the thickness of the sides. This provides a small ridge that makes it easy to apply the fusing liquid during assembly.
Another design option for standard shelves is to create stepped shelves with graduated shelf depths. In my example here I rotated one side and fit the two together, to get more efficient use of my acrylic sheet.
All of my standard shelves use 1/4" acrylic for the sides and 1/8" for the shelves. Shelf widths longer than 12" tend to sag in the middle, though, so wider shelves are best cut in 1/4".
Step 4: Design the Portable Shelves


The portable shelves are similar to the standard fused shelves only they are not fused - they rely on pins and shelf backs for their stability. The advantage of portable shelves is that they can be set up and taken down easily, making them suitable for travel or taking to your local game night.
The pins are designed to slide into holes on the shelf tabs and lock in place. The shelf backs are cut in 1/8" acrylic, and have downward hooks that slide into upward hooks that have been added to the shelf sides.
The pins are cut out of 1/4" acrylic, and I sandwich them into the gap created in the cut sheet by the hooks on the side. Always trying to optimize the use of my acrylic!
Step 5: Cut the Shelf Parts


Most of the shelf components cut quickly and easily on the laser cutter. The acrylic rod, however, is cut using a saw. I use a band saw, which does a pretty good job but can leave a small burr. I remove this by touching the end, very quickly and carefully, to a sander. You have to be careful because the heat of the sander will make the acrylic melt and leave the part worse than when you started! When you fuse the ends during assembly any striations you see will disappear.
Always be careful to keep the cut perpendicular to the rod length because any deviation will make the pedestal lean slightly.
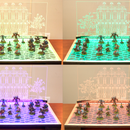
Step 6: Assemble the Pedestal Shelves


Four of the pedestals are taller and the center one is about an inch shorter. This provides good visibility to all models and a focal point that is usually reserved for the squad leader. Notice I cut an extra of each size!
First I fused the rod to each of the pedestal tops, using the engraved circles for guidance.
Then I fused each pedestal in place, using the circles on the base for guidance. This whole fusing process takes about 10 minutes to complete.
Step 7: Assemble the Standard Fused Shelves


Since there is a little bit of wiggle room in the tabs and slots (remember the 'variability of acrylic' discussion), it always helps to have a second pair of hands hold the shelves firmly and squarely while you run solvent cement along the ridge on each tab. The fluid will wick into the gap and create a permanent bond in minutes.
Step 8: Assemble the Portable Shelves


I find it easier to put the shelves on their side and put the pins into the top side's holes. Then I set the shelves upright and put the pins in the other side. The final step is to slide the backs on the hooks. The pins hold the shelves together but it is the backs that really keep the shelves square.
Clean your shelves with an anti-static acrylic cleaner, to discourage the lint that acrylic naturally attracts.


