

Introduction: How to Design and Make a Legend of Zelda BoTW Wall Quilt


In this Instructable, I show how to use a vector drawing program (I use Adobe Illustrator) to design a wall quilt, how to use that drawing to create templates (I laser cut mine) and how to use the templates to applique and quilt a wall quilt.
Step 1: Tools and Materials


Tools:
Vector drawing software (I use Adobe Illustrator, Inkscape is a free option)
Sewing machine (capable of blanket stitch, free motion stitching)
Walking foot (recommended)
Access to a laser cutter (optional)
Materials:
Quilting fabric (I used batiks)
Wonder Under fusible interfacing
Stabilizer
Invisible thread (I use Sulky Premium)
Batting (cotton, thin)
Quilting spray (optional)
1/8" acrylic for templates (or card stock)
Step 2: Draw the Main Motif: the Shrine


I imported a reference photo of my main motif: one of the 120 shrines that are in the Legends of Zelda BoTW video game. I drew all the main components of the shrine, with each component on a different layer of the drawing. This gives me complete flexibility for how I combine these images when I draw the templates.
I draw each component by first outlining it and then filling it to simulate how it will look in the quilt. The irregular shapes are outlined using the pen tool (I have some in-depth tutorial videos on how to do drawings in Adobe Illustrator if you would like more information) -- that is how I drew the outline of the shrine itself.
Some components, like the base, are drawn using the ellipse shape tool and the pathfinder tool. Most of the components, however, are drawn with the pen tool.
As I draw, I turn off the finished components, to make it easy to see the reference photo underneath. When all the components are drawn, I turn them all on to see the total effect.
I know, even at this early stage, that the most difficult part of this project will be to recreate the rocky exterior of the shrine (I call this the 'noodles'), which glows with a blue light! This will be challenging to recreate.
Step 3: Design the Full Quilt and Draw the Templates


I create drawings for the other motifs used in the quilt: the Divine Beasts and the constellations.
I draw the Divine Beasts by finding black and white images and using the 'image trace' function. The constellations, which are simple, are drawn using the ellipse tool and straight lines.
Then I created a new drawing where I designed the actual quilt. I knew that I wanted Link, the central character of the game, to be at least 2 inches tall. This constraint meant that the shrine block had to be 20" x 20". If I make the overall quilt 36" x 36", the Divine Beast corner blocks are 8" x 8", and the constellation blocks are 8" x 20". These are the finished sizes; when I cut the background fabric for the blocks, I will add the seam allowances, which add 1/2" to each dimension (1/4" x 2).
Now that I know the sizes I need for each motif, I can create my final drawing, which is used for cutting templates. To do this, I need to think about how I will actually use the templates. Will I use the 'positive', the actual image, to trace around, or the 'negative' to trace inside, like a stencil? Or both?
I will be using a laser cutter to cut my templates out of acrylic, but you could also send the drawing to a large format printer at a Staples or Kinko's and cut them out by hand (after all, the final fabric version will always be cut by hand). Aside from being faster, the main advantage of the laser cutter is that its accuracy lets you create the positive and the negative templates simultaneously!
I decided to create positive templates for most of the components, but for the constellations and especially the Divine Beasts I decided to create both. All that is necessary to do this is to add rectangles around the motifs, and this cuts them into separate templates. I made the drawing for the templates 24" x 18" because that is the size of the bed of my laser cutter.
Step 4: Cut the Templates


These drawings cut very quickly on a laser cutter because they are pretty simple vector drawings with no engraving. It takes three sheets of acrylic to cut out all the pieces. Even though I used clear acrylic, I leave the paper on the back of most of the pieces to make it easier to distinguish the right from the wrong side. This will be important in the applique process.
As I mentioned earlier, I have used a laser cutter but it is not necessary. These templates could be cut by hand out of card stock or some other semi-rigid material, even thick paper. The shapes are simple, and in the end the fabric appliques are all cut by hand.
Step 5: The Basic Applique Process


Begin by tracing the template shapes onto the paper side of the Wonder Under. Since this process will reverse the image, make sure the wrong side of the template is facing up. Group pieces close together and cut out the block of pieces for the next step.
Fuse the wonder under to the wrong side of your fabric. Since I am using batiks, which are the same on both sides, this is not an issue for me but it is very important when using typical quilting fabrics. Follow the instructions on the packaging, but in general this step is done with dry heat, no steam. The paper needs to have a parchment look to it before it is fused well enough to peel off easily for the next step. Once fused, cut the pieces out with small sharp scissors and peel off the backing paper. If the paper won't release you will need to fuse it longer.
This is when I used my 'negative' templates to trace the layout of the pieces on the backing fabric. Remember to add the 1/2" seam allowance to all backing fabric when you cut it! I used a white fabric pencil that would show up on the blue batik, then I laid out the pieces based on the outline -- this gives me perfect placement!
Fuse the pieces in place, this time using steam. The final step before sewing is to pin some stabilizer to the back of the fabric so it doesn't pucker when you sew using the relatively dense blanket stitch.
Most of my appliques are done using invisible thread. Experiment with the settings for the blanket stitch on some test fabric, and record the settings you decide to use. You may need to adjust the tension for the invisible thread, making sure the regular thread in the bobbin is not pulled to the front, making your stitches visible. When adjusted properly you will see the holes made by the needle (especially on batiks, which are very densely woven) but the stitch itself will be invisible and not detract from the applique shape.
For the constellations, I elected to use colored thread, but you can see from the image that this is much less forgiving of sewing defects than the invisible thread!
When you are finished sewing, trim back the excess stabilizer, but since this is going into a wall quilt and not a bed quilt, where softness is important, I didn't feel it was necessary to actually remove the stabilize completely.
Step 6: Using a Design Wall

In my sewing room I have a design wall, which is basically a large piece of flannel with a 1" grid on it. This design wall hangs on hooks along the top of the wall, and I can take it down and put it up easily, as needed.
The great thing about flannel, is that cotton fabric sticks to it easily but securely. You can just place a quilt block on it, smooth it into place, and it stays there until you peel it off! I put every block up as I work on it, as a way to constantly keep track of the current state of the quilt. A design wall will save you from many, many errors, and is well worth the small investment.
I completed the outer blocks of the quilt as a warm up to the really hard block, the center.
Step 7: Minimize Risk


I knew early on that I had a particularly difficult challenge: the 'noodles' with the blue light. If I had just proceeded along the logical path of building the shrine from the back to the front, I would get to the noodles last, and I would be sewing them to my prior work. This would be very risky!
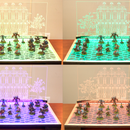
So I decided to start with the noodles, and to fuse them to stabilizer instead of the actual quilt block. This allowed my to sew my two noodle halves together (the light side and the shade side) and to experiment with embroidery techniques for the blue lighting.
It's a good thing I did! My first attempt, which was to use a satin stitch, was a complete failure! The embroidery was dense and visible, which was good, but it was too angular and not organic, which was bad. I ended up going with free motion stitching, using a nice shiny blue Sulky thread. On my second attempt, I completed a full set of noodles that I was satisfied with and that I could sew onto the center block at the appropriate time.
Step 8: Applique the Center Block and Sew the Blocks Together


I used applique and invisible thread to put the 'sheikah' motif on the top of the shrine; I used a stencil and embroidery to put the small constellations below.
I used applique and invisible thread to add the components of the base, including Link.
I trimmed away the excess stabilizer from the noodles and sewed them on using the blanket stitch and invisible thread. Then I did a final pass of blanket stitch around the shrine itself. The center block was complete!
The last step to complete the quilt top is to sew all nine blocks together, using a 1/4" seam allowance.
Step 9: Quilting the Quilt


Now it is time to create the 'quilt sandwich'.
Cut backing fabric and batting 4" bigger than the dimensions of your quilt top. I use basting spray to put the backing and batting together. I also using quilting spray to attach the quilt top, centered on the batting, but then I add quilt pins to get an even more secure sandwich for the quilting step.
Big quilts I send out to my favorite long-armer, who has a computerized long arm machine that will quilt my selected design flawlessly, but for a small project like this, I do it myself. In this project, I used a walking foot to 'stitch in the ditch', straight sewing directly on top of block seaming lines.
Then I used free motion stitching to 'echo' quilt around my appliques. You can see in the image above how the echo quilting looks like repeated outlines moving out from the center shrine. I use thread that blends into the background fabric, so while the quilting is visible it is not distracting. I do not use invisible thread for this step, since the needle is going through a lot of fabric at this point and invisible thread can be fragile.
Step 10: Bind the Quilt


The most hair-raising part of this process is now, when I have to use my quilt ruler to trim away the excess batting and backing. My general rule of thumb for using a quilt ruler is this: if you care about it, make sure it is under the ruler. That's the only safe place. Rotary cutters can (and do) slip, and anything not under the ruler can be accidentally cut. Take your time, and use the lines on the ruler to keep things square, and carefully cut away the extra two inches of backing all the way around the quilt.
Why do you make the backing larger than the quilt top? Because the quilting process itself can cause the fabric to move and shift and the backing to shrink up. By making it larger and cutting to fit after, you are guaranteed a perfect edge all around the quilt.
I created my binding by cutting a 2 1/4" strip of fabric, seaming it to be 13' long, and pressing it in half to create a 1 1/8" wide strip longer than the perimeter of my quilt. Then I sewed the binding to the front of my quilt, raw edges of the binding aligned with the edge of my quilt. Check out some videos on the internet if you want to learn how to make perfect mitered corners in this process.
In the third image above you can see the quilt on the design wall at this step of the process. The final step is to turn the binding to the back of the quilt and hand stitch it in place. You can see in the final image how this creates a uniform, narrow binding around the quilt.
Depending on how you want to display your quilt, you may add a hanging sleeve to the top as a final step. And I always add a label to the back that has my name and the year on it!
Step 11: The Final Result


In the first image you can see how the final quilt compares to the drawing of the quilt exported by Adobe Illustrator. In the next image you can see how both of those compare to the reference drawing I used to start the project. Pretty close!
I've made a video of this whole process, if you'd like to learn more.


