

Introduction: How to Fake Thermal Imaging Video


It has tons of real world uses, and thermal imaging has started leaking into Hollywood as well. From Predator, to Stargate, even the Ghost Hunters on Sci-Fi, I'm sure everyone has seen thermal imaging video. I recently had need to create some thermal imaging video and began to research prices of cameras. I quickly discovered they were a lot more than I wanted to spend and looked into modifying a camcorder instead. I quickly discovered that wouldn't work either (more on that shortly), so I began playing around trying to make normal video look as if it were shot with a thermal imaging camera.
After glancing around the net for tutorials I came up blank. That's when I decided it was time to come up with the technique myself. Hopefully, someone else with the same problem will come across this instructable and save themselves the time it takes to figure this out.
Step 1: How Thermal Imaging Works


In order to properly fake thermal imaging video, I had to develop a decent understanding of what it was and how it worked. The electromagnetic spectrum consists of several sections including (in order of wavelength) radio, microwave, infrared, visible light, ultraviolet, x-ray, and gamma rays.
There are basically three ways for a camera to "see in the dark". Light amplification is the most commonly used method. It is really just the gain on a camera and tells the camera to increase the amount of visible light it is collecting when the light source is faint. Also common on consumer camcorders is the nightshot feature, which lights the area in front of the camera with infrared light which can't be seen by human eyes, but which the camera can see. It then converts what it sees into video in the same way it normally would. These images tend to be pretty desaturated with a tint of green. Think Blair Witch Project, and you'll probably have the right idea.
That leaves thermal imaging, which uses cameras that do not operate with CCDs (charge-coupled device). Instead most thermal cameras use a concept called FLIR (forward-looking infrared) that captures thermal radiation and creates an image based on temperatures. These black and white images are then assigned color values and our easily recognizable thermal images are created. FLIR isn't the only thermal radiation system, but I'm guessing it's the most common, and the one I studied to understand the process.
Step 2: Creating Your Original Video


This may actually be your must important step. If you know before-hand that you want to create pseudo-thermal vid, you can control both the subjects and the background color. Namely, you will want whatever will be "hot" to be significantly lighter colored than the background. You can also take the opposite approach, and make everything darker, and I'll explain how to deal with this later on. If you have access to a green screen, blue screen, or white wall, I would suggest shooting on them. You can key in whatever colors you want at that point.
The cleaner and better your original video is, the better it is going to work when you try to alter it. You'll get a far wider range of colors. I chose this video simply for what they're wearing and the semi-consistent green background, but it is old and dubbed several times previously. If you look at the thermal there isn't a whole lot of mid-colors in the contrast. All in all though, it doesn't look too bad and good video would only improve upon that. You can also play around with your gradient, explained in the next step.
Next, go ahead and edit your video as if it were already altered for thermal. It is a time consuming process, and so you want to cut out as much video as possible before you start the conversion. When you're done editing, take the clip you would like to make thermal, and export the frames in that clip. It is important to name the exported files in such a way as they stay in alpha-numeric order for ease of putting them back together! Most editing programs (premiere, final cut, avid, etc.) have the option to export the entire clip as a picture sequence. Then, on to photoshop!
Step 3: Figure Out Process & Precise Gradients for Your Video


This was by far the most time consuming part of the project for me. Of course I was starting from scratch, and you can kind of pick up where I left off.
The actual process (and what most people are interested in) is really pretty simple:
1.) Either desaturate, or use a channel image to make the picture black and white. I think the red channel would work best for people and the blue channel would be best for objects like a house, although I don't know for sure. For this tutorial I copied the red channel.
2.) Adjust brightness and contrast. Playing around with this can help you get more, or less, color variation. If you like the gradient, but not the results, try this step.
3.) Add the gradient map, and select the gradient you have designed. This is kind of hidden, click on image, adjustments, then gradient map. Then find your gradient in the drop down editor.
4.) Add gaussian blur. I found best results with values between two and four.
5.) Look at final result, and decide if further changes need to be made. It's important to get the process down correctly, so if I want to change anything I go back to the original black and white image, then start from there.
The gradient is the hardest thing to get correct. I started by using adding a pretty true spectrum gradient and putting black and white at the respective ends. I then switched around yellow and red and added a couple of in-between colors, orange and sky blue. I also happened to set this up backwards, but you can reverse it when you add the gradient map in the next step, so no worries.
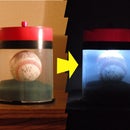
For my particular video, I ended up taking out the white because a lot of the color was blown out in the video, and it made everything look too hot. I also adjusted the gradient so green took up very little of the map, while red and blue take up about half of it themselves. This seemed to get a better result, and if you understand how gradient maps work, I'm sure you'll understand why. Attached is a picture with green grass, and then another pic with blue grass after I altered the green in my gradient.
Step 4: Make Photoshop Action List


Now that you've figured out how to make a frame look the way you want, you will want to set up an action list in photoshop. I'm going to assume if you've read this far, you have a decent knowledge of photoshop and your video editor so I'm not going into great detail. I will however touch base, and if you still want more information, there are plenty of tutorials you can google on all things video and photoshop.
To make an action list, first make sure the action window is open. Then open your first frame, hit record (the round button)and go through your process to "thermalize" your first frame. When you are done, hit stop, give your action list a name. I named mine thermafied, and was quite happy to have invented my own verb, even though I'm sure it's already used. However, we've just added a new definition to this fantastic verb.
Then, just open your next frame... make sure thermafied is selected in your actions window, and hit play. You'll watch as the computer finishes the next frame in the same amount of time as processing the changes takes. You can even include saving the image into your action list!
Speaking of saving, I exported all of my images as bitmaps, and when you save the altered versions, save them as .jpegs. This will let you sort them by type when you're done.
Step 5: Putting It All Together


A little time consuming, but not overly difficult. One other trick, you can alter every other frame and set your duration to 2 frames, it would be hard to tell the difference. I hope you've enjoyed instructable number four, please comment with improvements if you have them. Also, I will probably start linking tutorials for specific steps, so if you find something appropriate, please link me.


