

Introduction: How to Fold an Origami Star Wars TIE Fighter


Hey everyone, ready for another lesson in Star Wars Origami? This intermediate level model is fun to make and looks so cool in the end! For the best quality tutorial, watch the video. You may also follow along in the steps of this instructable. Do whatever suits your learning type. Enjoy!
Step 1: Fold the Paper in Half Both Ways


Basically the first step in almost every origami model ever. Fold in half, unfold, then rotate 90 degrees and repeat. Unfold completely when you are done.
Step 2: Fold an Eight by Eight Grid Part 1


Now fold in the left and right edges into the center crease as shown.
Step 3: Fold an Eight by Eight Grid Part 2


Fold the right edge to the farthest away crease (first picture) and unfold. Then fold the right edge in again to the nearest crease (second picture) and unfold. Repeat this process on the other side, but this time you will be folding the left edge to the second farthest away crease. This is because in the first part of this step, we folded another crease that is farther away than the one we want. Unfold everything when you are done, there should be seven evenly spaced creases.
Step 4: Create Two Sixteenth Subdivision Folds Part 1


Now fold the right edge to the farthest away crease and unfold. Repeat this on the left side. Now unfold completely and rotate the paper 90 degrees. The color not desired should be facing up at this point FYI.
Step 5: Fold an Eight by Eight Grid Part 3


Again, fold both the left and right edges into the center crease. This time, however, do not unfold.
Step 6: Fold an Eight by Eight Grid Part 4


Flip the paper over and rotate 90 degrees. Now fold the top edge down to the horizontal center crease. Then fold the bottom edge up to the same crease. Do notunfold. Now the eight by eight grid is done!
Step 7: Fold in the Last Two Sixteenth Division Folds


Flip the paper over and fold the top edge down to the horizontal center crease. Only crease in the center, not toward the edges. Unfold this step when you are done.
Step 8: Form the Cockpit


This step may be a little tricky. Push on the back of the middle (picture one) until the crease shows (as in picture two). Then pinch inwards on both sides as shown in the third picture.
Step 9: Shape the Cockpit


There should be a small square in the middle of the paper. Crease the top and bottom edges of the square (picture two) into valley folds and if you push inwards from both sides, the left and right should become mountain folds (picture three). The end result should look like the last picture.
Step 10: Forming the Right Wing


To form the wings, rotate the model 90 degrees and hold one side in both hands. Unfold that side without unfolding the cockpit (picture one). Mountain fold on the bottommost horizontal crease (picture two). Then pinch inwards with both pointer fingers (picture three). The wing should look like the fourth picture. When the fold is complete. The fifth picture shows a side view of the same wing. You may need to watch the video if this is hard to understand, because it is very difficult to describe this.
Step 11: Form the Left Wing


The other wing is formed the same way. Try to mimic what you did on the first wing so that the fighter stays symmetrical.
Step 12: Round Out the Cockpit and Position the Wings


Use your fingernail to make the cockpit's shape more round. Then bend the wings so that they are perfectly vertical.
Step 13: YOU'RE DONE!!

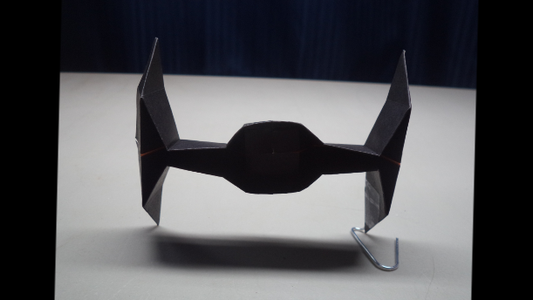
Congratulations, you just made an awesome Star Wars origami space craft! If you would like to learn more awesome origami like this one, check out my YouTube Channel at How To Origami or go to my Insructables profile! Feel free to like, comment, subscribe, or ask me for help and I always do my best to answer! Thanks for viewing!


