

Introduction: How to Hand Embroider Flowers


In this instructable, I'm going to show you how to hand embroider beautiful flowers! This embroidery stitch is called the woven spider wheel and can be created in a variety of different sizes.
I've included both photos and video of the woven spider wheel stitch so you can make sure your embroidered flowers are as perfect as they can be.
The pattern seen in this instructable comes from my Embroidery Class - check it out for free patterns and to learn all about embroidery.
P.S. Familiar with woven spider wheels and looking for a more exciting flower? Try embroidering flowers with French knot centers!
Step 1: Tools + Materials

You will need:
- fabric secured into an embroidery hoop
- 2 embroidery needles, one threaded with yellow thread and another the color you want your flower to be
- water soluble marker
- scissors
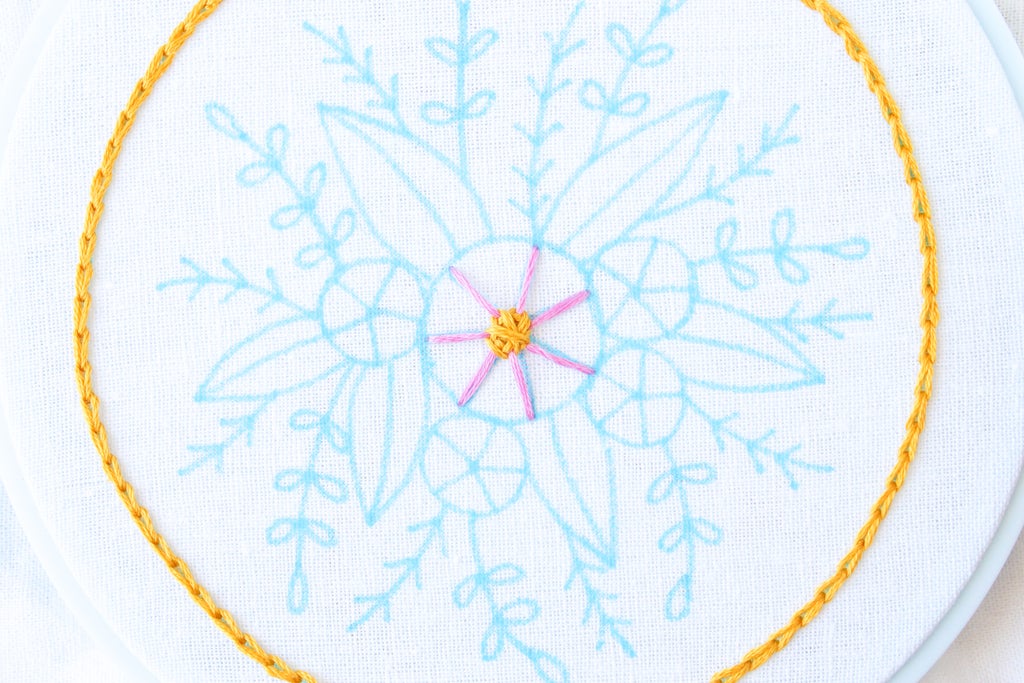
Step 2: Draw a Circle With Spokes

First up! Take your water soluble pen and draw a circle on the fabric, about 1 inch wide.
Start at the middle of the circle and draw an odd number of spokes - 5 or 7 is best here!
Pictured above is my floral sampler pattern, to give you an idea of what the spoked circles should look like.
Step 3: Stitch the Spokes


Start by bringing your floss to the front of the fabric through the very center of the flower. Then, insert your needle into the fabric at the end of one of the spokes and pull through. That's your first spoke!
Work your way around the wheel, stitching each spoke and bringing the floss back up through the center of the flower for each new spoke.
We're coming back up in the center every time to limit the amount of stray floss on the back of the embroidery - the more wild strands you have back there, the more likely you are to snag them and ruin your flower!


When you're done, the front and back should look like this.
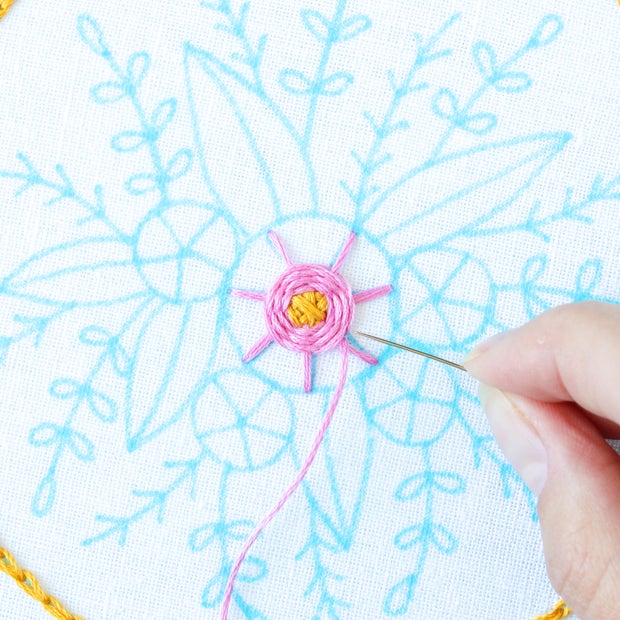
Step 4: Make the Center of the Flower

Now, bring the yellow floss through the center of the wheel. Pull it all the way through so its knot is flat against the back of the wheel.


And now we will start weaving! Beginning anywhere, start to move the needle over and under the spokes in a clockwise direction and pull the floss through. As you weave the yellow center, you'll need to hold onto the floss tail that's still dangling from stitching the wheel spokes. Otherwise, the wheel spoke it is attached to will become loose.
I only weave one spoke at a time, pull the floss through, and then go on to the next. This will keep your floss from tangling as much!
As you weave, pull the floss tight. You need to compact the middle woven stitches to try to cover the floss color of the wheel so no pink shows through! In the last photo above, you'll see some pink still peeking out. This tends to happen with the larger 7-spoke and above flowers, and it's easy to fix. If peekage happens, here's how to cover it.


Stop weaving in a clockwise motion and instead move from one side of the center to the other, bringing the floss over the center of the flower. You can normally cover all the pink in a couple stitches.
When you're happy with the center, push the needle to the back of the fabric and knot off the yellow floss.

And here's how the front and back should look once you're done with the center!

Step 5: Weaving the Flower

Now, bring the spoke floss needle to the front of the fabric next to the center. Make sure you're not pulling the needle through any pieces of floss on the back.


Just like we did with the center, begin weaving the floss over and under the spokes, going around in a clockwise motion. If you push the needle through a spoke instead of under it, remove the needle and try again. You need to go cleanly under the spokes or you can ruin the flower.

When you start to run out of floss, push the needle to the back of the embroidery and tie off the floss. Thread another piece of floss and bring the needle to the front of the fabric right next to where you tied off, as shown above.


Keep weaving until you reach the ends of the spokes. There should be just a tiny amount of the spokes peeking out from under the flower. Now we'll do a little stitching to cover them.
Step 6: Finishing the Flower


Bring the needle to the front of the fabric near the outside edge of the flower and make a large stitch. Insert the needle at an angle under the flower edge.
Pull the floss through while holding it down with a finger so it doesn't twist and curl.
Continue taking these larger stitches all around the outside edge of the flower, slightly overlapping each stitch. Keep going until all the spokes are covered and then pass the floss to the back of the fabric and tie it off!


Here's how your flower should look at the end! See how the spokes are covered and there are smaller stitches going all around the outside of the flower on the back?
Step 7: Video Tutorial for Stitching Flowers
Just in case you need a little extra help, here's a video showing how I stitch these flowers:


