

Introduction: How to Make Compelling Eyes


We're huge Halloween fans, and we do it for ourselves, so we don't worry about making it kid-friendly, either. This past year I had need of a lot of corneas for a prop I built and there were extras, so I made other things out of them!
Here's what you'll need:
1. At least one Ten Well Paint Palette
2. A Graduated Container for Mixing and a Stir Stick (Wooden Coffee Stirers and Large Orangewood Sticks work really well)
3. Two Part Polymer Resin (I use Enviro-Tex Lite, but use whatever you like best.)
4. Heat Gun (Optional)
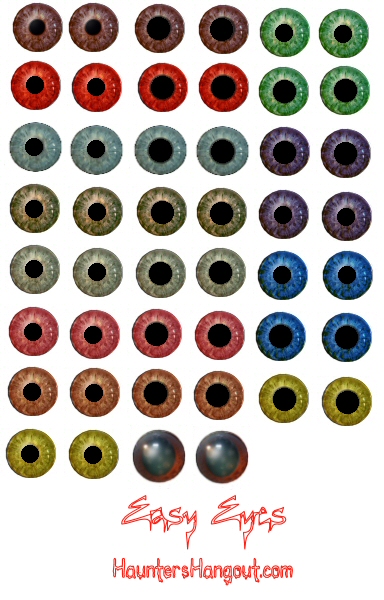
5. Easy Eyes Template from Haunters Hangout (or whatever template you like)
6. Waterslide Transfer Paper and Crafters Hole Punch (Optional)
7. Small bowl with water, tap is fine (only needed if using Waterslide Transfer Paper)
8. Clear Brush On Glaze (I use Triple Thick Brilliant, but use whatever you like best.)
9. Paintbrush (it doesn't have to be the best paintbrush in the world, but you don't want the bristles to fall out, either)
10. Paper Towels
11. Paint (your choice of eyeball background colour)
12. Disposable Gloves
13. Safety Glasses
14. Dust Mask, the inexpensive ones are fine (only needed if sanding or shaping finished pieces)
15. Silicone Mat or Pad (optional, but helpful for neatness and heat protection - if using heat gun)
Optional Items:
1. Heat Gun (I recommend a variable speed/temp gun, you can pick them up at discount retailers for $10 - $20)
2. Waterslide Transfer Paper (If you take a look at Step 7, you'll see why I recommend this, but regular paper works too!)
3. Crafters Hole Punch (just makes it easier, not required)
4. Silicone Mat or Pad (optional, but helpful for neatness and heat protection - if using heat gun)
Step 1: Palette Molds

I like the ten well paint palettes, they're just the perfect size and you only need one. But, if you have more than one, you can make more molds at one time. You can find these at most craft stores. I happened to have a 50% off coupon for Michaels when I found this 10 pack retailing there for $9.99 (so I only paid $5) - score! They usually retail for ~$1 a palette.
You can use other things for molds as well, contact lens cases are really cool, but there are only two molds per case.
Step 2: Filling the Mold


You will need a two-part polymer resin, I use Enviro-Tex Lite, but you can use whatever you like best. This Instructable will use the directions for the product I use, please follow the manufacturers instructions if you use a different product.
You will need to don your safety glasses and your disposable gloves for this step.
Add one part resin to one part hardener into your graduated container. Mix with your stirrer. Make as big a batch as you'll use in an hour. This product has a 24 hour cure time.
Gently pour into your mold. Neatness isn't your key concern here - you can trim the edges later, but try to keep it clean-ish. If you are using a silicone mat, place it under your palette before you start to pour. (DISCLAIMER: Not that it needs to be said, but I feel that it needs to be said... If you're using "baking mats" such as Silpat mats for this project, I hope they're old and kitchen/food use replacements have already been purchased. If you get polymer resin on them, you can NEVER use them for food again.)
Step 3: Why a Heat Gun Is Good

The Heat Gun is recommended at this stage, if you're using one. The heat gun will help to release any air bubbles trapped in your polymer resin mix. Keeping your safety glasses ON, turn on your heat gun on LOW and gently pass it over the mold you just poured, keep the heat gun about 8-10 inches above the surface of your mold and repeat until you can no longer see any trapped bubbles.
Step 4: Curing and Unmolding

Find a nice, quiet place for your mold to rest and cure for the next 24 (or more) hours. You don't want pets, kids, et cetera getting into this...
When your mold has fully cured (24+ hours), I would recommend placing it in the freezer for about 5 minutes. This step will help you unmold your palette quickly and easily. (It sounds odd, but it really does work.)
Step 5: Meanwhile...

While you're waiting for your mold to cure, go ahead and print out your iris templates. Again, I used this one from Haunters Hangout but if you find something you like better, go for it!
If you're using the waterslide transfer paper, this is where you'll need it. I use Lazertran Inkjet Waterslide Decal Paper (if you have something you like better or if you're fancier than I and have a color laser copier, go with what you know).
Step 6: Making Irises

Cut out your irises, if you're using the craft punch, this is your time to shine! If not, I hope you have a steady hand or you're using waterslide transfer paper.
Step 7:

Here's why I like waterslide transfers. When I first started making my corneas, I used regular paper for the irises. The problem? There was an "opaque" quality to the colour AND if I was using the scrapbooking punch, there was sometimes a white ring around the template. If I cut free-hand, you could see my not so un-shaky hands in the final product. The second image shows the paper iris (left) and the waterslide transfer iris (right). You be the judge.
Step 8: Okay, Everything Is Ready for Application!


You've now unmolded your corneas and you've cut out your iris templates.
Using your (decent) brush and your Clear Glaze, lay down a coat of glaze on the back (flat) side of your cornea.
Step 9: Iris Application - Waterslide Transfer Paper


If you've used waterslide transfer paper, you will need to soak your waterslide transfer cutout in water (see manufacturers instructions for details).
Remove with tweezers and place face down on a paper towel (to soak up the excess moisture).
[If you're making something like the "eyeball corn," you'll need to use rubbing alcohol on your surface to "bond" the transfer to your eyeball. Then follow the steps below.]
Place the "printed" surface of your transfer to the back (flat) side of your cornea. Place it EXACTLY where you want it and seal with a coat of brush on glaze. Let dry.
[Please ignore my "snakeskin" nails. :) It's hard to work and photograph at the same time!]
Step 10: Iris Application - Plain Paper

Pick up your cutout with tweezers and place face down on the back (flat) side of your cornea.
[If you're making something like the "eyeball corn," you'll need to use an adhesive, like glue or brush on glaze, on the surface to "stick" the paper cutout to your eyeball. Then seal it on top with more brush on glaze.]
Place it EXACTLY where you want it and seal with a coat of brush on glaze. Let dry.
[Again, please ignore my "snakeskin" nails. :) It's hard to work and photograph at the same time!]
Step 11: Paint the Back and Then the Sky's the Limit!


Once everything is dry, select the correct "eyeball" colour for your finished piece. there is no wrong answer here. You can go with opaque white (as in the cornea corn) or a stylized silvery-green opalescent (as in the eyeball bib necklace). Use whatever you like best. As long as you've done the protective second coat over the back of your iris with the brush on glaze, your iris should be secure and won't melt, even with nail polish. Use paint, leafing, nail polish, whatever you like best!
The first image is my "cornea corn" made with paper irises. I will try this again with waterslide transfers!
The second image is single cornea earrings and an eyeball ring.
The third image is a 3-tier eyeball chandelier earring set and an eyeball hair flower. (Or, as one of my nieces knows them, The Anti-Zombie Flower - provides protection from brain eaters.)
The last image is the Cornea Bib Necklace in its original incarnation. I plan to remake it this year with more 'stable' connections.
Thanks for checking out my Instructable!

Participated in the
Halloween Props Contest


