

Introduction: How to Make a Death Star Mailbox


Just as the recent Star Wars hype was ramping up I came across an old pressure tank from a water pump. Its spherical shape demanded to be made into something. I thought a Death Star would be easy, and I like my creations to be functional, so I determined to make it into a mail box.
As usual I haven't gone into too much detail in this I'ble - hopefully just enough to demonstrate how easy it is and to inspire someone to have a go.
What would you use one of these tanks for? Please let me know in the comments. I have another one in my shed waiting to be reborn.
Step 1: What You Will Need

Materials
- One old spherical pressure tank. Free from a pump repairer.
- Scrap steel. Free from wherever you can find it.
- One hinge. Found.
- Some Rubber sheet to seal the door. Left over from a job.
- A magnet to hold the door shut.
- Glue to stick the rubber on with.
Tools - Here's what I used. There's always other ways of doing things so you could do the same job with a completely different set of tools.
- Personal Safety gear
- Spanners
- Welder
- Angle Grinder
- Flap discs to remove paint and preparing surfaces for welding
- Grinding and cutting discs
- Plasma Cutter
- Pens for Marking
- Compasses, Square, Rule, etc.
- String line
Step 2: Prepare the Tank


First remove the flange that attaches the plumbing and holds the bladder.
When you get the flange off drag the rubber bladder out.
Using a flap disc on your angle grinder remove the paint and any obvious rust.
Step 3: Mark Out Death Star Features


Search the internet for the proper dimensions of a Death Star. Then try to remember the mathematics they taught you in high school so you can calculate the proper proportions and positions of the Superlaser Fucus Port and the Equatorial Trench.
I chose to position the superlaser focus port over a rusted hole where the old air valve was. I then worked out where the equator was in relation to it and marked it using a square measuring from my bench. To get a straightish line I wrapped some webbing around the sphere and used it as a ruler.
I marked the other horizontal lines using compasses from the poles.
To mark the vertical lines I put a screw in each pole and stretched string between them. These were pretty much random on my Death Star, but if you have time and patience you could do it more accurately.
Step 4: Create the Trenches


Once I'd completed marking out the trenches to my satisfaction I simply cut them into the steel using a cutting disc on my angle grinder. Being careful of course not to cut right through the tank.
Step 5: Create the Superlaser Focus Lens


All this is is a cone made from steel. The proportions were swiped from a plan found on-line.
I made the cone just as you would with paper. Make a circle with a wedge cut out of it. Bend the circle to make the straight edge of the wedge contact each other. Weld the edges together.
Cut out a hole in the tank to fit the lens. Weld the lens into position.
You now have a Death Star. A Death Star with a massive hole and a flange in the back of it. But that's okay, I use the flange to attach it to a post.
Step 6: Make a Door


The door is pretty simple the way I did it.
Firstly I found a convenient door-sized rectangle shape formed by the existing trenches on the surface of the Death Star.
To accurately position the hinge I used my angle grinder with a thin cutting disc to cut along the top of the rectangle only, and then welded the hinge into position at the centre of the top of the door. I only used one hinge because the spherical shape makes it very awkward to get two hinges to cooperate.
Once the hinge was attached I cut around the remaining sides of the door. It swung beautifully.
To provide a weather seal and to prevent the door from closing too far I glued some rubber strips to the inside of the Death Star around the door opening. The rubber overlaps the edge of the door by about 20mm.
To hold the door closed I glued a strong magnet to the inside to the lower rubber strip.
I made a door handle out of some rubber and attached it with a screw. I had to grind the tip off the screw so it didn't clash with the rubber weather strip.
Step 7: Make a Letter Slot


My letter slot is a simple horizontal slot cut in with the angle grinder. It is protected by a little roof to prevent the rain from entering.
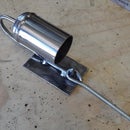
Step 8: Make a Stand


Seeing as we can't position this Death Star in stationary orbit at an altitude that can be reached by a postman we need to support it on a post or a wall or something.
I made a bracket out of some 50mm x 50mm square hollow section and attached it to the flange at the back of the Death Star. The Death Star is held away from the bracket by some steel pipe - this is my attempt to make it appear to be floating. It is all welded together solidly.
I drilled holes in the SHS in case it is to be bolted to a wall or post. The SHS can also be dropped over a star picket or any slender post.
Step 9: Conclusion


There are a few changes I would make if I was to make another of these, but overall I'm quite happy with outcome.
I might suggest a more discrete letter slot and a more sturdy hinge.
I hope you enjoyed my Instructable. I you did, please vote for it in the contests.
If you would like to see more of my work please feel free to check out my website, or even my Etsy shop. In fact, please share my Esty Shop with your friends if you think they might be interested, especially if they have exquisite taste and too much money. I need to increase my shop activity to reduce the need for me to go out and get a proper job.
Please feel free to post comments and questions.

Second Prize in the
Make a Box Contest


