

Introduction: How to Make a High Fashion Specular Reflector

How to Make a High Fashion Specular Reflector - $15 and about 15 minutes.
-RICH MEADE
Step 1: What You’ll Need
I’ve got a fun little DIY light modifier for you today. I call it the High Fashion Specular Reflector or “shiny board” for short. In my travels, I have to carry a LOT of gear. Especially when the trip is on my own dime and I don’t have a budget to rent the cool toys I want to have. I came up with the idea for this reflector through experimentation and just obnoxious luck. I wanted to create a very hard light (in addition to the sun) to use on my model while on location. That’s not too hard to accomplish with strobes, but remember, I get lazy. I first started messing around with mirrors, but they didn’t really do what I wanted, not to mention they are heavy and dangerous if broken. Then I thought about Mylar! Well now rolls of Mylar aren’t super hard to find, but also aren’t readily available in a lot of locations. There is however a cheap and readily available solution, and that is a camping emergency blanket! So combining the Mylar blanket with a couple of other items I was able to create a remarkable source of light, that is cheap, and versatile. Here is how.
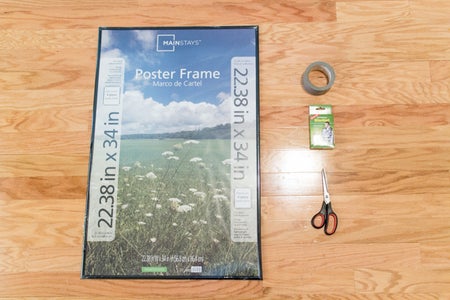
What you’ll need :
- 24×36″ Poster Frame ($10) These come in all sizes, but you need the ones with plexiglass fronts, easily found at any superstore
- Duct Tape ($1.50) Also found at the superstore. You know the saying, if you can’t Duck it…
- Scissors ($1.50- $400) Supersharp hair styling shears are preferred, but you can use a $1.50 pair too.
- Emergency Camping Blanket ($4) The key ingredient, found at pretty much any store that has a camping section.
Step 2:

First thing you want to do is take the poster apart and separate its pieces.
Don’t throw anything away (except the shrink wrap that came on the frame).
Step 3:

Next you want to open up the Emergency Camping Blanket. Unfold it until it easily covers the backing board of the poster frame.
Step 4:

Cut around the edges of the board, leaving about 2 inches of space. When you are through, you are likely to have two sheets to fit your reflector, handy if you are making more than one.
Step 5:

Next place the backing board down onto one of your mylar sheets. The board can face any direction, it doesn’t matter. Start by taping one side and then going to the opposite side. Pulling the mylar taught each time. Your goal here is just to “tack” the mylar into place, we’ll make it permanent in the next step.
Step 6:

Now you want to place the plexiglass face down (it should have a protective film over the front of it), then lie the mylar sheet on top of it, which is now attached to the backing board. Now here is where the filler paper comes in (that sheet that had all the information on the poster frame). If it has a white back, I like to affix it to the back side of the board so I have a white fill at my disposal as well. This is completely optional of course.
Step 7:

Now, you have two options here. One, you can use the frames attachment pieces to hold everything together. It’s cleaner looking, but also a pain in the ass to do. The other option is to use the Duct tape. I choose to use Duct Tape to keep everything together. You can use whatever strong tape you choose, like Gaffer’s Tape, but Duct Tape is much cheaper. Using the same taping technique as before, work your way around the board, taping as you go. When you are finished taping, flip the reflector face up, and peel away the protective cover on the plexi.
Step 8:

Voila! Your new super sophisticated High Fashion Specular Reflector (shiny board)!
Step 9:

So, the burning question;“what does it do?”
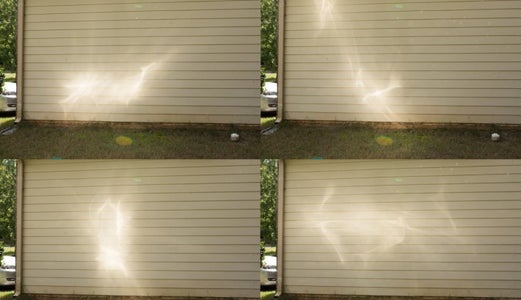
Well when used in direct sun, the mylar will reflect the light extremely well. It has an almost mirror-like quality to it, similar to reflections off of rippling water. The emergency blanket provides a unique characteristic that a clean sheet of mylar won’t have. The folds and variations caused by the packaging break up the light just enough to give it that “rippled water” look. Whereas the clean sheet of mylar will just make one or two streaks of light. Below are some examples of what you can do with this reflector. With each photograph I turned, bent, or twisted the reflector slightly just to give some different effects.
Step 10:


As you can see there is a significant difference in the intensity and shape of the light between our freshly made Specular Reflector, and the basic fold up silver reflector. The “Shiny Board” is a bit tricky to get used to because it does, by design, create hotspots on the subject, as well as create very hard shadows. However, that is what I like about it, it’s a quality of light that most people are afraid to use because of it’s unforgiving nature, but I think the results are worth the extra few frames to get that hot spot in just the right area. But that’s not all! Not only do we have the optional white fill that we built in, you can also intentionally “distress” the plexiglass. By either applying dulling spray or taking the time to painstakingly scratch up the front of the plexiglass. This will soften/diffuse the light that comes off of the board. The best part is, it’s still more intense than the average fold up silver reflector because of the Mylar’s reflective properties. That means you can throw fill in from greater distances than you normally could with the basic reflector.
Below are a few shots that the “shiny board” was used on.
So the next time you are in a strange city, and need a little extra light, consider the Shiny Board option.
I mean, for $15 and about 15 minutes.
You can have a really unique and versatile reflector that you won’t have to pack with you nor feel guilty about leaving behind.
Do you have any similar DIY ideas for travel? Let us know in the comments below!
You can see here and follow Rich Meade : http://bit.ly/1fPv7c7
Reda Izo, Motion Designer, Photographer.
Want to see more ? Follow me, and stay tunned !
my Instagram


