Introduction: How to Make a Leather Top Hat
I've wanted a leather top hat ever since I saw them at the Georgia Renaissance Festival. The one I saw that inspired me to make one myself wasn't quite a typical top hat. Rather than getting larger at the top like a Mad Hatter top hat or just going straight up like a stove pipe top hat it actually kind of angled in toward the top. It also had a very stylized brim. I think this one in particular was designed for a woman, but I thought I could make something similar in a more masculine style, so that's what I did.
Step 1: The Pattern
In my research into making a top hat I found several very useful instructional sites, which I will share here, but because of the style I wanted I couldn't actually follow any of them to the letter and had to create my own pattern.
Leather Learn: Top Hat
I believe this site uses a pattern that you can buy at Tandy Leather. The site does have a copy you can download and resize.
Tom Banwell: Leather Hat Tutorial
This one has two different patterns that you could potentially use.
I printed off and put together all three patterns as well as one I free handed. Then I tried to combine aspects that I wanted into one SUPER PATTERN! Okay, maybe that's a little much but, regardless, this is what it looked like.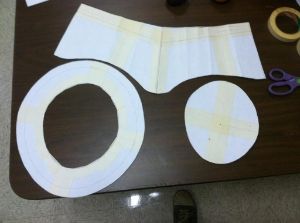
It was at this point I realized it looked like I was making a pattern for underwear...
Now that you can see what I came up with let me explain why the pattern looks the way it does. The three parts of the pattern are the Crown, the Brim, and the Top. The wavy bottom line on the crown is because I want the brim to swoop down in the front and back, but curve up on the sides. The sides of the crown are angled in towards the top because I didn't want it to flare out like most top hats. Oddly enough the top of the crown has to be curved so it will be flat when it's rolled into a cylinder. If the top goes straight across it actually ends up with an odd peak in the front once you put it together. This is caused by the angled sides. If they were straight up and down you could cut the top straight across.
As you make your pattern you'll want to check to make sure the fit is right. I have a felt top hat that my wife bought me for Christmas that is a perfect fit, so I took measurements from that to make sure that this new top hat would be of similar height, brim width, and fit. If you don't have that, it's okay, you can just measure your head and either stick to a pattern or just eyeball how big you want it to be. It's actually not a bad idea to make it slightly bigger than you need it because the leather can shrink. If it turns out a little too big in the end you can just add a sweat band to the inside, which isn't a bad idea anyway.
My measurements were:
Crown Circumference: 24 5/8"
Crown Height: 6"
Brim Width: 2 3/4"
Regardless of how you choose to do it remember to continually check the fit by actually trying it on your head, because that's the best way to know if it's going to fit. Another plus side? You can take goofy pictures of yourself wearing it!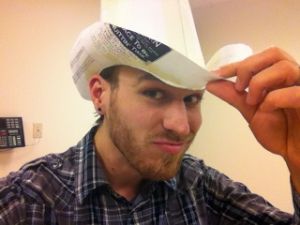
Step 2: The Supplies
Pictured is the "Ultimate Leatherworking Kit" from Tandy Leather. I didn't purchase the kit, nor did I use everything in the picture. I'm just using it as an example of the some of the tools that are useful for this sort of project.
The tools I used were:
-Cutting blade and scissors
-Stitch spacer
-Hole punch
-Rawhide hammer
-Leather needles
-Waxed thread
-Edge trimmer
-Edge slicker
-Daubers (for dye)
-Glue
-Dye
Step 3: The Pieces
Now that your pattern is ready it's time to trace it onto the leather. I hate it when I'm tracing something and I get half way around before I realize I've moved it slightly and now it's completely off, so I used some tape to help keep myself accurate. The way I did it was I put down tape in a couple of places, traced around it and then, one at a time, moved the tape to different spots and traced under where the tape had been.
The leather I'm using is called "Veg-tan". It's called that because it's tanned using "tannin" (hence the term tanning) which is found in plant matter. It comes in various thicknesses. I don't remember what mine is, but you should be able to pick by feel, or if you're ordering off the internet try contacting someone at one of the Tandy Leather branches and ask them for advice.
::Edit:: I asked my local Tandy store and they said when they do a hat making class they recommend about 4 or 5 oz leather, which I think is what I used.
Veg-Tan has a smooth side and a rough side. Unless you want the rough side to be visible you need to cut out two brims that will later be glued together.
Side note: Never just put your pattern in the middle and start cutting it out. Figure out the best placement so that the remainder is a nice whole section rather than just a bunch of little scraps. I was really careful with how I placed my pattern and was actually surprised at how much was left. I was worried I wouldn't have enough for the hat and I ended up with enough for another project.
I had already figured I would just make the top out of the piece that I cut out of the center of the brim but as I was cutting the pattern out I decided I wanted the top to be circular instead of ovular. I made a quick make-shift compass to draw it out. I also realized it needed to be smaller than I originally thought. I still cut it out of that center piece so as not to waste more leather.
Here's my Handy Dandy Homemade Compass: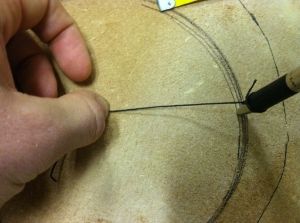
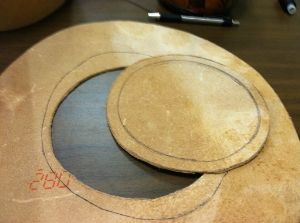
So the final pieces are 1 Crown, 1 Top, and 2 Brims.
Step 4: The Punching
Now that you've got the pieces cut out there's something you should know. You have to stitch these pieces together, and to have everything fit together correctly you need to have the holes match up perfectly. To make sure that everything worked out I started with a tool designed to lay out stitch marks. If you don't have one you can fake it with something else like a fork; anything that will give you an even set of marks on the leather. Wet the leather a little bit and the marks will set in the leather better. After I marked each piece I counted the corresponding marks to make sure there was the same amount. Whenever they didn't match I would try to add in a hole or two.
Now the really important point that I'm getting at here is that because I counted the marks in each section I know that if you do a hat the same size as mine you're looking at punching about 600 holes. It takes a while. It's repetitive. Take it easy. The way I did it was I punched different sections at a time and did other work in between. It helped it not be so daunting. When I first started I tried using an awl. I would not recommend this way. The hammer and hole punch wasn't as much of a strain on my hands and wrists, and the finished product looks better.
Step 5: The Stitching
This part is done inside out to hide the seam on the top.
The first thing I stitched together was the crown. You don't need to spend too much time getting this part looking perfect because you'll need to take this apart later. The thread I'm using is a heavy duty waxed thread from Tandy Leather.
I paused here to take another opportunity to try it on and see if everything fit together correctly.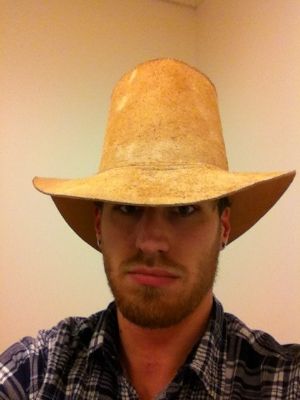
The brim is not actually attached yet. It's just sitting there.
Once the crown is together you can attach the top. I stitched around it twice and then tied it off to the loose end at the beginning.
Step 6: The Flipping
Now that the top is on we need to flip it right side out. To do this we first need to undo the back seam. I untied the knot I had tied it off with so I could reuse the same thread.
After you've undone the back submerge the entire thing in water for about five or ten minutes. The water turns a nice tea color so don't do this in a nice bowl or something. It may stain it.
Once it's all nice and floppy carefully turn it inside out. If you put too much strain on the leather it can leave wrinkle marks that don't come out so it's best to go slow.
After you've flipped it right side out try to form it to how you want it to look because once it dries it will retain the shape you left it in. I made sure to give it a nice inverse dome on the top and then I tried to straighten it out as much as possible so it didn't dry crooked.
Step 7: More of the Stitching
After it's done drying it's time to stitch up the back again. I still went with the cross stitch because I think it looks the best for this type of seam.
Now comes perhaps one of the hardest parts of the whole process; stitching on the brim. The hard thing about this is that you have to stitch through three holes at a time (the first brim, the crown, and the second brim), without missing any holes.
Just like with the top, I stitched around it twice. It took a while. To give you an idea of what it looked like here's a close up of the inside stitch.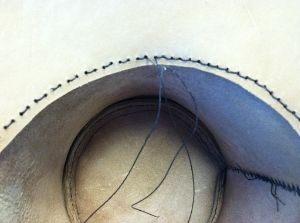
As you can see, the first time around looks like a dotted line but on the second time around the stitch becomes a solid line.
Step 8: The Shaping
The next step is to get the brim in the right shape.
First I set it in some water. This time it doesn't have to be completely submerged, just as long as the entire brim is under water. Leave it under for five to ten minutes just like last time.
While it was soaking I made a box to hold it in the right shape while it dried. I set the hat in upside down and curled the sides of the hat down towards the crown and the front and back up. Then I let it dry.
Step 9: The Gluing
I used Tandy Leather brand glue and applied it with a craft foam brush. Once I had enough glue in between the two sides of the brim I just squeezed them together really tightly. I basically just went all the way around the brim pressing firmly on either side and holding for a little bit until I felt it was secure.
Step 10: The Trimming
As evidenced by this picture (taken before I glued the brim) the hat still had a decidedly western feel to it at this point. I was not okay with this. I also kind of knew this was going to be the case and was waiting until this point to trim it down. Because of the way I made my pattern I chose to wait until I had formed and glued the brim to trim it to its final width.
This part was incredibly hard to do. It meant cutting through two very thick layers of leather. My scissors are heavy duty so they had no problem but talk about a hand cramp!
To do this part I basically just measured around the edge, marking with a pencil as I went, until I had a circle all the way around. Then I cut the excess off.
Once I had trimmed it down I needed to finish the edge. There's a lot that goes in to this if you want it to be truly professional but I settled on "kind of" professional. First I took my edger (the wooden handled tool in the picture) and rounded the edge. Then I wet the edge and used my edge slicker to finish it. The edge slicker is the white disk in the pictures and it has a groove around the edge. The way you use it is you set the groove on the edge and rub it really fast. This smoothes down any rough parts. You can use saddle soap to make it even better.
Step 11: The Dyeing
Rubber gloves are an absolute necessity, unless you don't care about having stained hands for days and days. I used these little daubers but you can use a sponge or a rag or whatever you have lying around that you don't care about completely ruining. I also used this "Chocolate" dye. It's darker than what I originally wanted but it's what I had on hand so I just went with it.
There's a trick I learned the first time I stained leather. When I say that, I mean that someone told me to do it a certain way, I ignored their advice, and surprise surprise it turned out they were completely right and I felt stupid. Keep a rag or some paper towels on hand when you're dyeing leather. As you spread it, use the rag to wipe the excess off and kind of buff it as you go. This helps keep a nice even stain and avoid streak marks. For my first project I thought it looked fine and I wouldn't need to do it, but streak marks that I hadn't even realized were there suddenly became apparent as it dried. I will never make that mistake again.
I did a couple coats and called it done. It doesn't look perfectly smooth and even, but part of that is because I didn't treat the leather before staining it. When you buy leather it usually has chemicals or products left on it from the tanning process or put there to make it look better to the buyer. If you want a really clean stain you have to strip this product off before staining. I don't mind the look though so I left it like it was. I also didn't do the inside because it's unnecessary and I'd rather have the unstained leather against my head.
After the dye has dried you can use a leather sealer to finish it. Apply it the same way you apply the dye. This is an important step if you actually intend to wear this anywhere. It helps protect the leather from rain and helps keep the dye from rubbing off on things.
Step 12: The Showing Off
If you want, you can decorate it by adding a band around the base of the crown. You could give it a Steampunk flair, make it really western, do a fancy band around it with a feather, etc. There are endless possibilities for customization. You can use it for costuming, role playing, or just wearing around town.
Have fun, and if you make one, share pictures!
Update- If you would like to purchase one of these please message me or visit my Etsy page at:
https://www.etsy.com/shop/LittleHouseBlue?ref=hdr_shop_menu

First Prize in the
Halloween Props Contest

Participated in the
Indestructibles Contest

Participated in the
UP! Contest


