

Introduction: FULL SCALE Levitating TARDIS


The Hydraulic Levitating TARDIS!
Bear with me. This is my first instructable! I will answer as many questions as I can. Want to see it fly? my instagram is hardlyhumanfx
The whole thing operates like a giant marionette. inside, there are hydraulics, pulleys and handles which allow a user to animate the TARDIS movements.
Step 1: The Panels


The Panels and most surfaces are made from 1/8" baltic birch sheet wood. The dimension is due to cut out squares that I sunk in using trim wood.
The Panels are attached to the super structure inside, consisting of a wheeled cart, steel pipes and hydraulic pistons.
In total, you will need about 14 sheets of 3mm thick 4x8 baltic birch and many meters of 10mm trim molding.
The square holes are cutout of each panel. you will need a steady hand and a carpenter's square. After this is done, many hours later, you will nail and glue the molding to the back side of the panel. after this is done to every square hole, you will create 24 squares out of baltic birch and nail/glue them against the trim. This gives the illusion of depth and weight to your 3mm thick panel board. Between each board, you will want to nail a bridge in place. Do this while the panel is laying flat. This reinforces the panel.
Step 2: Panel Trim


You will notice the dimensionality of the panel at this point. I used 1 inch wide trim on the sides and center, glued and nailed in place. The corners are made from 3/4" x 3/4" square stock with 4 inch strips of 3mm baltic birch nailed/glued. i ended up using velcro as a mechanism for attaching these panels to each other. 2 panels have two corners nailed/glued on to their structure. the other two panels are velcro'd in and removeable.
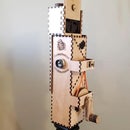
Step 3: Super Structure


The internal structure is the part that you hang the panels on basically. it consists of steel pipe, cross cables, a wire harness, and hydraulic pistons (from a car trunk--sorry neighbor). only the very top of the panels attach to the top of this structure. I used PVC to accomplish this but there are many ways to do it. the top of the structure is mobile, due to the hydraulic pistons. this allows the TARDIS vertical movement.
Step 4: Some Details


Lighting really sells this illusion. Part of what makes my box so impressive is the last photo. that is simply a reflector. it makes each window its own light source. There are no shadows and no variations.
There are many ways to do what I've done but I was the first and this is how I did it. if you have any questions, feel free to ask. I'll try to answer!
Want to see it fly?
my instagram is hardlyhumanfx


