

Introduction: How to Make a Raspberry Pi Case From an Altoids Tin


If you have a Raspberry Pi computer board, you can make a great case for it out of an Altoids mint tin.
You'll need:
1 Raspberry Pi computer board
1 Altoids mint tin
1 Plastic gift card
1 Dremel or Small drill
1 Tin snips or diagonal cutter
This work is in the Public Domain. To view a copy of the public domain certification, visit http://creativecommons.org/licenses/publicdomain/ or send a letter to Creative Commons, 444 Castro Street, Suite 900, Mountain View, California, 94041, USA.
Step 1: 1) Left Side of Tin

Step 1: Drill a hole for the Pi LED corner at the bottom front left corner of tin; then, with tinsnips or diagonal cutter, cut out large area (as indicated in picture) for the Ethernet & USB ports in the left side of the tin.
Step 2: 2) Front Side of Tin

Step 2: Drill holes in the front side of tin for the audio and RCA jacks. The RCA jack hole will include part of the tin lid lip.
Step 3: 3) Right Side of Tin

Step 3: Drill holes for the SD card and power jack in the right side of the tin.
Step 4: 4) Back (hinge) Side of Tin

Step 4: Drill a hole for the HDMI port on the back (hinge) side of the tin.
Step 5: 5) Insulate the Bottom

Step 5: Drop a plastic gift card into the tin to insulate the bottom of the board from the bottom of the tin.
Step 6: 6) Begin to Install the Board

Step 6: Angle the board into the tin so the RCA jack goes through its hole first.
Step 7: 7) Complete the Board Insertion
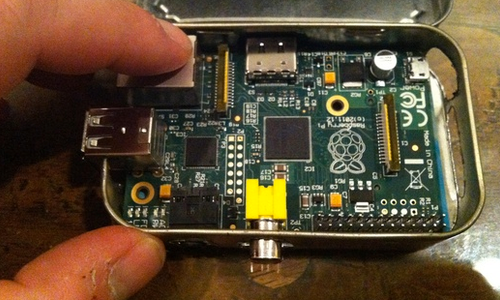
Step 7: Drop the HDMI side of the Pi board down into the Altoids tin.
Step 8: 8) Install SD Card & Peripheral Connections

Step 8: Plug in your SD card, video (RCA or HDMI), audio, Ethernet and USB (keyboard & mouse) plugs.
Step 9: 9) Connect the Power

Step 9: The LEDs should light up once the power is plugged in. The GPIO pins are accessible by opening the tin lid. You can use an old 5V DC power supply from a blackberry or other device with a micro-USB connector. Try to use one with at least 1Amp if possible although I have found a 650 milliAmp one works well with the Raspberry Pi model B.
Step 10: 10) Add WiFi

Step 10: Using an Apple aluminum wired keyboard allows you to plug a mouse into the keyboard instead of the Pi, freeing up one USB port. With a WiFi USB dongle as pictured, you can disconnect the Ethernet cable. I used the AirLink101 AWLL5088 Wireless N 150 Ultra Mini USB Adapter, but any WiFi dongle that uses the Realtek Semiconductor Corp. RTL8188CUS 802.11n WLAN chip should work, such as the Edimax EW-7811Un 150 Mbps Wireless 11n Nano which is also popular with the Raspberry Pi community.

Participated in the
Instructables Design Competition

Participated in the
Pocket Sized Contest


