

Introduction: How to Make a Raspberry Pi SuperComputer!


By itself the Raspberry Pi doesn't boast impressive specs. But with the dirt cheap price, buying several of these and connecting them to use they're combined processing power could potentially make a decent low cost computer. There have been several impressive rigs built connecting dozen's of Pi's together. So in this instructable, let's explore how the technology behind cluster computing and make our own Bramble Pi!
Step 1: Watch the Video Version
I've also made a two part video version of this exact same project. So if you're not one for reading, kick back and watch the vids! Please note that the video version uses Raspbian Wheezy. However, the instructions below are for the current Raspbian Distro, which is Jessie at the time I am writing this.
Step 2: What You Will Need
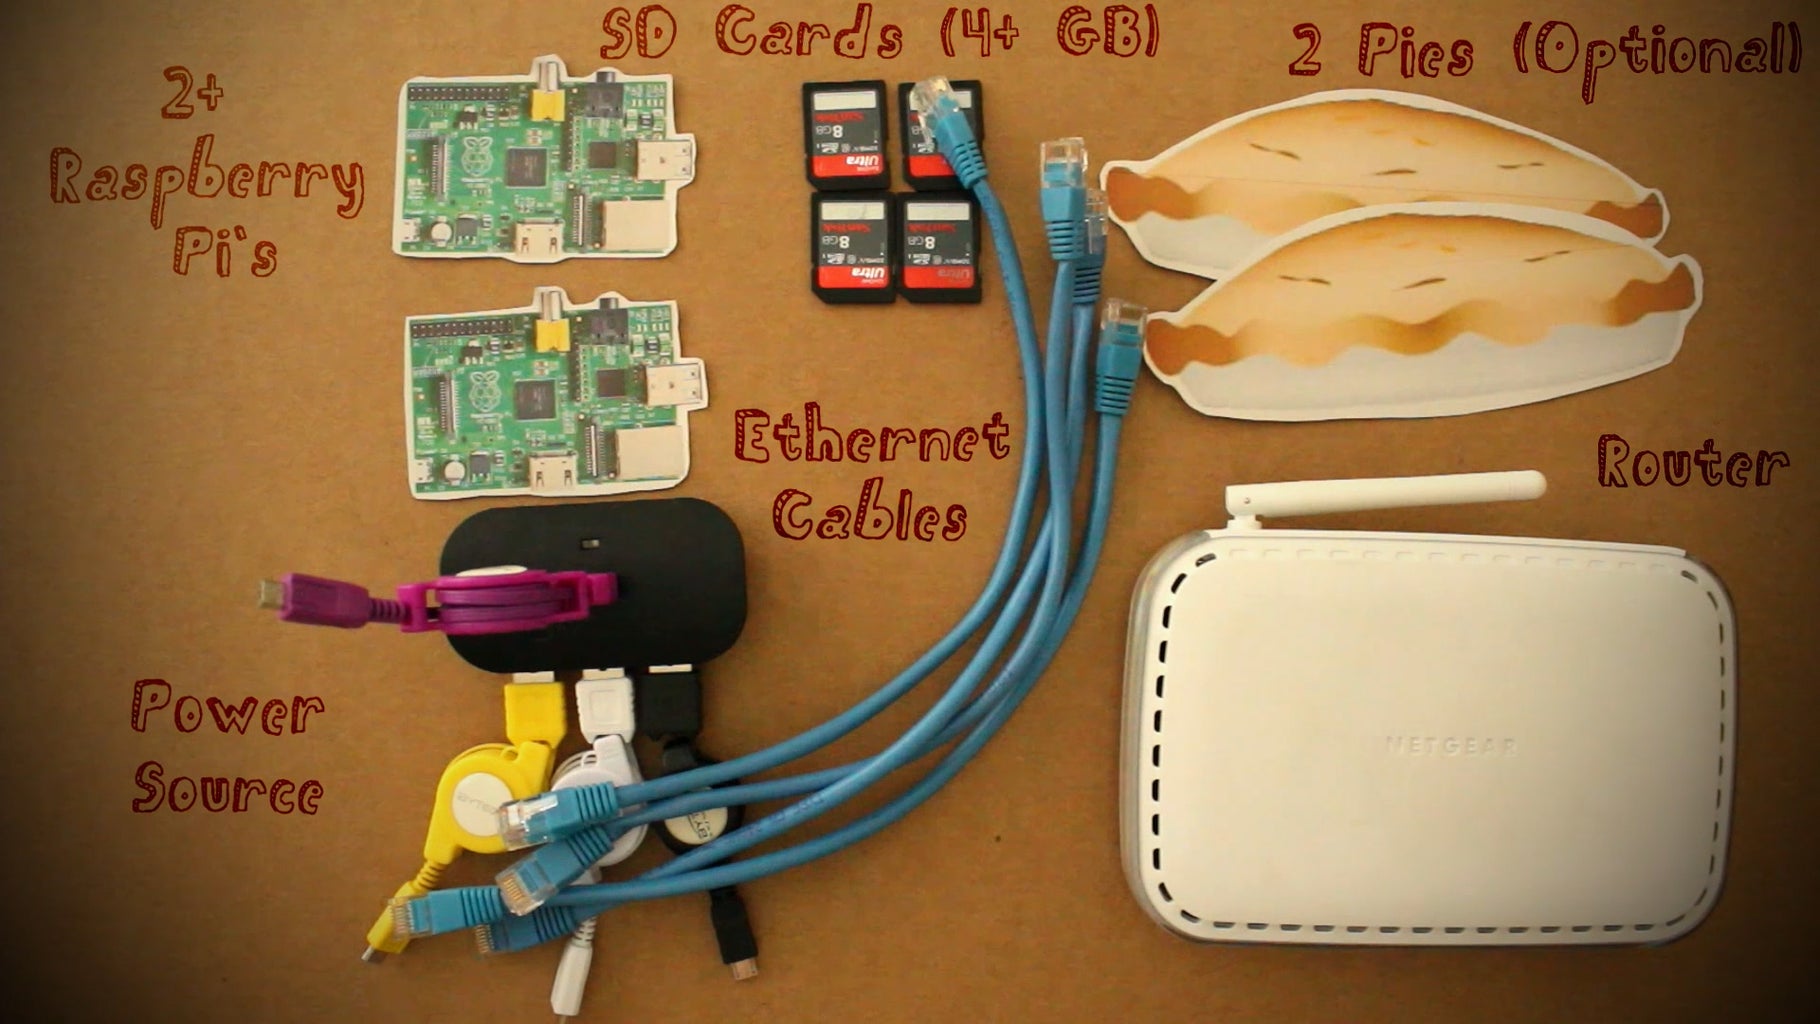
To follow along with this project, here are the parts you will need to acquire
Here’s what you will need:
- 2 or more Raspberry Pi’s
- SD cards for each Pi
- Power Cables for each Pi
- Powered USB Hub (optional)
- Networking Cables
- A Hub or a Router
TOTAL COST: ~$100.00
Step 3: Installing and Configuring Raspbian


Once you have all the parts, the next step is to download and configure Raspbian OS on one of the Raspberry Pi's. This will be your master Pi. Here's the steps:
- Download the Raspbian Image from here.
- Burn the Raspbian image to each SD Card you have for each Raspberry Pi.
- If you have Windows, you can follow these instructions.
- If you have a Mac, you can follow these instructions.
- Once the image is burned to your SD Card, put it into each of the Raspberry Pi and boot it up.
- Upon first boot, you should see the Rasbperry Pi Desktop. Click on the menu icon in the upper lefthand corner and go to Preferences > Raspberry Pi Configuration. Here’s the options we’ll need to configure
- Expand the File SystemIf needed.
- Change the hostname to Pi01
- Change the boot option to CLI (Command Line Interface), since we won't really be using the Desktop Interface.
- Clock on the "Interfaces" tab and make sure SSH is enabled.
- Click on the "Overclock" tab and choose "Turbo".
- Change the GPU memory to 16mb.
- Click on the "Localization" tab and set your keyboard layout to match that of your countries.
- Finish out of the configuration, and reboot your Pi.
Step 4: Installing MPICH


Still using only the one Pi as the master, we now need to install the primary software that is going to allow us to use the processing power of all the Pi's on our network. That software is called MPICH, which is a Message Passing Interface. Here's what you need to do to install it:
sudo apt-get update
mkdir mpich2
cd ~/mpich2
wget http://www.mpich.org/static/downloads/3.1/mpich-3.1.tar.gz
tar xfz mpich-3.1.tar.gz
sudo mkdir /home/rpimpi/
sudo mkdir /home/rpimpi/mpi-install
mkdir /home/pi/mpi-build
cd /home/pi/mpi-build
sudo apt-get install gfortran
sudo /home/pi/mpich2/mpich-3.1/configure -prefix=/home/rpimpi/mpi-install
sudo make
sudo make install
nano .bashrc
PATH=$PATH:/home/rpimpi/mpi-install/bin
sudo reboot
mpiexec -n 1 hostname
These commands will download and install MPICH, as well as add it as a path to your BASHRC boot file. The last command runs a test to see if it works. If the last command returns “Pi01”, then you did everything successfully.
Step 5: Installing MPI4PY


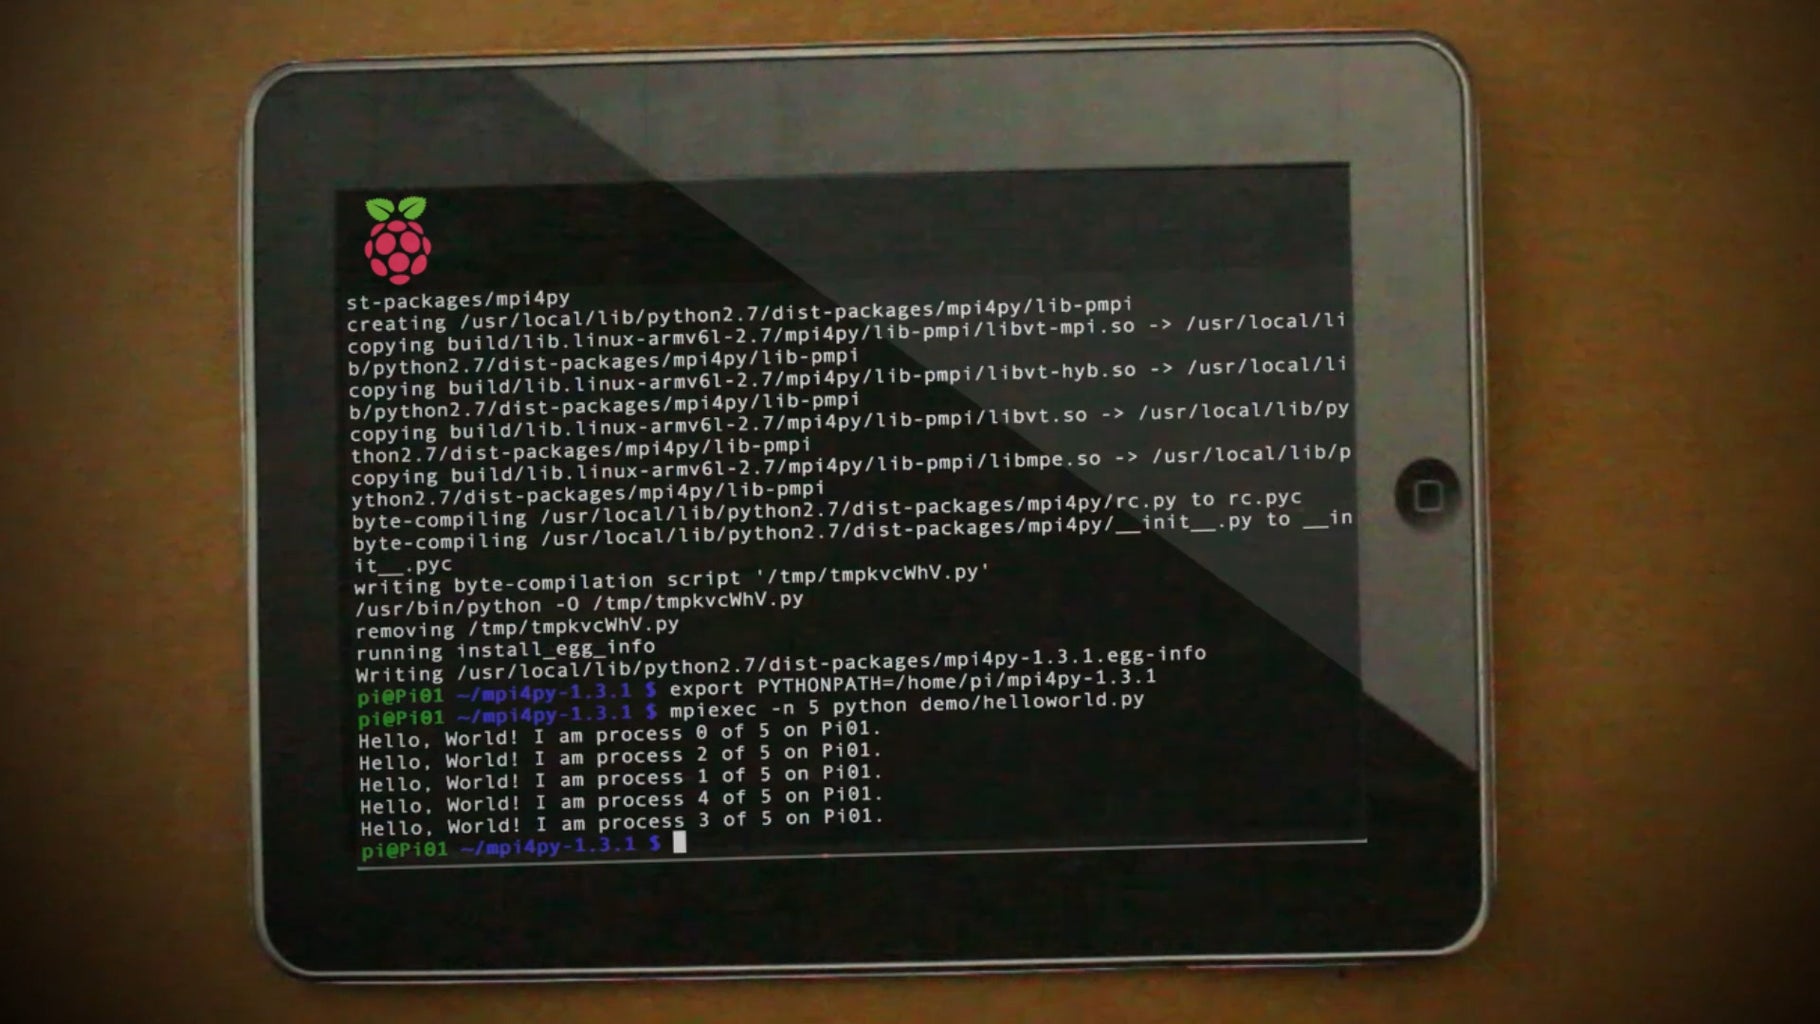
As it is, MPICH can run C and Fortran programs. But since the Raspberry Pi has the Python coding environment pre-installed, it would be easiest to install a Python to MPI interpreter. Here’s the commands to do that:
sudo aptitude install python-dev
wget https://mpi4py.googlecode.com/files/mpi4py-1.3.1.tar.gz
tar -zxf mpi4py-1.3.1
cd mpi4py-1.3.1
python setup.py build
python setup.py install
export PYTHONPATH=/home/pi/mpi4py-1.3.1
mpiexec -n 5 python demo/helloworld.py
That last command should return five responses. Each one is a different process on Pi01 running the python program "Hello World" that we just made.
Step 6: Copying the Image

Now that we've successfully configured our master Pi, we need to copy that Pi's SD card image to all the other Pi's. Here's how you can do that on Windows:
- Take the master SD Card out of the Pi and insert it into your computer.
- Using Win32DiskImager, use the "Read" button to save the contents of the SD card to your computer.
- Eject the master SD Card and insert an SD card for one of the other Pi's. Then use the Win32DiskImager "Write" option to write the image we saved to the new SD Card.
- Repeat step 3 until you have the master image written to all of the SD cards.
Step 7: Configuring the Remaining Raspberry Pi's


Now that we have all of the SD Cards prepped, insert the Master SD Card back into the Master Pi, connect it to a router and boot it back up. Then for the remaining Raspberry Pi's, insert SD Cards into all of them, connect them to the same router as your Master Pi, and then boot them all up. None of the secondary Pi's need to have keyboards, mice, or monitors.
Once all of the Pi's are powered on, using our Master Pi, we should be able to get the IP addresses of each Pi on the network. Here's how:
- First Install NMAP
sudo apt-get updatesudo apt-get install nmap - Then get the current IP for the master Pi
ifconfig - Now you can scan your routers subnet for the other Pi IP addresses
sudo nmap -sn 192.168.1.*
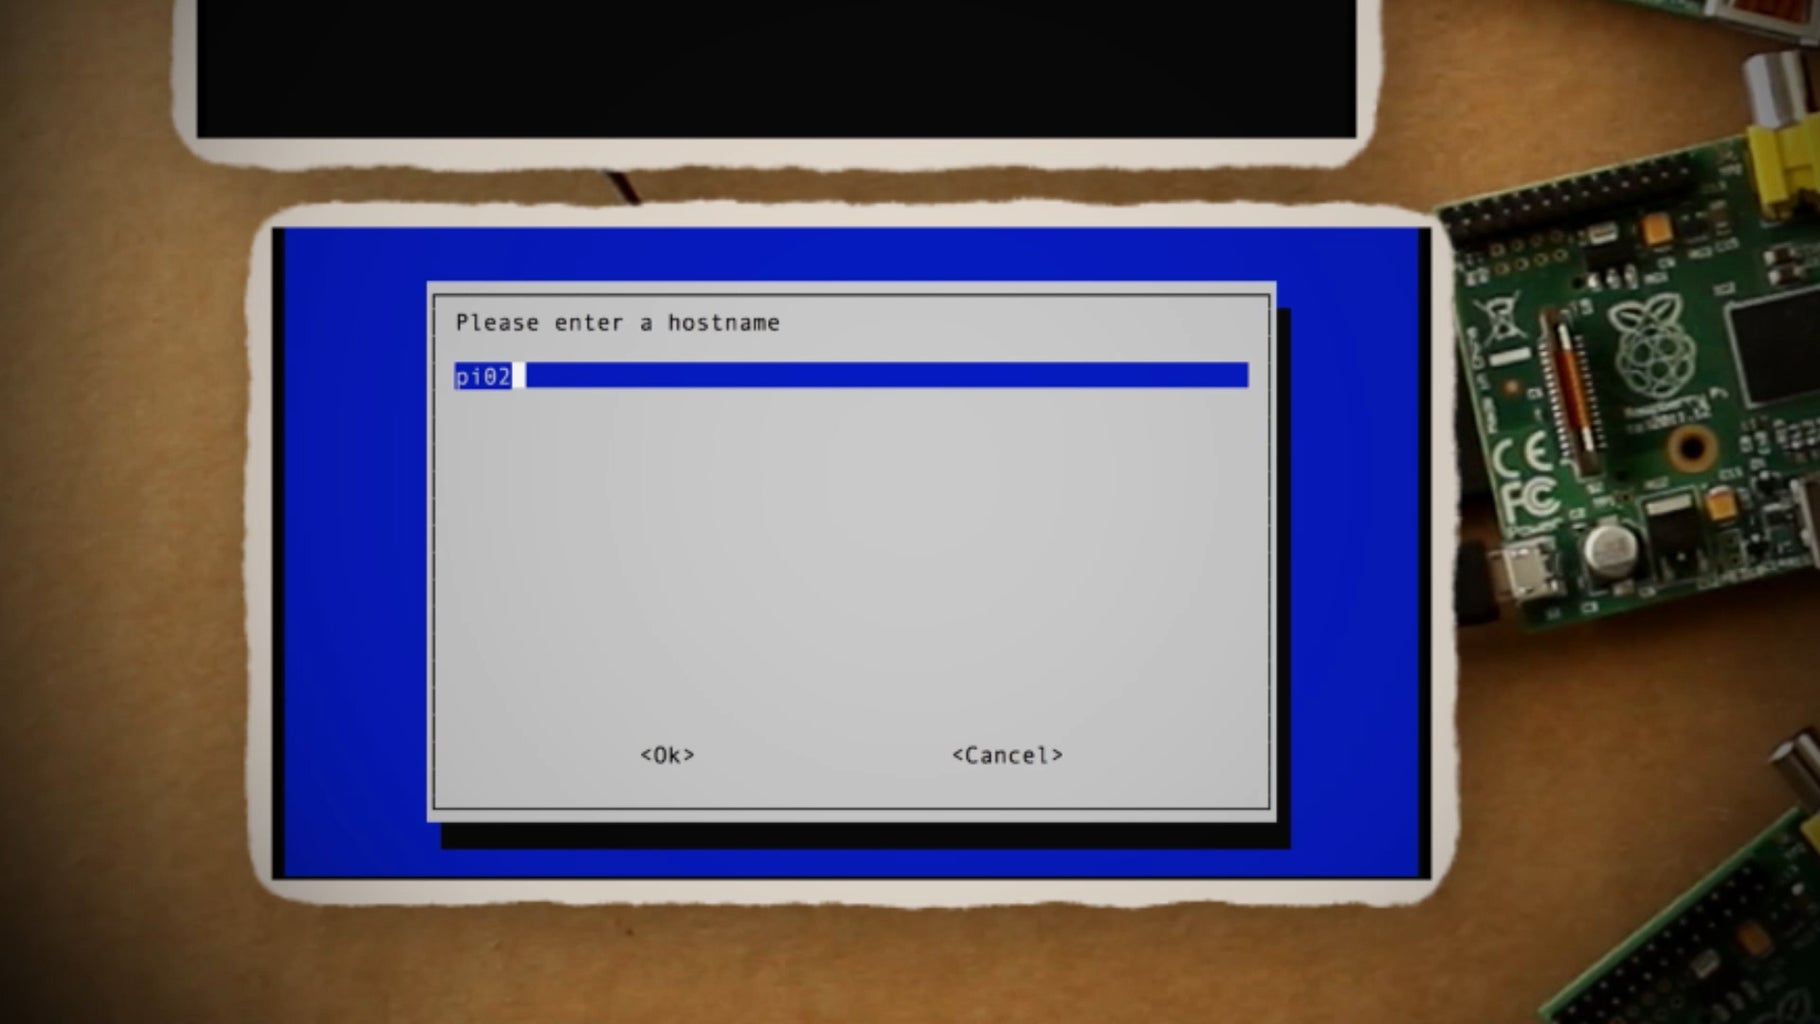
Copy down all of the IP addresses that pertain to the other Raspberry Pi's on the network. We will then be able to use those IP's to connect into each of the other Pi's using SSH. What we need to do first is rename each of the secondary Pi's to a unique network name. Right now they're all set to Pi01. Assuming that one of the secondary Pi's IP addresses is 192.168.0.3, here's how you can connect to it and change it's name:
- Establish an SSH connection
ssh pi@192.168.0.3 - Run raspi-config
sudo raspi-config - In the interface, scroll down to the Advanced option, and then choose Hostname.
- For the hostname, change Pi01 to the next sequential number, which is Pi02.
- Then exit out of the SSH session
exit
You want to repeat those steps for each of the other Pi's on the network renaming them to Pi03, Pi04, etc.
On your master Pi, you want to create a new textfile called "machinefile"
nano machinefile
And in it, you want to type in each of the Pi's IP addresses (including the Master IP address) on a new line and then save the file.
At this point, we could run a test file using mpiexec -f machinefile -n 4 hostname, but it will error out saying that there was a "host key verification failure". So in the next step, let's fix that.
Step 8: Verifying Host Keys


To fix it so that communicating with each Pi doesn't result in a host key verification failure, we need to create and swap keys for each of our Raspberry Pi's. This part may get slightly complicated, but hopefully you can stay with me.
- On the Master Pi, in the default home folder, create a new key.
cd~ssh-keygen - Navigate to the ssh folder and copy the key file to a new file called "pi01"
cd .sshcp id_rsa.pub pi01 - Next you want to connect via SSH into Pi02 and repeat those same steps to create a Pi02 keyfile
ssh pi@192.168.1.3ssh-keygencd .sshcp id_rsa.pub pi02 - Before exiting out of Pi02, we need to copy the Pi01 keyfile over to it and authorize it.
scp 192.168.1.2:/home/pi/.ssh/pi01 .cat pi01 >> authorized_keysexit - With Pi02 done, repeat all of those steps for Pi03
ssh pi@192.168.1.4ssh-keygencd .sshcp id_rsa.pub pi03scp 192.168.1.2:/home/pi/.ssh/pi01 .cat pi01 >> authorized_keysexit - Repeat the last step for the remaining Pi's that you have on your network.
- After generating keys for each of the Pi's, exit back to your Master Pi and copy over all of the keys generated on each of the Pi's.
cp 192.168.1.3:/home/pi/.ssh/pi02cat pi02 >> authorized_keyscp 192.168.1.4:/home/pi/.ssh/pi03cat pi03 >> authorized_keyscp 192.168.1.5:/home/pi/.ssh/pi02cat pi04 >> authorized_keys
(repeat for as many Pi's are on your network)
Step 9: Running a Program on Your Supercomputer


Now everything should be set up. While still on your Master Pi, try running this machinefile again:
cd ~mpiexec -f machinefile -n 4 hostname
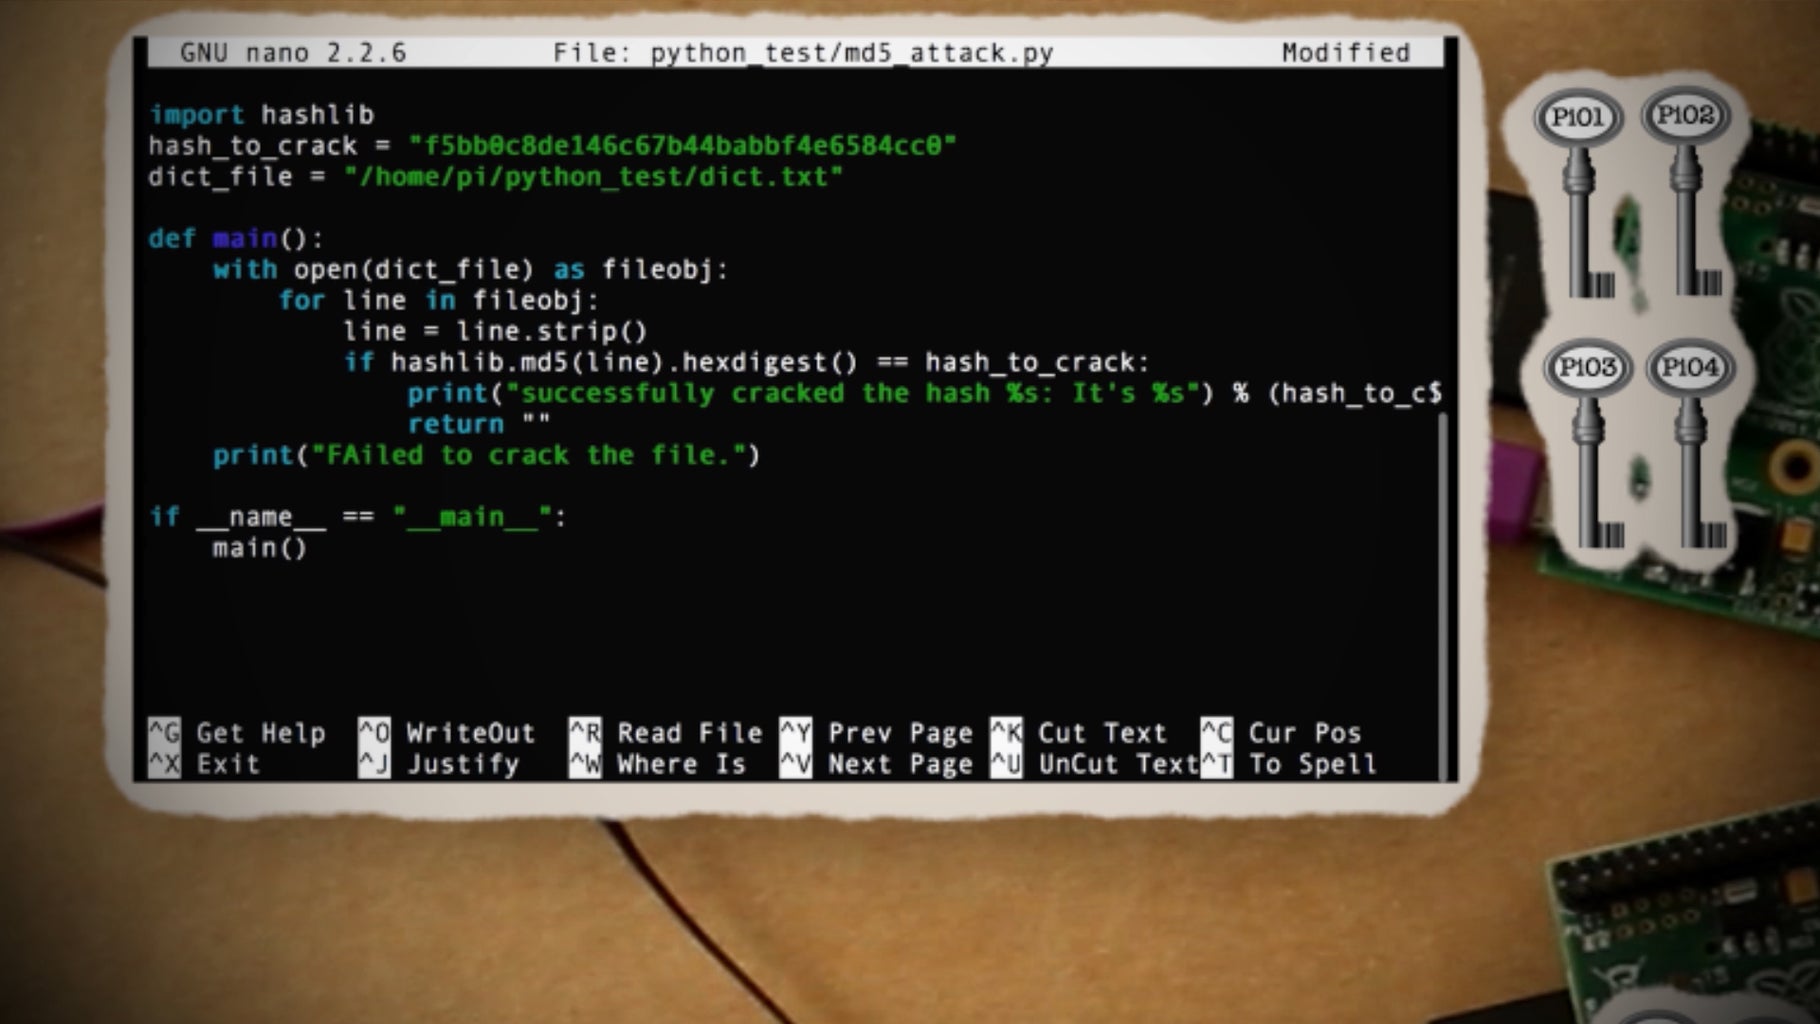
If everything was done correctly, it should return the IP addresses of all your Raspberry Pi's. Now that we've successfully tested out our supercomputer, lets run a python program on it:
- Download and unzip my test Python password cracking script.
wget http://www.tinkernut.com/demos/364_cluster_comp/python_test.tar.gztar -zxf python_test.tar.gz - Edit the password hash to one that you'd like to crack.
nano python_test/md5_attack.py - Copy the Python file to all of your Pi's.
scp -r python_test 192.168.1.3:/home/piscp -r python_test 192.168.1.4:/home/piscp -r python_test 192.168.1.5:/home/pi
(repeat for all remaining Pi's) - Run the python script.
mpiexec -f machinefile -n 5 python python_test/md5_attack.py
The script will run using the processing power of all of the Pi's on your network! Feel free to test it out using your own python script!

Third Prize in the
Raspberry Pi Contest 2016

Participated in the
Full Spectrum Laser Contest 2016

Participated in the
Hack Your Day Contest


