

Introduction: How to Make a Tablet Mount for Your Car


Hello Instructablers.
I do quite a bit of driving these days. I visit customers in country towns and some days spend five to six hours behind the wheel.
I like to use my Samsung Galaxy Tablet for music, navigation, CRM, and emails. For navigation and music I had to find a way of mounting the tablet to make it as safe as possible to use while mobile.
My first attempt was made from a plastic travel mug, duct tape, and a coat hanger. It worked quite well, but it was truly ugly.
My next effort (with valuable assistance from my daughter Lucy) gave a much more satisfying result, and that is what I will be setting out in this Instructable.
The basic concept is a plastic frame to hold the tablet supported by an upright that is anchored by a cast silicone block ("Oogoo") made to fit snugly in the centre console cup holder.
Step 1: Materials and Equipment

Materials
2 x Perspex or Plexiglass sheets 350x260mm (I got mine from eBay for $5 per sheet).
1 x Plywood to make a template the same size and thickness of your tablet.
2 x Plywood strips approx 40x200mm.
6 x countersunk head screws (or strong glue if you prefer)
2 x 500g tubes of silicone sealant
1 x 500g bag of corn starch (corn flour)
optional oil based paint for colour.
optional copper pipe or similar to make pen holders if desired.
Equipment
Heat gun
Jigsaw ( with blades for wood and plastic)
Drill
Clamps
Plastic freezer bag (large size)
Disposable rubber gloves
Container and spoon for mixing silicone
Simple workshop tools (screwdriver, hammer, marker pen, etc.)
Step 2: Make the Tablet Frame


• Place your tablet on the plywood sheet and mark around it.
• Cut out the sheet to make a template the same dimensions as the tablet.
• Cut out the three extra strips of plywood to hold the hot folded edges of the perspex.
• I found the A4 sized sheet of perspex was exactly the right size for the Galaxy Tab. If you have a different tablet, cut the sheet to suit allowing about 30mm on each side and at the bottom for folding.
• Cut the bottom two corners off the perspex to allow for folding.
• Clamp the template to the perspex sheet with the top edge flush and equal overhang on each side.
• With the heat gun, carefully heat one edge of the perspex until it becomes soft and pliable.
• With gloves on your hands use one plywood strip to fold the edge of the perspex around the template and clamp it in place until it cools and hardens.
• Repeat this process for the remaining side ant the bottom edge.
• Mark the locations of buttons.
• Remover the template.
• Cut away any perspex that covers buttons.
• Test the size with the actual tablet. Mark and cut holes for the headphones and power sockets.
• If the size is not right you can simply reheat the perspex and it will return to its original shape.
Step 3: Make the Upright

The upright is the part that supports the frame and holds it in the correct position. The frame is attached to the top part of the upright and the bottom part is cast into the silicone base.
• Cut perspex 350mm long and 50mm wide.
• Drill some holes into the lower part to help it key into the silicone base.
• Heat and bend the bottom part to lock it into the base.
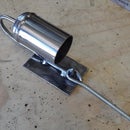
•Consider what else you can cast into the base of the unit. I made two pen holders from short lengths of copper pipe - about 60mm long with one end flattened.
Step 4: Cast the Base


This is the fun part. It's pretty messy so use disposable rubber gloves
• Mix silicone and corn flour at about 1:1 ratio by volume. For more details see Mikey77's excellent Instructable How To Make Your Own Sugru Substitute. This works much like mixing bread dough. It doesn't seem to cooperate at first, but soon comes together to form a nice elastic dough. I just used my hands and added more flour if it continued to be too sticky.
• When you have a nice elastic ball of dough drop it into a clean plastic freezer bag. This will protect the car.
• Push the bottom of the upright into the dough and squeeze the dough to get it into all the holes and to eliminate trapped air.
• Insert the pen holders or whatever accessories you have chosen to include.
• Drop it into the cup holder of the car.
• Manipulate the upright to get it into a good position and push the dough so it completely fills the space within the cup holder.
• Leave it all in position for a few hours to let it cure. Make sure the car windows are open.
Step 5: Attaching Frame and Final Positioning


• Once the silicone has cured you can remove the plastic bag.
• Position the upright and the frame in the car at the ideal positionand mark where to attach them. Remember that final adjustment will be made later.
• Attach the frame to the upright using countersunk screws or glue.
• Use the heat gun to carefully heat and soften the upright.
• Position the tablet frame as you want it and hold it in that position until the perspex cools and hardens.
• Make sure the unit doesn't block any controls or gauges.
• If it's not as you like it simply reheat and try again.
I found the upright to be slightly too flexible making the thing quite wobbly. I rectified this by gluing an extra strip of perspex behind the upright.
Once the glue is dry the unit is ready for testing. Drop the tablet into the frame. Plug in your leads and you're ready to rock and roll.
Step 6: Conclusion

This system has worked well for me, and I think it looks OK for a prototype. I would be really interested to hear your suggestions for improvements, or new ideas using the cast silicone base concept.
I hope you have enjoyed my Instructable; if you like my work you might like to visit my Etsy shop at this link.
Step 7: Formlabs

I have created this Instructable especially to enter the Formlabs contest. The prizes include Formlabs' impressive FORM 1+ 3D Printer. I would truly love to get my hands on one of these in order to:
• Start experimenting with creating replacement water pump parts for remote locations, and get my colleagues in the water pump industry thinking about the the new opportunities that technology like this brings.
• Modelling structures like bridges, stadia, etc.
• Making artworks using my own 3D AutoCAD drawings.
• And a plethora of other stuff that hasn't been thought of yet.
Thanks Formlabs for providing the inspiration for this project and for the massive range of great ideas that I'm sure this contest will reveal.
Step 8: SAFETY
After many comments from concerned readers I have decided to add an extra step to point out what should be obvious.
Don't let small children use power tools without very careful supervision.
Don't use a tablet while driving a car.
Don't use a tablet holder in your car if it is against the law.
You have been warned!

Participated in the
Remix Contest

Participated in the
Formlabs Contest

Participated in the
Glovebox Gadget Challenge


