

Introduction: How to Make a Van De Graaff Generator


I've built this Van De Graaff generator for a science coursework and it works pretty well considering it being built in a rush (needa hit that deadline man). With it, I managed to achieve a 1.5cm spark, a happy physics teacher and full marks for my coursework :D.
All the parts used are easy to find in shops and really cheap. Don't be too intimidated by the looks of it, its not that hard, improvising is key.
It's my first instructables so bear with me and I welcome any suggestions and comments.
All the best!- CCX
Safety
A generator is able to generate a very high voltage but it's pretty safe due to the low current. One with a weak heart, a pacemaker or any sensitive electronic device should not be operating or even be close at it. I bare no responsibilty over your carelessness and injury.
Step 1: Understanding How It Works.

It is really important to understand how it works, if not what's the point?
A Van de Graaff generator is an electrostatic generator which uses a moving belt to accumulate electric charge on a hollow metal globe on the top of an insulated column, creating very high electric potentials. It produces very high voltage direct current (DC) electricity at low current levels.- wikipedia
Understanding it can really assist on your build. (I missed this part)
Step 2: Plan and Gather Supplies
I used:
1. Plywood
2. Nylon wheels
3. 6mm Threaded Rod
4. 6mm Nuts
5. 8mm Washers
6. L brackets
7. 8mm standard bearings
8. 8mm aluminum tube
9. warning tape
10. PVC pipes
11. Metal bowls
12. Copper wire
13. Yellow Crimp Ring terminals
14. Screws
15. Teflon tape
16. Aluminium tape
17. 12v motor from a car vacuum
18. O-rings
19. Electrical connector strips
These are the materials I used although many can be changed and improvised
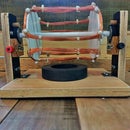
Step 3: Building the Body


I used two pieces of plywood with four threaded rod, washers and nuts as the main body. And the PVC pipe is held using two L Brackets
Step 4: Building the Bottom Roller and Brush


The bottom roller is made with 2 nylon wheels superglued together and an aluminium rod in the center.
It's supported with 2 L brackets and two ball bearing which are Epoxied together.
My roller is covered with a layer of teflon tape to determine the charge I want on my Van de Graaff
The material covering the roller can change the charge and you can choose the material you think suitable by refering to a triboelectric chart here.
For instance, mine is covered with teflon tape which is on the negative side of the triboelectric series which meant that my Van de Graaff generator will be POSITIVELY charged as it will take in all the negative charges.
The bottom brush is a yellow crimp ring terminal crimped to some wires and a heatshrink tube to keep things a little neat.
Step 5: Building the Top Roller


My top roller is done using the same method as the bottom roller with a aluminium rod in it, but to allow it to spin freely, I used a threaded rod (longer than the diameter of the PVC pipe) and placed inside the aluminium rod with also a layer of aluminium tape over it so that it will allow it to spin easier with less wear. It is then held on two cut outs on both sides of the PVC pipe and secured with two washers and nuts.
Step 6: The Belt


The roller is a warning tape (without the sticky side) cut to size and combined together using some double sided tape.
The tension of the belt can be adjusted using the four threaded rods on the main body of the Van De Graff
Step 7: Building the Dome and Brush


The dome is made using two metal bowls with some M3 screws, washers and nuts holding it both of them together.
The bowl on the bottom have a hole cut out to fit the PVC pipes that will be connected to the body.
Inside there's also a yellow crimp ring terminal crimped to some wires and heat shrinked to act as the top brush that connects to the dome.
Step 8: Connecting the Bottom Roller to a Motor


The motor wasn't actually part of my Van De Graaff and I was just using a drill to power it until my physics teacher requested me to add it on.
The bottom roller has an extended rod to either power it using a drill or add the motor.
I used the inner roller of a correction tape and a washer to make the belt pulley on the bottom roller. And the belt pulley on the motor is made out of two rivet ends chopped off and epoxied to the motor. And the belt would be an O-ring.
It is powered using a lab bench power supply so the speed can vary from the selected voltage.
Step 9: Complete!


Now test it out and enjoy your piece of work!
After building it, I figured that the sparks could be much bigger and was limited by the size of the dome and the way it's built with lots of sharp edges and gaps from the cutting and joining of both bowls... such waste.
Anyways, I hope this have assisted you on building your own Van De Graaff generator!

Participated in the
Epilog Contest 8


