

Introduction: How to Make More Game Memory / Cards for the Hydra Game Console


I started to do this because I wanted to show off more than one program
on the Hydra, and it is in a few ways easier than I thought. The book that
comes with the Hydra almost explains this but leaves out a few details
that I will fill in. It is much simpler than I thought.
It will make it much cheaper for you to share games you make for your
Hydra, and it seems to be OK (as in legal) and very convenient to do this.
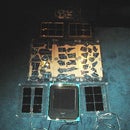
What is shown here is not one but several game memories in various make stages.
Step 1: Things You May or May Not Need...

You will need more serial flash chips.
Although 24LC256 and 24LC1024 are mentioned by the author of the Hydra manual,
I've used 24LC512, which has 64K of bytes on it.
Almost all of the hydra software I've seen runs in 32K,
and therefore which ever chip is most readily available
or cheapest is recommended. Also recommended is getting DIP chips instead
of surface mount if it's available, even if they cost a little bit more.
You can obviously use up your experimenter's card to make another
game card, but I saved mine. You can easily etch a single sided board
or not even etch it. I had a stale bottle of ammonium persulfate that did
not etch, so I cut away the excess copper with a dremel tool after etch failure.
(Note to self: Ferric Chloride etchant has a much longer shelf life.)
The boards can be single sided because all of the pins used for memory
are on the back side of the board.
You don't even need to be plugging any boards into the cartridge slot.
You can simply turn off the Hydra and replace the 24LC1024 that is
socketed on the motherboard with any of the above chips, and load
games or programs into the replaced chip.
HAZARD: Pins breaking off. This problem can be avoided somewhat
by putting the chip into another socket, especially one with hard round pins.
HAZARD: Plugging the chip in backwards. "If" this is likely to happen, label
the chip with an arrow (and also some clue as to what program might be
on the chip, even perhaps by labeling them, like #1 ... etc.).
HAZARD: Be sure to turn off the Hydra when changing the chip on the
motherboard. The cartridge slot is designed to be hotplugged, the
chip socket on the motherboard is not. The Propeller is a 3 volt chip
that may be very static sensitive.
Summary:
Needed: more flash chips
Needed for best results: usable boards or equipment to make them
(etchant, permanent marker, soldering iron and solder, drill or dremel,
safety glasses and gloves or do at your own risk...)
Needed to protect memory chips plugged into motherboard:8 pin dip/dil socket or pin header with hard round "machine" pins. I cut the green one (16 pins) in half.
(and insert them correctly with the help of labeling)
Step 2: Making Boards - and Extra Details.


What is left out of the manual concerning the flash chips is the power pins.
Pin 4 is ground and pin 8 is +3.3 Volts.
The chip is connected this way:
1.GND 8. (+)3.3 volts
2.GND 7. GND
3.GND 6. SCLK
4.GND 5. SDAT
It is recommended to put a 0.1uF capacitor across pins 1 and 8,
and also an LED in series with a 330 ohm resistor (optional) to tell you it's on.
It appears necessary to make the board jump the connections called
+3.3V and +3.3V LOOP (notice this also connects to pin 8)
and
+5V and +5V LOOP
Notice now there are only 3 more edge connections to make...
GND, SCLK, and SDAT...
And that all edge connections are on the back side of the board,
so be mindful that they are backwards:
Looking at the BACK side of the board the connections will be in this order.
GND NC NC /--\ /--\ SDAT SCLK NC
and /--\ represents TWO LINES connected together... remember that the
second pair is the 3 volts which goes to pin 8, and that pin 8 appears
on the upper LEFT (WHEN Looking at the BACK SIDE of the Board).
NC means that that edge trace line is not connected to anything.
If you are adding a chip to your experimenters board, make the
connections to the top row of holes above the edge connections
which are clearly labeled in reverse order on the front side of the board.
(of course...)
HAZARD:Confusion about the order of the connections is likely. Be careful.
Again notice that when connecting to the chip from the back side then the
left and right columns of pins on the chip will also be exchanged.
Beware of the fact that my small black wire is unnecessarily going from
the 5 volts loop edge-connections to the "5 volt" (red) LED, AND that wire is
hiding part of the trace for the 3 volts to pin 8 (in the second picture).
Step 3: I Am Busy Making More Boards and Other Memories So Check Back.

Here I will show any more board or other removable game memories
for the Hydra and any additional details , or answer any questions.
And soon ... photo of this board working in the Hydra. It does.
One more thing... The Hydra can easily be used to program the memory chips to
boot games or other programs into stand-alone or Protoboard Propeller chips.
Just care to look for relevant copyright notices on any borrowed code you use,
especially for non-Hydra Propeller units, and avoid borrowing code for them.
--- end as of 10/23/07 ---
Added picture of Hydra Game System running one of it's graphics demos
from the home made game card. TV does not show up very well in pictures,
nor does it come with the console kit, as everything else on the table does.
To see the demo better, look here and ignore the German.
Propeller Prozessor
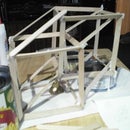
Step 4: Protoboard Cards and Also Independent Memory Chips


Here are two more game cards made from proto board with the
right spacing on the edge connection, and a chip with machine pins
added. The second picture has a red arrow pointing to where
game/program memory chips can go on the motherboard
instead of using a game card.
Refer back to step 2 especially the last picture (drawing) for the
details on wiring the game cards.
Step 5: Make Games!
I have been too busy to finish any of my games for this yet,
even though it comes with lots of games and demos and
half finished games, I've been making all kinds of stuff lately
and haven't got around to finishing any games yet.
Making games is like being god.
With just words (of code) you can start with nothing and create worlds and rules and
display everything in them as millions of dots on a screen. The code can be learned
by hacking the other games sometimes faster than reading the whole manual.
THIS IS A FACT: More videogames than movies are played every day!


