

Introduction: How to Program Arduino Bluetooth Serial Communication in Visual Basic Express 2010


There are various Android Program/Software to control your arduino bluetooth robot with your android. But you can not find one to use with your windows PC. So I program a LITTLE one In Visual Basic Express 2010. Hope it might be helpful as a resource to beginners in Visual Basic GUI Programming. And if you enjoy it please leave a feedback. I do my best in this first INSTRUCTABLES.
Sorry for spelling & Grammar mistake in advance.
Step 1: How To
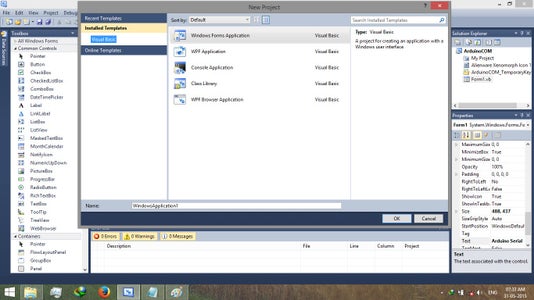


Start Visual Basic Express 2010.Open a new window with a blank form. Add two Group box from Containers Toolbox menu. Change text of this two box to Connection Settings and Serial monitor. Then add a label , combo box and a button to the 1st group box and change the text and name as follow-
label: text to "COMM PORT" combo box: name to "lstPorts" button: name to "Button1"
In 2nd Group box add a list box and change the name to "lstConsole" and a button and change the name to "Button2" and text to "Exit"
Step 2: Insert Control Button

Now add your five button to control the movement and set the name and text to:
Button3 to "Forward/w"
Button4 to "Backward/s"
Button5 to "Left/a"
Button6 to "Right/d"
Button7 to "Stop/c"
Button8 to "Bluetooth Test"
Step 3: Programming

Now we program every components of the Form. First Form load code.To do so double click in any where in the form and change the code to
Private Sub Form1_Load(ByVal sender As System.Object, ByVal e As System.EventArgs) Handles MyBase.Load
        GetSerialPortNames()
End Sub
Then add some additional code above the Form1_Load code to get your comm port and some function to work with your software
Imports System.IO
Imports System.IO.Ports
Imports System.Threading
Public Class Form1
    Dim buffer As String
    Delegate Sub myMethodDelegate(ByVal [text] As String)
    Dim bD1 As New myMethodDelegate(AddressOf process)
    Dim WithEvents SerialPort As New IO.Ports.SerialPort
Private Sub Form1_Disposed(ByVal sender As Object, ByVal e As System.EventArgs) Handles Me.Disposed
If SerialPort.IsOpen() Then
SerialPort.Close()
End If
End SubAnd below the code of Form1_Load
Sub GetSerialPortNames()
        For Each sp As String In My.Computer.Ports.SerialPortNames
            lstPorts.Items.Add(sp)
        Next
    End Sub
    Sub SendSerialData(ByVal Port As String, ByVal data As String)
        If (SerialPort.IsOpen) Then
            SerialPort.Write(data)
        Else
            MsgBox("Not connected to Port.")
        End If
    End Sub
Sub process(ByVal myString As String)
buffer = buffer + myString Dim str As String str = buffer If InStr(str, "|") Then Dim words As String() = str.Split(New Char() {"|"}) buffer = "" Dim word As String For Each word In words If (word.Length > 0) Then lstConsole.Items.Add(word) End If Next End If End Sub
    Private Sub SerialPort_DataReceived(ByVal sender As Object, ByVal e As System.IO.Ports.SerialDataReceivedEventArgs) Handles SerialPort.DataReceived
        Dim str As String = SerialPort.ReadExisting()
        Invoke(bD1, str)
    End Sub
Private Sub SerialPort_DataReceived(ByVal sender As Object, ByVal e As System.IO.Ports.SerialDataReceivedEventArgs) Handles SerialPort.DataReceived
Dim str As String = SerialPort.ReadExisting() Invoke(bD1, str) End Sub
Step 4: Intitialize Connect

To initialize the button "Connect" replace the button code with
Private Sub Button1_Click(ByVal sender As System.Object, ByVal e As System.EventArgs) Handles Button1.Click
        If lstPorts.SelectedIndex <> -1 Then
            Try
                If SerialPort.IsOpen Then
                    SerialPort.Close()
                    Button1.Text = "Connect"
                Else
                    SerialPort.PortName = lstPorts.SelectedItem.ToString
                    SerialPort.BaudRate = 9600
                    SerialPort.DataBits = 8
                    SerialPort.Parity = Parity.None
                    SerialPort.StopBits = StopBits.One
                    SerialPort.Handshake = Handshake.None
                    SerialPort.Encoding = System.Text.Encoding.Default
                    SerialPort.Open()
                    Button1.Text = "Disconnect"
                End If
            Catch ex As Exception
                MsgBox(ex.Message)
            End Try
        Else
            MsgBox("Please choose a serial port", vbInformation, "Serial Port")
        End If
    End Sub
Click the Button "Bluetooth Test" and replace the code .This button click will recive a messege in consol as "OK" to confirm that bluetooth is connected with the device. Else "ERROR" to say something wrong in connection.
Private Sub Button8_Click(ByVal sender As System.Object, ByVal e As System.EventArgs) Handles Button8.Click
        If (lstPorts.SelectedIndex <> -1) Then
            SendSerialData(lstPorts.SelectedItem.ToString, "AT")
        End If
    End Sub
Step 5: Code for Control Keys

Now replace the code of each button as follow to control the movements
Forward:
Private Sub Button3_Click(ByVal sender As System.Object, ByVal e As System.EventArgs) Handles Button3.Click
        If (lstPorts.SelectedIndex <> -1) Then
            SendSerialData(lstPorts.SelectedItem.ToString, "w")
        End If
    End Sub
Backward:
Private Sub Button4_Click(ByVal sender As System.Object, ByVal e As System.EventArgs) Handles Button4.Click
        If (lstPorts.SelectedIndex <> -1) Then
            SendSerialData(lstPorts.SelectedItem.ToString, "s")
        End If
    End Sub
Left:
Private Sub Button5_Click(ByVal sender As System.Object, ByVal e As System.EventArgs) Handles Button5.Click
        If (lstPorts.SelectedIndex <> -1) Then
            SendSerialData(lstPorts.SelectedItem.ToString, "a")
        End If
    End Sub
Right:
Private Sub Button6_Click(ByVal sender As System.Object, ByVal e As System.EventArgs) Handles Button6.Click
        If (lstPorts.SelectedIndex <> -1) Then
            SendSerialData(lstPorts.SelectedItem.ToString, "d")
        End If
    End Sub
Stop:
Private Sub Button7_Click(ByVal sender As System.Object, ByVal e As System.EventArgs) Handles Button7.Click
        If (lstPorts.SelectedIndex <> -1) Then
            SendSerialData(lstPorts.SelectedItem.ToString, "c")
        End If
    End Sub
To close the software we must program the quit button as follow
Private Sub Button2_Click(ByVal sender As System.Object, ByVal e As System.EventArgs) Handles Button2.Click
        Application.Exit()
        If SerialPort.IsOpen Then
            SerialPort.Close()
        End If
    End Sub
Step 6: Finalize the Build


For Modification and design Purpose you can now change the Form1 Title text to your choice name as I change it to "Arduino Bluetooth Communication".
Now you have done. Save the projects with any name of your choice. Then from Debug menu click Build. When successfully done you got your own "Arduino Bluetooth Communication Software".
N.B: I assign some key to the buttons as follow-
Forward-> "w"
Backward->"s"
Left->"a"
Right->"d"
Stop->"c"
means when you click the any button it execute the assigned key to arduino so you need to program your own arduino sketch with this key to control. You can also change the baud rate,parity,data bit etc when initialize the code for Button1
The source code is here for reference:


