

Introduction: How to Program an ATtiny 85 Digispark


So, why another 'How to' about the ATtiny 85?
Mainly to clarify key steps that could help avoid the problems being experienced by so many, with errors like this:
"avrdude: stk500_getsync(): not in sync: resp=0x00 "
"avrdude: usbdev_open(): did not find any USB device "usb".
These instructions relate to the Digispark kickstarter, which is an Attiny85 USB Development Board for Arduino.(See photo).
I decided to get it with the intention of building a Fridge Door alert and expected a board would be better than just the chip. However, most tutorials just refer to the raw chip using pin numbers based around DIP (dual inline package) or relevant sockets. This was confusing because the Digispark board just has terminal numbers and it was hard to confirm which pin on the chip they were connected to. The next step will make this clear.
Step 1: Pin Designations

Finally after much searching I realised that the same physical pin can have different designations in the Arduino IDE (Integrated Development Environment).
Physical pins on Microcontrollers are numbered anticlockwise starting at the notch or dot on the back of the chip. Then, for example, physical pin 7 on the ATtiny85 is designated as digital 2 or Analog 1.
Step 2: Open Source Arduino IDE Setup
.
It is now assumed that the Open Source Arduino IDE has been downloaded and installed along with the ATtiny 85 board manager files.
If not, it is all detailed here: https://github.com/damellis/attiny/zipball/Arduino1
Step 3: Setup the Arduino As a Programmer
The Arduino Uno first needs to be setup as a Programmer or ISP (In System Programmer).
Select "Arduino Uno/Genuino" as the board .
Verify(Compile) & Upload the Sketch "ArduinoISP", found under Examples.
It should complete successfully with message Done Uploading.
This will confirm that correct Port is being used and communication between PC and theArduino Uno is working.
Step 4: Connect the Arduino Uno to the ATtiny 85 Digispark.
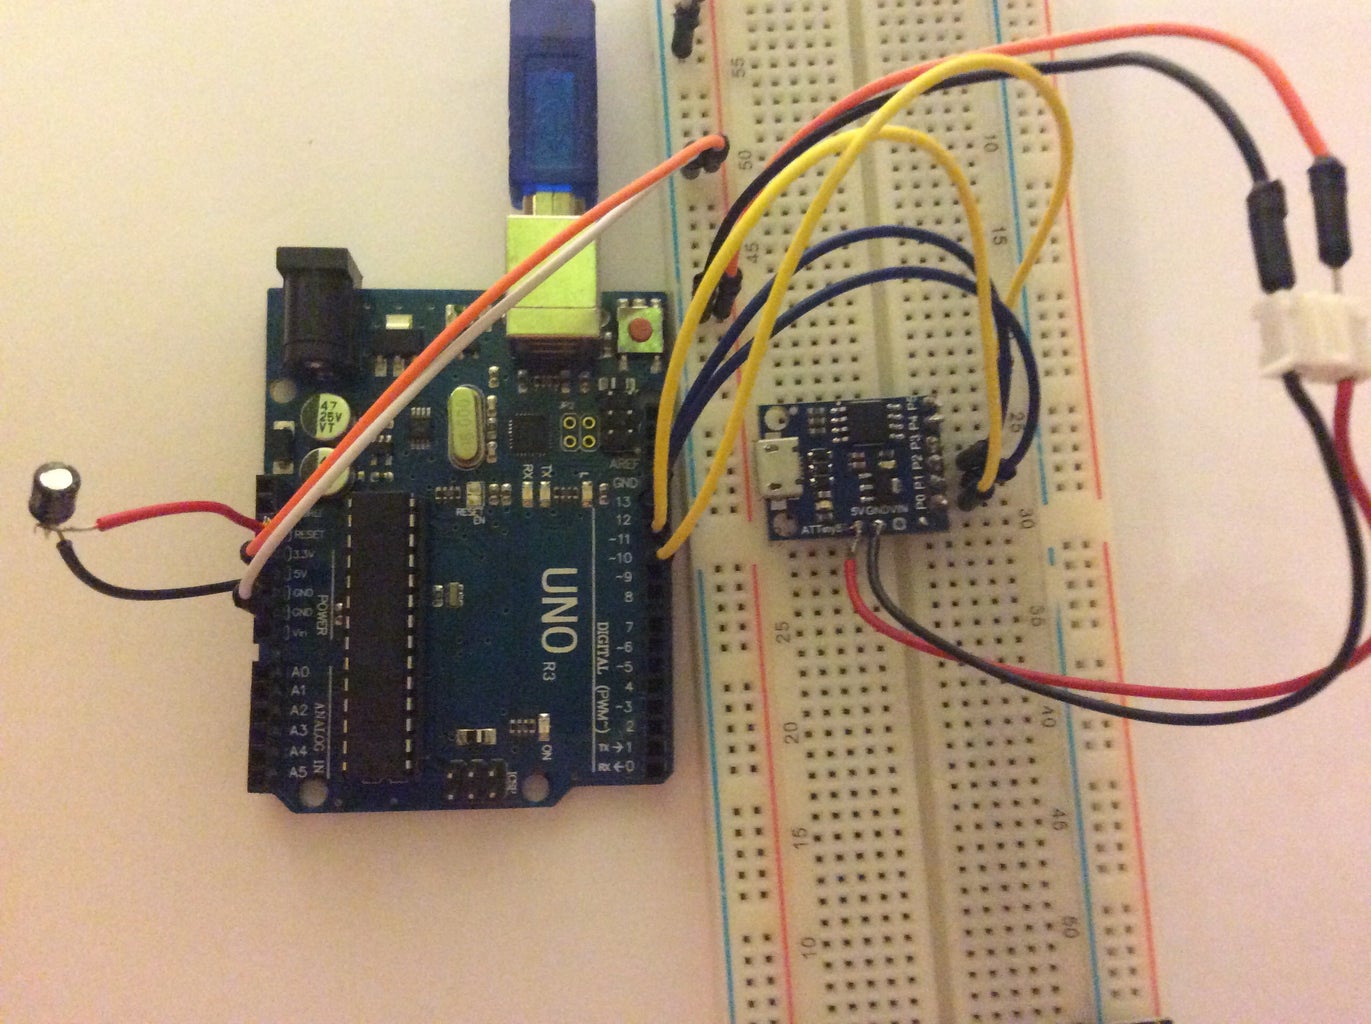

Also, a 10uF capacitor from Reset to GND on the Arduino Uno.
IMPORTANT: This prevents an auto reset when uploading the program to the ATtiny85.
However, an error will occur if it is connected in the previous Step, when Uploading the "ArduinoISP' Sketch.
It should only be connected in this step when using "Arduino as ISP" to program the ATtiny85.
Step 5: Burn Bootloader Onto ATtiny85.
To do this the Arduino must be setup as In System Programmer.
From Tools Menu,
Change Programmer to "Arduino as ISP"
From Tools, Board Select "ATtiny85" as the Board to be Programmed:
Recheck that the correct ATtiny is selected, otherwise there will be errors.
From the IDE Tools, Menu, Clock. Select: 8MHz Clock speed.
Burn Bootloader.
The IDE should confirm with 'Done burning bootloader'
Step 6: Upload a Sketch Program
This can be confirmed by hooking up LED tp pin P0 and Uploading Blink from examples list.
Note: Change pin number from 13 to 0. It appears in 3 places. Then, compile and upload.
Step 7: Test to Confirm

Hook up an LED to terminal 0 and power up the ATtiny85 via the mini USB or a battery.
Step 8: Check Programmer Heartbeat

Instead of blindly following steps, it helps in troubleshooting if one understands the process better.
So, Attached is a file of comments in ArduinoISP sketch.
It begins with "this sketch turns the arduino into a AVRISP".
What is an AVRISP?
Again after much searching AVR, are simply the initials of the guys that developed small processors like the ATtiny 85.
Alf(Egil Bogen) Vegard (Wollan) RISC processor. (aka Advanced Virtual RISC)
And RISC= Reduced Instruction Set Computing.
And ISP = In System Programmer
For those who want visual confirmation that download was successful and that the Programmer is running try this:
// Put an LED (with resistor) on the following pins:
// 9: Heartbeat - shows the programmer is running
// 8: Error - Lights up if something goes wrong (use red if that makes sense)
// 7: Programming - In communication with the slave


