

Introduction: How to Sew Spandex


In this instructable, I'm going to show you how to construct a one-piece spandex superhero costume using a home sewing machine. Contrary to popular belief, sewing spandex on a home machine is actually quite easy and effective with the right tools and techniques, and learning to sew spandex is a great skill to have, no matter what you're going to use it for.
This instructable is part of my How to Become a Superhero collection, and in the previous tutorial I showed you how to create your own custom-fit pattern for a spandex suit. If you have your own pattern, ready to go, or if you just want some tips on sewing spandex on a home machine, this instructable is for you! Otherwise you might want to start with one of the other tutorials in the series.
Constructing a Spandex Supersuit (*you are here)
Step 1: Tools and Materials
Materials:
- About 2-3 yards of 4 way stretch spandex (or what is required for your pattern)
- Matching thread
- ⅜” elastic
- Zipper, hook and eyes or other closures (depending on your design)
- Commercial or hand designed pattern for your design
Tools:
- Sewing machine or serger
- Stretch sewing machine needles
- Double sewing machine needle
- Needle point and serrated tracing wheel
- Transfer Paper
- Fabric and paper scissors
- Thread snippers
- Seam ripper
- Hand sewing needles
- Pins
- Tailor’s chalk or disappearing marker
- Clear ruler
- Flexible measuring tape
- Hip curve
- Pattern paper
- Cutting table or other cutting surface
- Zipper foot (optional)
Step 2: Prepping for Spandex Sewing
Before you start sewing your supersuit, or any spandex project there are a few things you should do to make the process go more smoothly.
First, choose the right needle for your project. While universal sewing needles can sew stretch, there are needles specifically designed for different types of stretch fabric. Jersey and stretch needles have ballpoint ends that help prevent the needle from tearing the fabric, and the structure of the needle is designed to avoid dropped stitches.

Test your stitches first on every new fabric. Stitches might perform differently when you are sewing along the grain or cross-grain of a knit, so you need to take that into account when you are sewing.
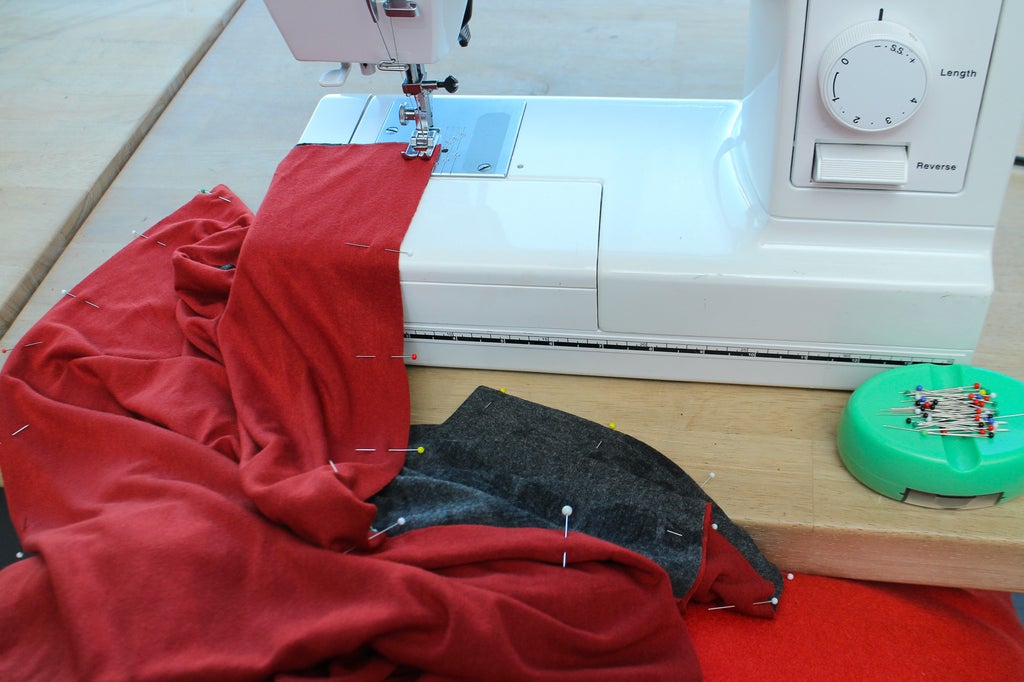
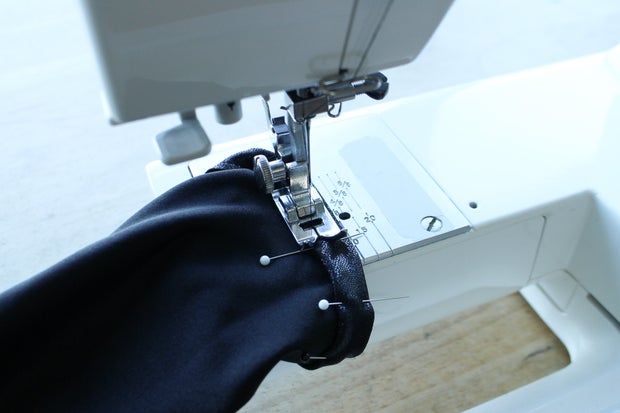
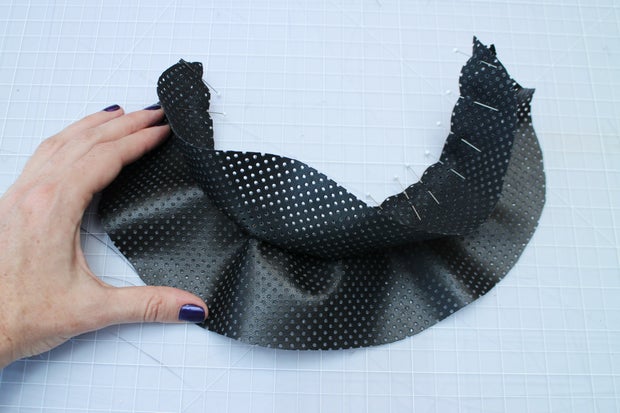
If your machine lets you adjust the pressure of your presser foot decreasing the pressure can help prevent stretch fabric from stretching or puckering while you sew as you can see in the photo below.

Pin! Spandex tends to stretch and travel as you sew, so pinning your pieces together securely is key.
Sometimes when we are sewing a tricky shape, or trying to match seams exactly, it's a good idea to hand baste before you machine sew. Sure, basting can be a little tedious but it will sometimes make sewing clean seams so much easier and save you time and frustration in the end.

Step 3: Stretch Stitches on a Home Machine

Some people think you need a serger to sew spandex, but while sergers and overlock machines are great tools that can simplify stretch sewing, they are by no means the only option. The main challenge in sewing spandex is that your stitches need to be able to stretch with the fabric, so you need to use special stitches when using a home machine. Stretch fabrics can also be a bit slippery, springy, and hard to control as you are sewing them, though I actually find spandex to be among the easiest stretch fabrics to sew.
Stretch sewing definitely presents some unique challenges but since I started sewing spandex on my home machine I have become a convert, and I think that with a few tricks a home machine is actually a better tool for sewing stretch than a serger.
On most home machines, you usually have a few different options of stretch stitches to choose from. You know all those squiggly lines labeled with numbers on your stitch selector dial? Those are actually very useful stitches that will help you sew stretch. Here are a few of my favorites:
Zigzag - a classic for sewing stretch fabrics on a home machine, because the structure of the stitches allows the seam to stretch. If zigzag is the only stretch stitch your machine offers, it's a great option, but it is not necessarily the best option. Zigzag seams have fairly large gaps between stitches, and the threads tend to pull and become visible on a tight garment. Zigzag can also have a tendency to pucker and is not as strong as some of the other more reinforced stretch stitches. I usually only use zigzag to sew seams in mock-up garments like the one we created in the last lesson.


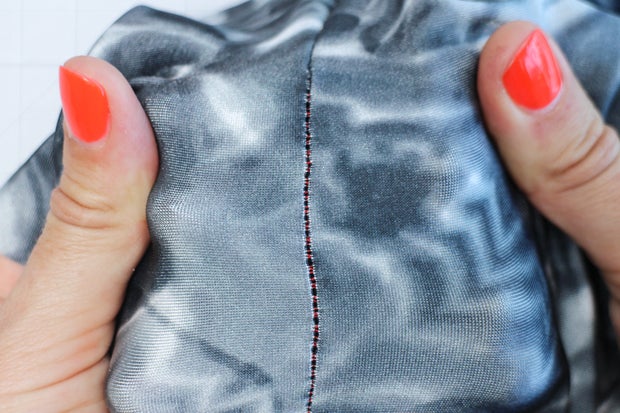
Overcasting (or Knit) Stitch - this is a great stitch for stretch because it both makes a clean unbroken seam line and creates a wider stitch that finishes the edge of the fabric. It also lays really flat, allows for a lot of stretch, and is great for stitching spandex and other very stretchy fabrics. This is my go-to for sewing supersuits once I know my garment is fitting correctly. The one drawback of this stitch is that is is really hard to take out a seam if you make a mistake.


On my machine there is a special "Stretch Stitch" (S.S.) mode on the stitch width dial that you use when sewing most of the stretch stitches like this one. Check your machine manual to see how to set up your stretch stitches.

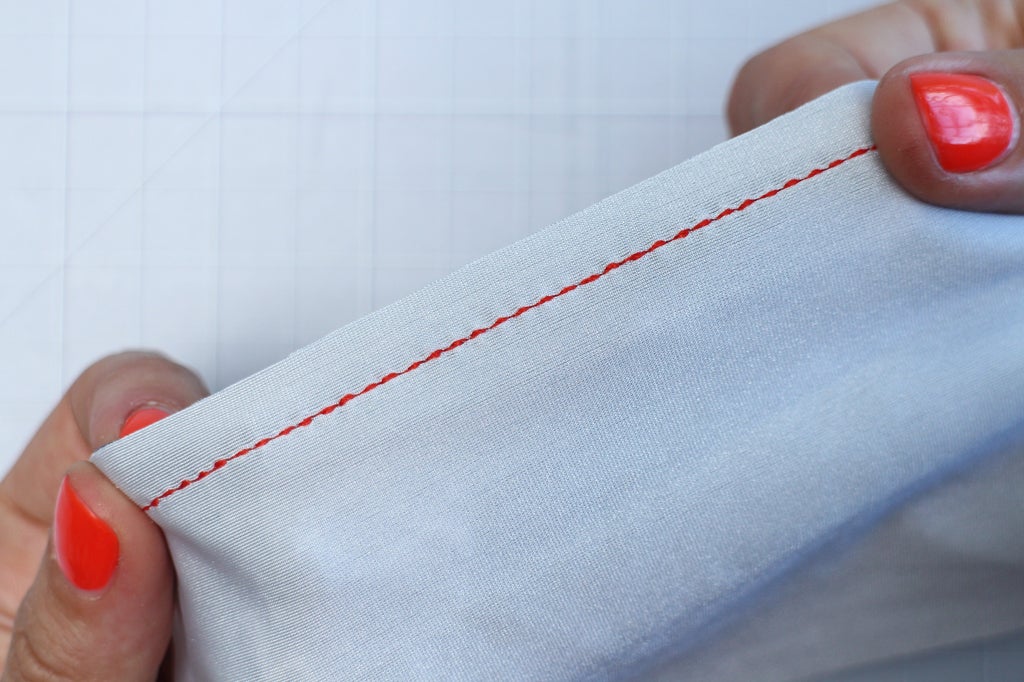
Triple (or Straight Stretch) Stitch - this stitch looks like a regular straight stitch but each stitch is sewn three times, giving the seam more stretch. It doesn't pucker like other stretch stitches sometimes do and is good for seams that need to look clean and have a lot of strength, or seams that need to be pressed open rather than finished together as they are with a zigzag or overcasting stitch. It is also a great stitch for hemming and topstitching spandex. I use this stitch a lot, but like the overcasting stitch it is hard to take out if you mess up.

Triple Zigzag (or Tricot) Stitch- like a regular zigzag made out of a straight stitch, this stitch is both stronger and stretchier. It's a good stitch for topstitching down things that need to stretch, but not as good for seams. It's used a lot on elastic and underwear, and is a good stitch for creating appliques on stretch or setting in panels of invisible mesh for cut-outs.


Another technique that is used by a lot of home spandex sewers is the "stretch the straight stitch" method. This means you use your regular straight stitch like you would on a non-stretch fabric, but as you sew you stretch the spandex. You need to use both hands to do this, with one in front of and one behind the foot, stretching equally in both directions as the fabric feeds under the needle. This creates room for the regular stitches to stretch when you're done sewing.
I am personally not very fond of this method, I find sewing this way to be awkward and a bit hard to master. I also think it makes sewing curves and complex shapes much more difficult and the finished seams aren't nearly as strong as seams made with the other stretch stitches. If you are working on a machine that doesn't have any other stretch stitches (like an industrial machine) you can definitely use this method, and it can also be a good stitch for sewing mock-ups because the seams are easy to take out.
Step 4: Using a Walking Foot Attachment
One thing that can happen when you're sewing stretch on a home machine is that the seam can pucker or get "wavy". This is because the fabric, especially the top layer, isn't feeding fast enough through the machine and it is getting stretched as it is sewn. When you're sewing something like a supersuit that is going to be stretched tight against the body, this kind of seam stretching isn't necessarily a problem, but if it is causing you difficulty, you might want to try using a walking foot attachment on your machine.


A walking foot has "walking" teeth that mirror the movement of the lower feed dogs, helping to move the fabric through the machine and create more even stitching. It can be especially helpful for topstitching stretch, or sewing slightly 'sticky' materials like the faux leather I used on my suit. Waking feet are also helpful for a lot of other types of sewing, especially if you're working with thick fabric or leather, so they aren't a bad investment.
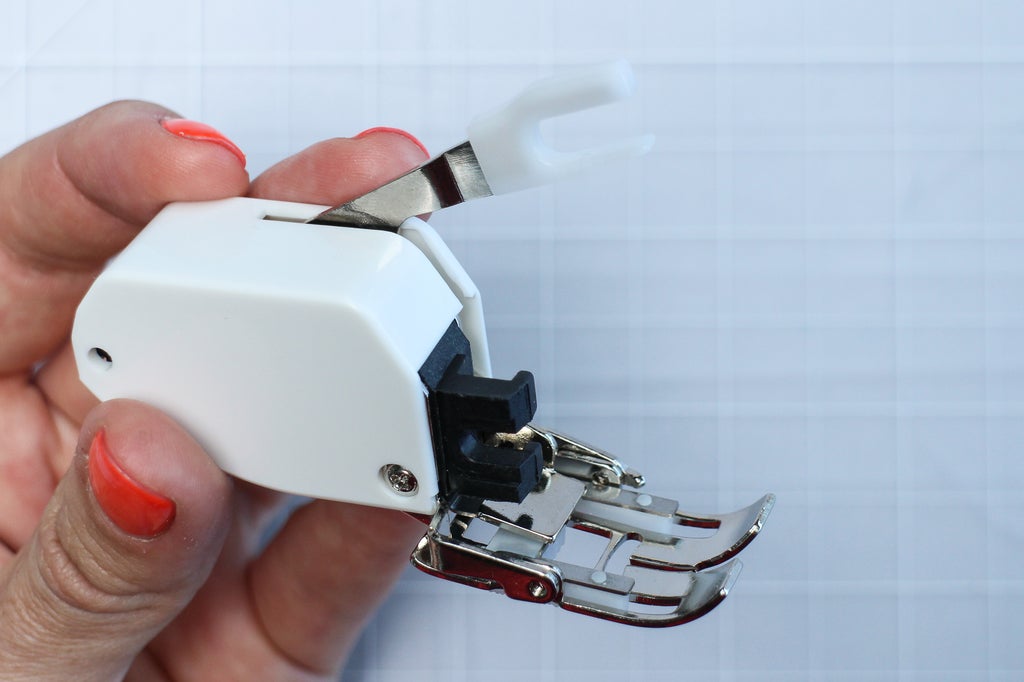
Not all walking feet work on all machines, so check your manual or look online to see which one to buy for your machine. (You don't necessarily need to buy the one sold by your machine's manufacturer though. Janome makes a walking foot for my machine that is $50, but I found a perfectly good one on amazon for $11).
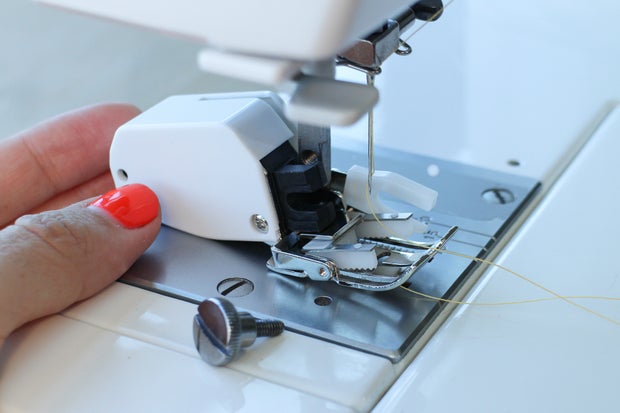
To attach most walking feet, you need to unscrew the entire presser foot holder by unscrewing the thumb screw. Slide the walking foot over the presser foot bar while simultaneously fitting the little claw on the right of the foot over the base of the needle clamp screw. Tighten the thumb screw and you're ready to sew.


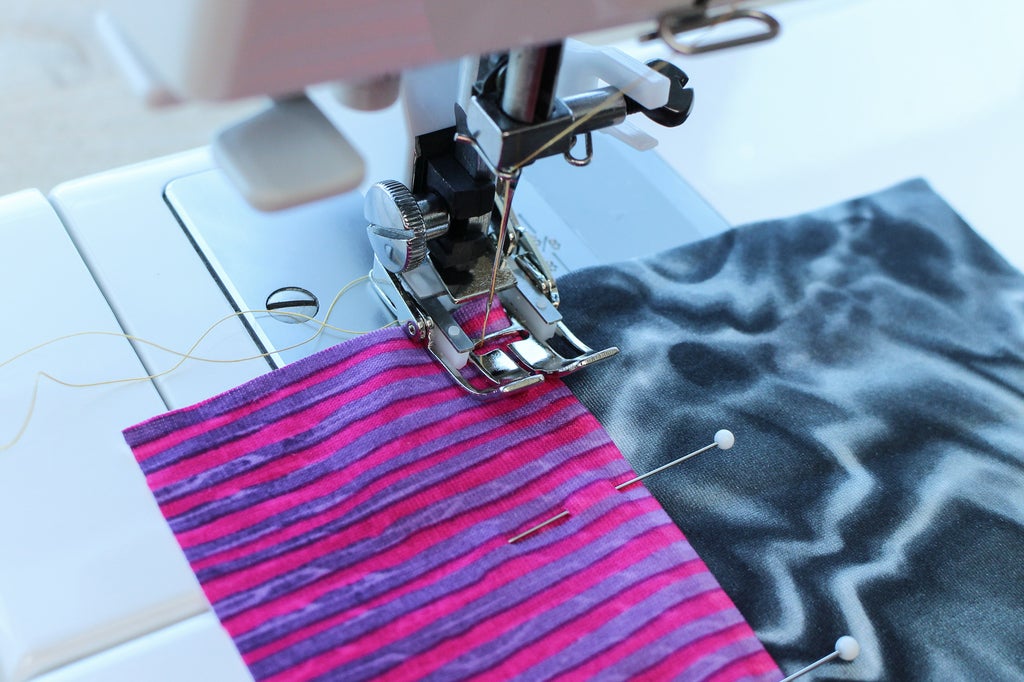
Sew just like you would normally when using the the walking foot attachment. Test it on your machine and compare the results you get from different stitches.
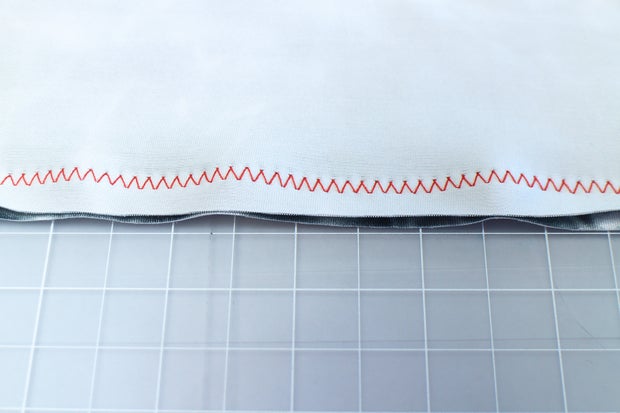
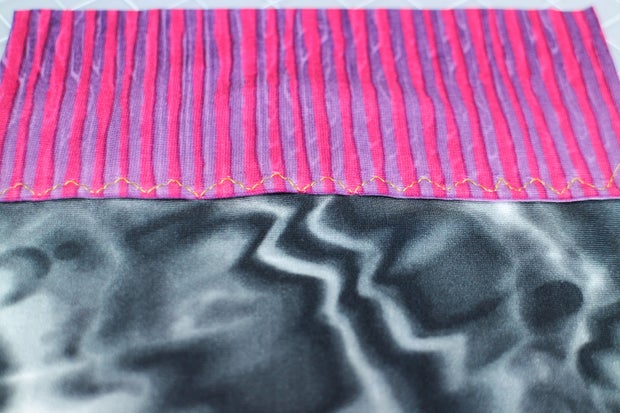
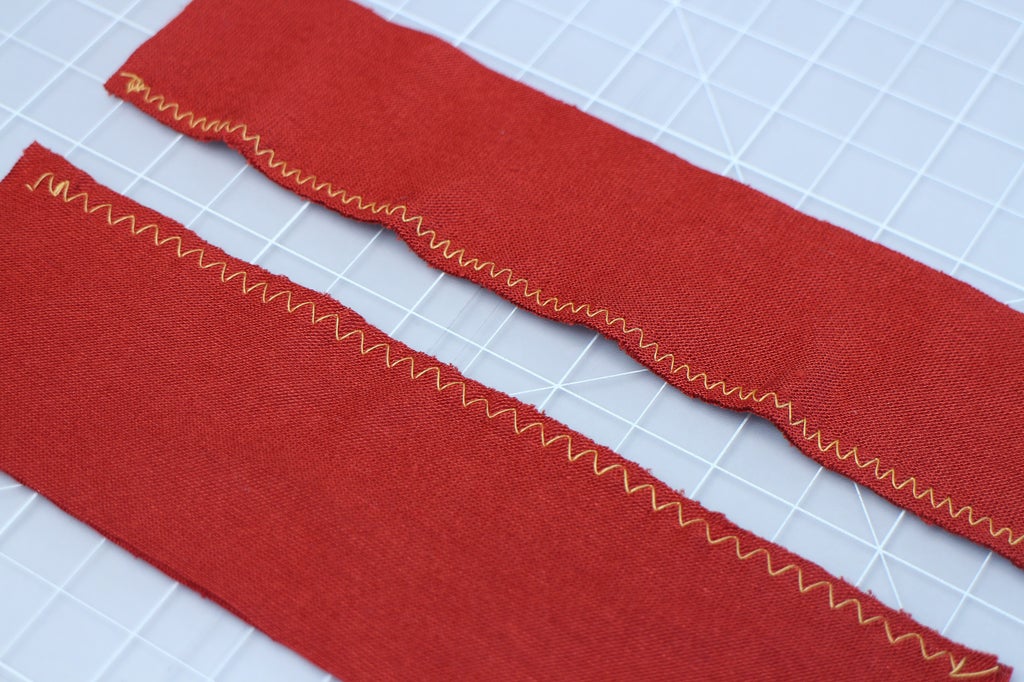
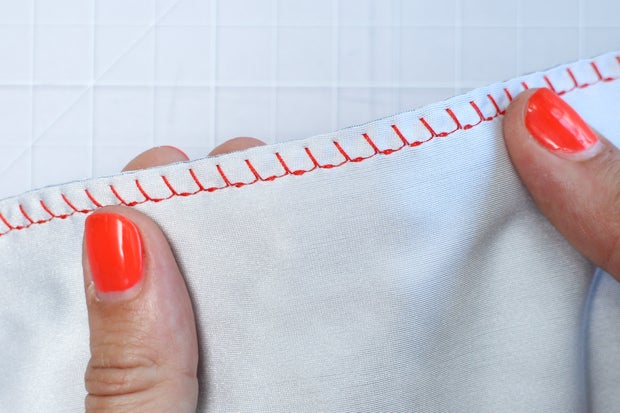
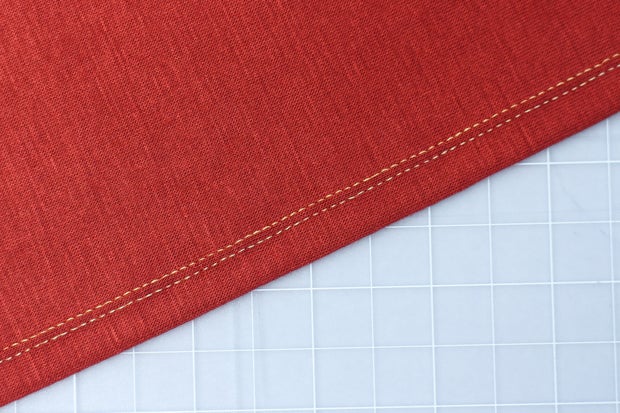
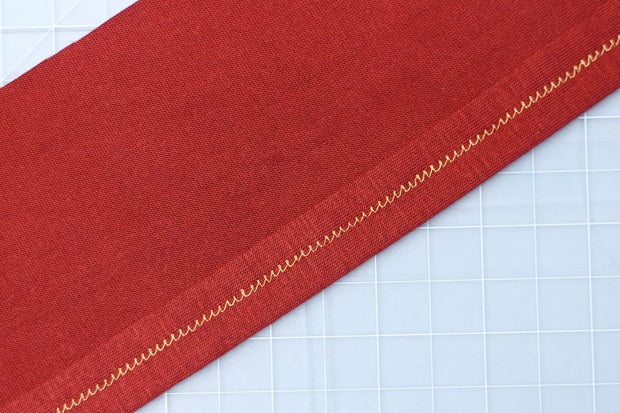
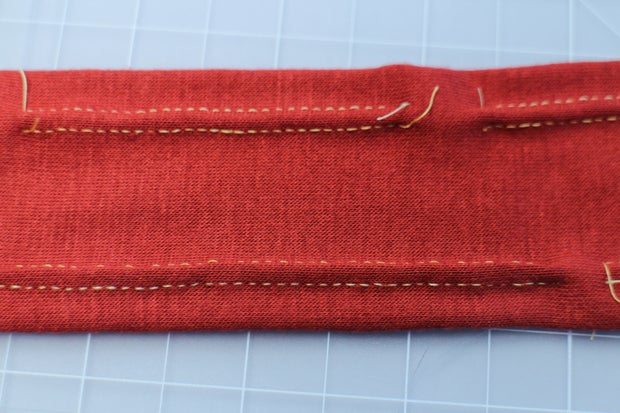
The red fabric in the top of this photo was zigzagged with a regular foot, and the zigzag on the bottom was sewn with a walking foot. As you can see the regular foot stretched the fabric out and made the seam wavy as it sewed the zigzag, while the walking foot seam is laying flat.
I found that on my machine, the regular zigzag and triple zigzag worked better with the walking foot, but the other stretch stitches actually worked much better with the regular foot. I imagine this will vary a bit from machine to machine, and fabric to fabric. A good reason to always test your stitches first!
Step 5: Spandex Sewing Tips

When you start sewing your spandex with your chosen stretch stitch, let the fabric feed naturally into the machine (you shouldn't need to pull it from the back or front to get it through). I sometimes press the fabric forward just slightly from the front as it feeds under the presser foot to combat the tendency to pucker.
The only time I stretch as I'm sewing is when I am trying to ease a slightly longer piece of fabric into a shorter piece, or sew around a curve. At these times it can be helpful to stretch the spandex slightly so it lays flat and even as you sew. It doesn't really matter if your seams end up puckered here because your whole garment will be stretched tight enough that any puckers should lay flat when it's on the body.
If you're sewing something big try not to let your fabric hang off the machine as you sew, the weight of the fabric will stretch the seam, and make it harder to sew neatly. Support your project on a table or your lap. I sometimes even put a pillow on my lap to hold my project up higher when I'm sewing stretch.
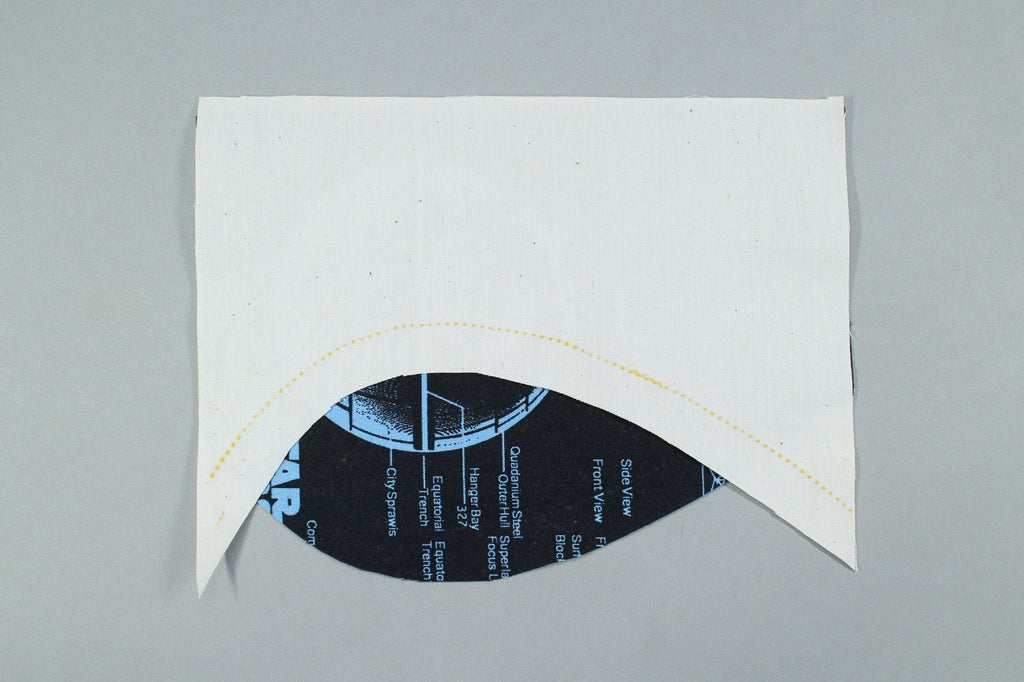
One strategy for getting really neat finished seams is to leave a seam allowance wider than the knit stitch you're using, this will help prevent the seam from getting stretched and puckered as you sew. When you're done, trim the excess away to create a neat finish, being careful not to cut into the stitches.

Step 6: Sewing Panels

When you sew together your supersuit, the order in which you attach your pattern pieces to each other will vary to some extent based on your design. When I created the paneling in my pattern design in the Designing a Spandex Supersuit instructable, I talked about how to strategically plan the panels to avoid having to sew sharp corners, and it's important to keep that in mind as we assemble our piece.
If your suit has side seams like mine does, that usually means you should assemble the front and back completely before you sew them together. It is also generally good to first sew small pieces, or pieces that are difficult to sew, before attaching them to large pieces. Beyond that, the best order of operations will depend on your individual design.
To figure this out lay out your cut pattern pieces the way they are going to be assembled and think about the best order to attach them.

Start pinning and sewing them together in order, using your notches to help guide you.

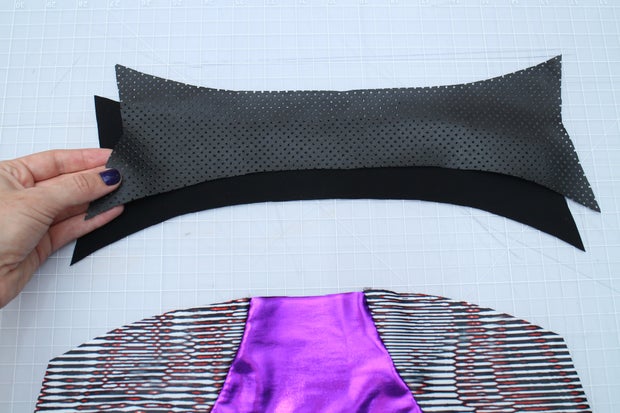
On the front of my design I need to sew the small purple side insets onto the leg before I attach the legs to the lower front panel.
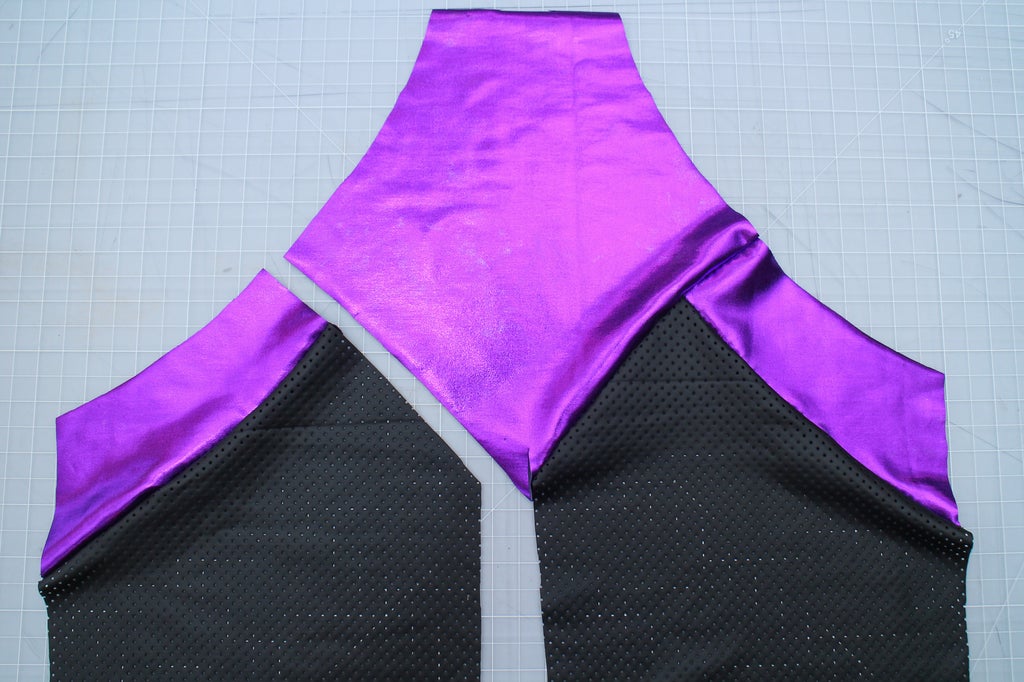
If I was to do this is reverse, attaching the leg to the lower front and then trying to sew in the purple side inset, it would turn the small purple piece into a point that would be very difficult to sew. To avoid any more tricky corner sewing I continued assembling the front of my suit like this:


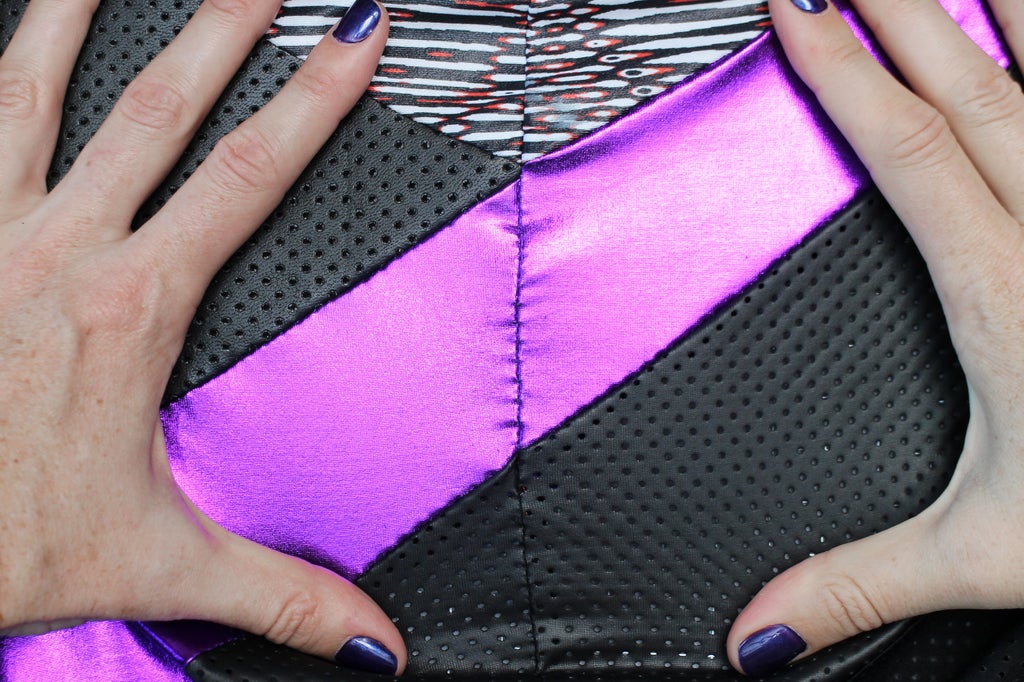
My black perforated spandex is somewhat sheer, and in some areas, like the waist and butt, I wanted to line it. To do this I simply lay the self on top of the identical lining piece, pinned them together, then sewed in the doubled panel as if it was one piece.


When you are sewing in all these the panels make sure that the seam allowances are laying down in the same direction at both ends of the seam, if they twist along the seams they will end up looking lumpy.

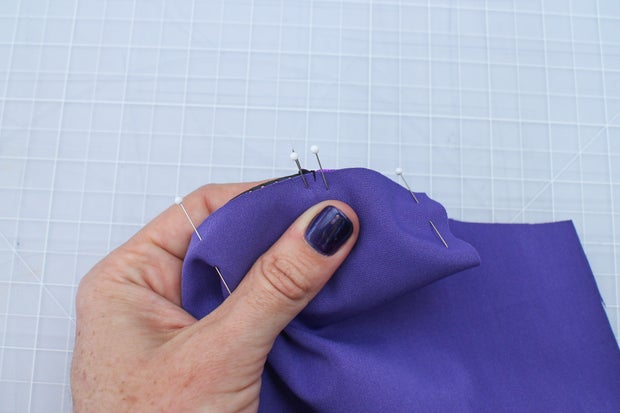
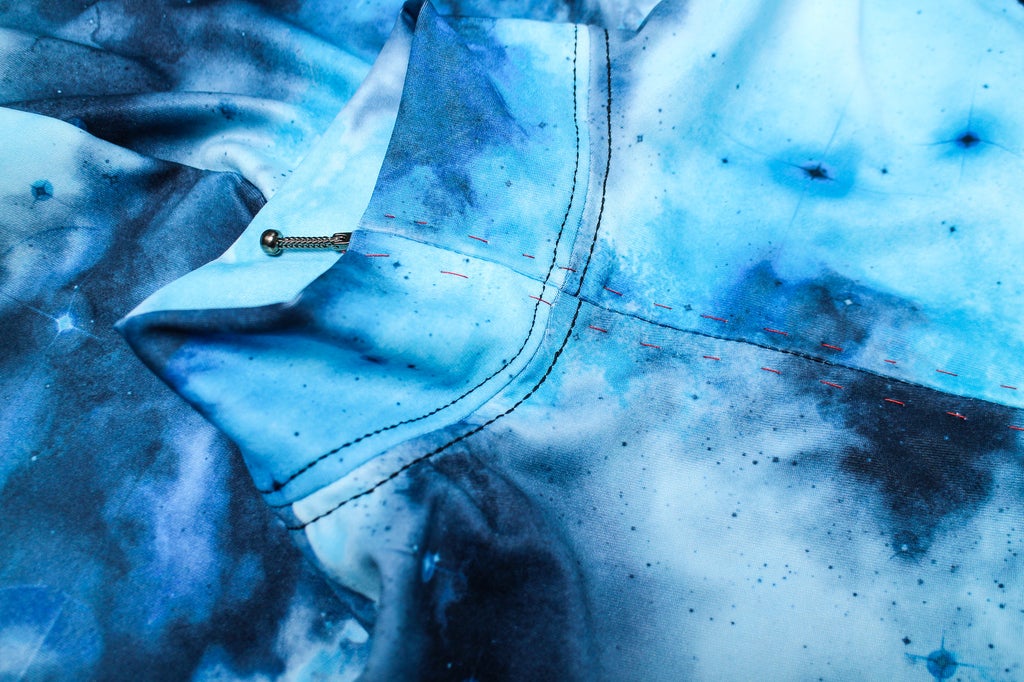
If you are sewing together two pieces with style lines that need to match perfectly, which often happens at the side seams, it helps to hand baste the pieces together just in this spot before you sew the seam on the machine. Stick your needle through both pieces in exactly the spot you want the seams to meet.

Hand sew the seam together with large stitches an inch or so on each side.

When you sew with the machine over this area, your seam lines should end up meeting perfectly.

Step 7: Sewing the Inseam
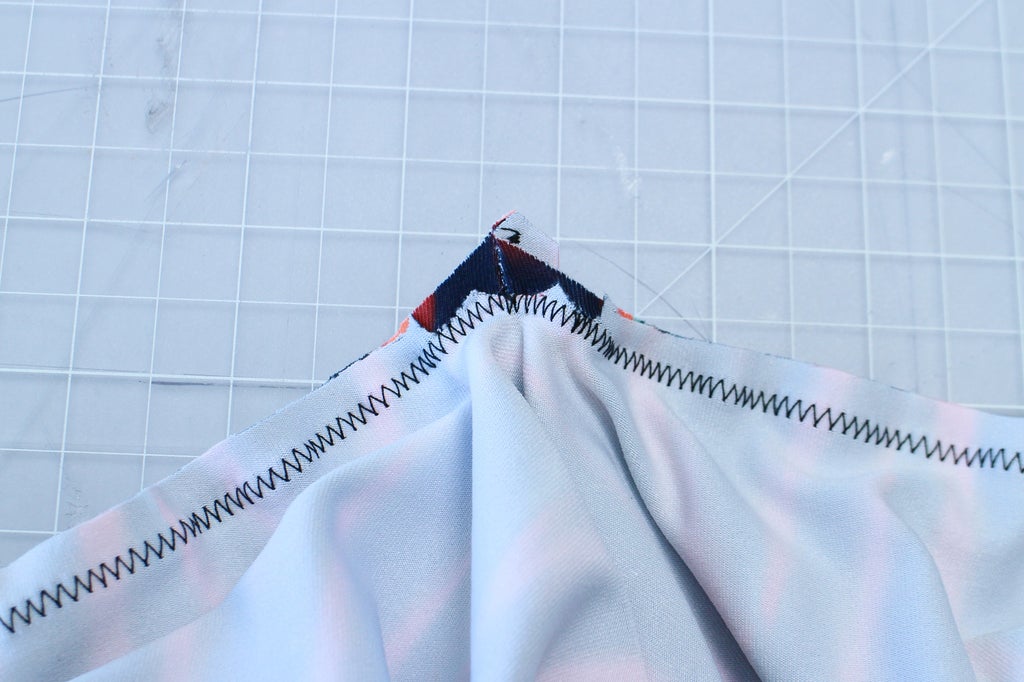
I discuss this when I'm sewing a mock-up in my Designing a Spandex Supersuit instructable, but sewing the inseam on a pattern like this can be a bit tricky because the shapes of the two pieces are opposite each other, the back is a point, and the front is a V. To pin these two pieces together, match the crotch points and place a pin here.

Then begin pinning down one side, then the other.


This will end up a bit awkward, with the front piece bunched up to fit around the point of the back. It can be a good idea to baste this area before sewing. I was lazy and didn't baste my mock-up. As you can see when I sewed it my stitches barely caught the edge of my front piece, which will make the crotch a bit unstable.
When I made the final version of the suit, I made sure to baste this corner first.

Step 8: Sewing Curves and Points

Here's another way to sew the inseam of your suit, which also works for sewing paneled insets that have sharp corners. I would avoid sewing purely decorative pointed seams whenever you can, since designs with sharp angles are really best done with applique, but if you have to, this technique works pretty well.
With the concave piece on top bring your two pieces together by sticking a pin through the exact corner at the sewing line.


Pivot the concave piece to one side so the seam allowance lines up with the seam allowance of the convex piece and pin them together along this one side.

Sew along this seam and stop when your needle is exactly at the corner point. Lift your presser foot and snip into the seam allowance at the corner close to the needle.


Pivot the second side of the top piece around to meet the second side of the bottom piece. Lower your presser foot and sew down the second side.

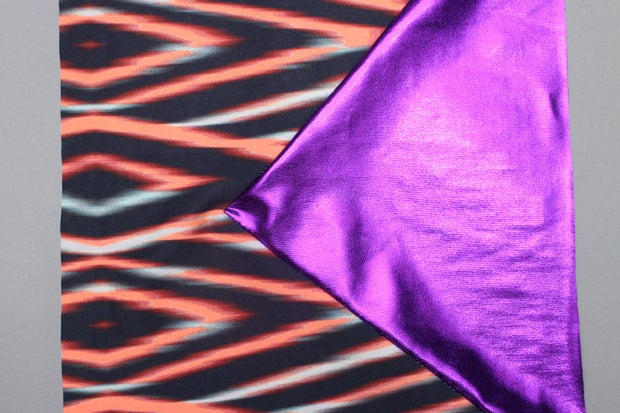
When you flip your fabric over, you should have a clean pointed seam. In the case of a crotch seam you may want to topstitch for a few inches here to re-enforce the corner.


If you have any very curved panels to sew together, there is a slightly different technique you should use. As I describe in my basic Machine Sewing Class, creating flat panels with curved seam lines are also tricky because of a similar concave/convex issue:


To create a seam we need to sew these two pieces of fabric together with wrong sides facing out. As you can see when we lay them on top of each other they don't match up at all. In fact, they are the opposite of each other, juts like the pointed pieces.
When you are sewing with woven fabric you have to clip the concave seam allowance and spread it along the convex one like this:

With stretch fabric this is not nearly as much of an issue because you can usually stretch the concave piece to fit around the convex one as you sew. If you are dealing with a very tight curve it can be a good idea to baste the two together before you sew them with the machine.
Step 9: Hemming
To finish the raw edges of your spandex suit, such as cuffs, ankles, armhole and neckline etc., you usually want to create a hem by simply folding over the edge of your fabric once or twice and stitching it down.

You can use any of the stretch stitches available on your machine, I often use the triple straight stitch because most of the others will make a very visible stitch pattern on the outside of your fabric, and the more zigzag style stitches can sometimes create a puckered hem.
Another great solution for making very professional looking hems on stretch is to use a double needle. The double needle stitch creates two lines of straight stitches on the top of the fabric, and a zigzag between the two rows of stitches underneath. Most machines have this capability, and it's actually really easy to use.

To set your machine up for double needle sewing you need to be sure your machine supports this function. Check in your manual or look online, but generally if your machine has two thread spool pins, it can accommodate a double needle.
There are different widths of double needles, so when you buy one, make sure it's not too wide for your machine. The distance between the needles should be no wider that your widest zigzag setting.
Insert your needle into the machine just like a regular needle and put a spool of thread on each thread spool pin. Thread the two threads through the machine together as if they were one thread.

Separate the threads above the needle bar thread guide and thread the left thread through that guide and the left needle. Skip the needle bar thread guide with the right thread and just thread it through the right hand needle.

Set your machine to the straight stitch setting and a stitch length of about 2-3. Fold your fabric along the edge to create a double or single fold hem, then top stitch with the double needle an even distance away from the folded edge.
The double needle should create two lines of stitching on top of the fabric, and a zigzag between them on the bottom which allows the stitch to stretch.
If the zigzag is pulling the two stitches together and creating a pucker between them on top and a tunnel underneath, tighten the thread tension on top and loosen it on the bobbin until the stitching lays flat.

Step 10: Creating Elastic Hems

In some places on a spandex suit, such as leg holes, armholes, and necklines it's good idea to reinforce your hems with elastic to help the spandex stay in place and prevent it from stretching or sagging. If you are making leotard style suit with no legs, the leg holes are especially important places to put this elastic, but you have to be careful not to make it too tight or you might end up with that unattractive dug-in panty line. :/
On my suit I decided to add elastic hems to the edges of the deep V neckline, since these panels are sewn into the suit at each end, I added the elastic before I sewed the panels in.
I pinned 3/8" wide elastic into the seam allowance of the neckline panels, stretching it slightly but not too much, then sewed it down with a zigzag.

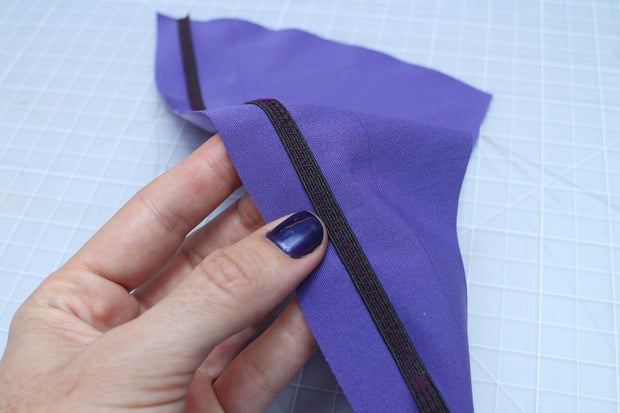
I folded the elastic over along the sewing line creating a single fold hem, then stitched the hem from the top with the triple straight stitch. I could have used a zigzag here, but the straight stitch looks neater. The edge will end up looking a little puckered, but that's ok, as it will smooth out when it's stretched against the body.

I also could have created a double fold hem, fully enclosing the elastic like this:
Step 11: Binding Edges

Hem binding is another kind of edge finishing technique you can use which is good for hemming curves and creates a nice decorative effect.
I like adding the binding to my edges before I sew them into seams like I did on the sleeve here, but you could add the binding after as well.
Cut a strip of spandex about 3/4-1" wide, depending on how wide you want your binding, then pin the strip to the edge you want to bind, with the right sides together.

Stitch the two pieces together with a zigzag along the edge.

Flip the strip around to the other side and pin. Make sure the underside edge of the strip extends past the seam.

Stitch in the ditch between the binding and the main fabric (in other words, topstitch directly into the seam between the purple and black so your stitches remain hidden on top, but catch the purple fabric underneath).

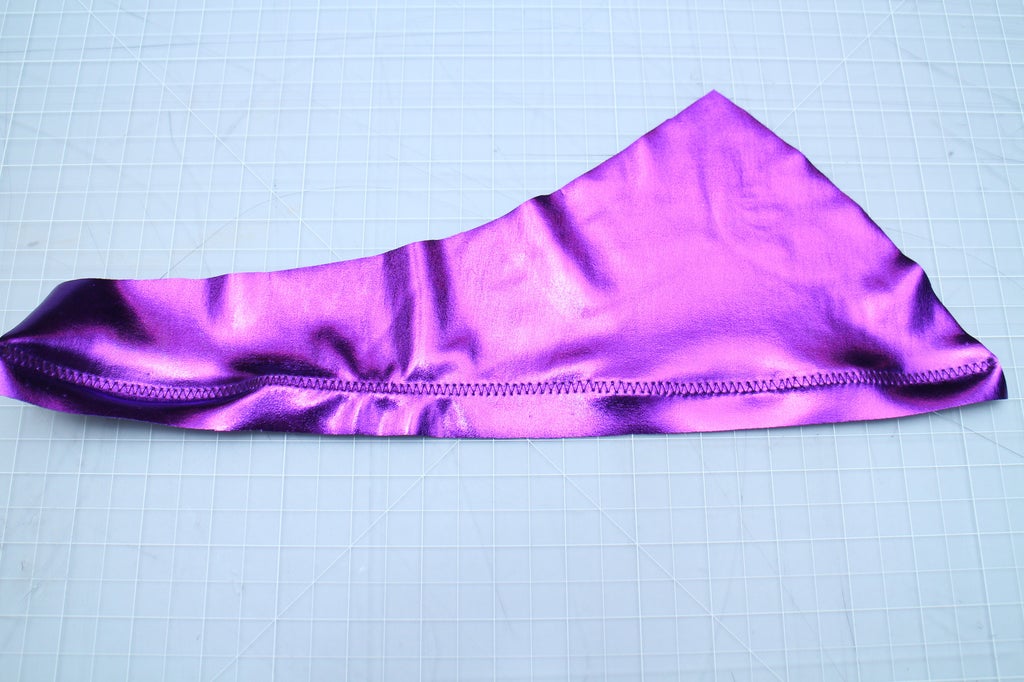
To finish this off I sewed the underarm seams of my sleeves creating a nice finished cuff shape. If you wanted you could even combine this technique with elastic to create bound and elasticized hems!


Step 12: Facing
As we talked about when making our pattern, when you want to create a clean finished edge on a shape that is curved like a collar a cut-out, a facing is a good solution.
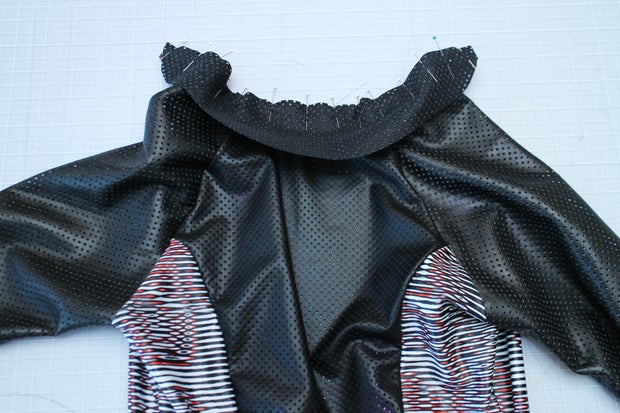
I created a facing for the collar and neck of my supersuit, and once I had set in my sleeves I could sew on my collar and facing. To attach a collar like this first sew the outer layer of the collar onto the neckline of the suit.


Sew the facing layer of the collar to the neck facing. Because I wanted the seam allowance to lay flat along the neck I also topstitched it down from the outside with a zigzag.


Pin the outer edge of the facing to the collar with right sides together, then sew along the edge with the triple straight stitch. It's good to use the straight stitch here instead of another stretch stitch because you want to be able to trim the seam allowance close to the sewing line.

Trimming like this will help the edge of the collar form a smooth curve when the layers are flipped right side out.

Flip the layers inside out, and flatten the collar, then topstitch along the edge of the collar to define its shape.


The collar and front neck area of the suit are now finished with a clean edge, but the neck facing is still flopping loose inside the suit, so it's a good idea to pin the the facing and body of the suit together and topstitch them together along the neck seam.

This is one variation of how you can use a facing to create a clean edge on an odd shape when making a bodysuit.
Step 13: Attaching a Zipper

While I generally think zippers in spandex bodysuits are best avoided, sometimes your design will just require one. When you have to set in a zipper there are a few different kinds you can use. I think a standard zipper inserted railroad style, is one of the best and easiest options, and an invisible zipper is fairly simple too.
As I mentioned in the Designing a Spandex Supersuit instructable, the problem with adding a zipper to a stretch garment is, where the zipper is attached the fabric will no longer stretch, so the garment will be tighter in that area. Adding zippers to the center front of unitards is common, but personally I think it's one of the worst places you could put one because of the threat of cameltoe, the nemesis of the well fitting supersuit!
For this reason I think it's a better idea to add a zipper to the center back seam, or even add one along the top of the shoulder or the raglan sleeve line. If your style does call for a center front zipper, make sure you add a little extra torso length to your pattern or even adding a panel right below the zipper that eliminates the center front seam in the crotch.
Adding a zipper to the front or back of a suit is basically the same. I'll show you how to set a railroad style zipper into a stretch garment here, but if you prefer to use an invisible zipper, or want more info about zippers in general, check out this lesson of my Machine Sewing Class.
Say we are attaching a zipper to the center front. Pin your center front seam together and mark where the bottom of the zipper is going to sit (for ease of sewing it's best to add the zipper before you sew the side seams). Sew with a stretch stitch up to this mark from below. Hand baste any areas like the collar seam that need to match up perfectly, then sew the rest of the center front seam together with a standard straight stitch on a relatively long stitch length.


From the front it should look something like this:

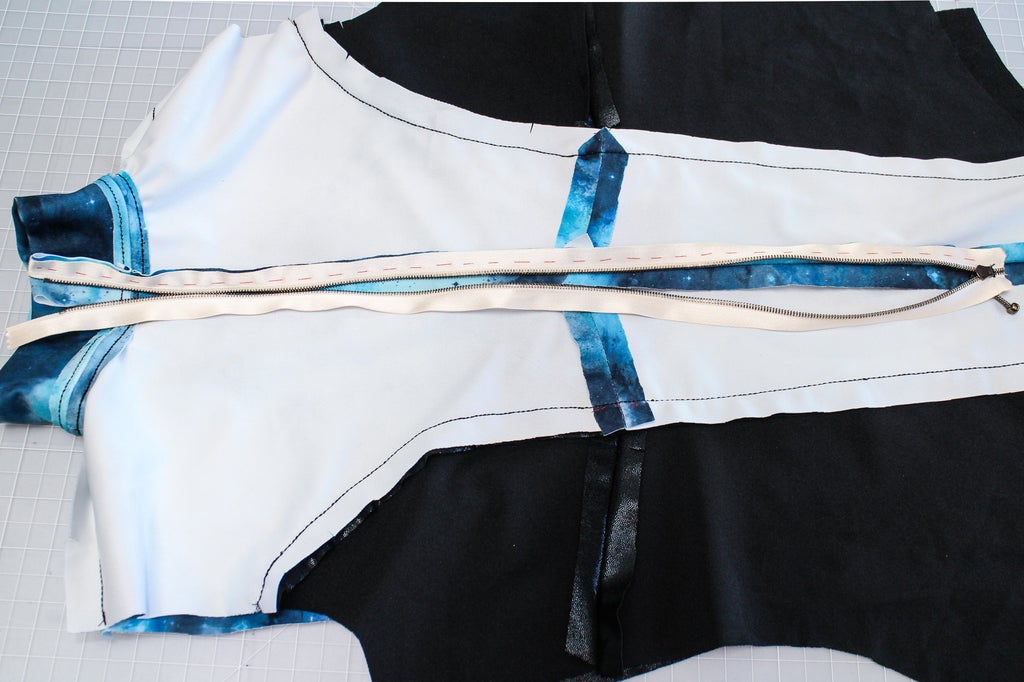
Unzip your zipper. With your suit still folded in half on the center front seam open the seam allowance and pin one side of the zipper to the seam allowance, right sides to right sides, like this:

Hand baste this side of the zipper to the seam allowance.
Close the zipper and pin it down so the zipper teeth are sitting right over the center front seam.

Now hand baste all the way around the zipper 1/4" out from the teeth, sewing all the way through the seam allowance to the right side of the garment.

You should be able to see your basting stitches on the each side of the center front seam like this:
Now use your zipper foot and a regular straight stitch to sew down one side of the zipper, across the bottom and up the other side. If you are using a metal zipper be careful when sewing across the bottom of the zipper because you could break the needle on the zipper teeth.

You won't be able to sew all the way to the top of the zipper, because of the zipper stop, so stop about two inches down. Use a seam ripper to open the center front seam of the garment all the way to the end of the zipper, then pull the zipper stop down a few inches and finish sewing the top ends of the zipper.


Take out the hand basting stitches and Pow! Perfectly set in railroad zipper!

Step 14: Sew Your Supersuit!


Show us what you've made! What kind of new super slick second skin have you created for your secret identity? How does it fit you? Do you feel any new superpowers starting to manifest themselves?
If you've used your new home machine spandex sewing powers to create an awesome project, share an "I Made It' it in the comments section below.
If you want to add some super accessories to your costume, check out the rest of the instructables in this series to learn how to work with worbla and EVA foam!


