

Introduction: How to Sew a Cute Cloche Hat


I love vintage hats - and this Instructable is inspired by the cloche hats of the 1920s! Cloches were close-fitting hats that were worn quite low - almost down to the eyebrows. They were made in a variety of styles from brimless to turned-up brims. They only cost between $1 and $5 back then! This hat in the Instructable is quite easy to make - so let's get started.
Step 1: Materials Needed for DIY Cloche Hat & Pattern


Materials Needed:
- half a yard of premium felt (or other material for hat)
- sewing machine(I use the Brother CS600i - and love it)
- hand-sewing needle, thread & pins
- scissors or rotary cutting tool & mat (I highly recommend this if you do a lot of sewing and cutting)
- pattern
- *optional: starch (I used Sta-Flo liquid starch)
Before You Begin:
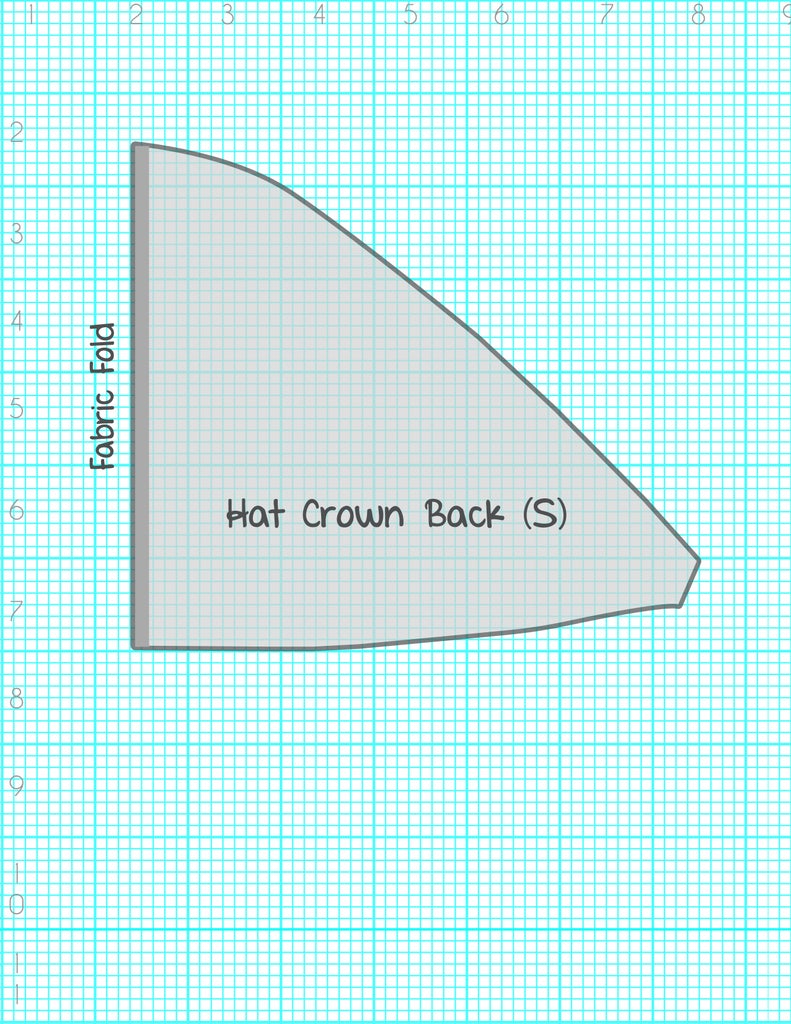
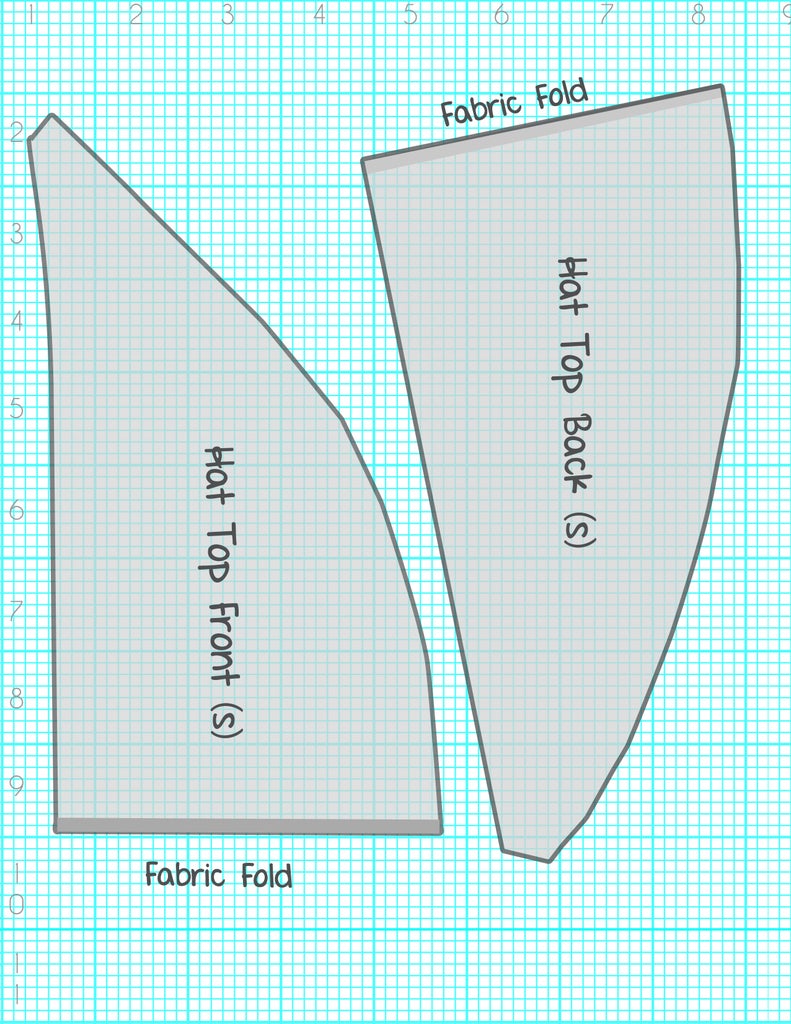
First, you can download the pattern piece in this step and print and cut them out.
Update!!! I've finally uploaded a PDF version of the pattern pieces that you can download. Just be careful that when you go to print out, you do not hit any special settings like "fit to frame," - just print it the size that it is. You will know it's the accurate size after printing it out and putting a ruler next to the ruler grid on the pattern pieces. It will be accurate or true-to-size.
The hat I made is for a head size approximately 21 1/2 inches. If you need to increase the hat size, you can do so by adding material to the ends of the pattern pieces. This tutorial here on increasing or decreasing a hat size pattern may help you.
The large flower on the hat I created was made from an online tutorial and free pattern download here. Thank you so much to Joy Kelley for the pattern for the beautiful felt camellias!
Holly Mann is a participant in the Amazon Services LLC Associates Program, an affiliate advertising program designed to provide a means for sites to earn advertising fees by advertising and linking to amazon.com.
Attachments

Step 2: Cut Out the Pieces


First, cut out all the pattern pieces. Then, take the Hat crown front piece, wrong-side up and pin it to the hat top piece, also wrong-side up. Head over to the sewing machine and use a 1/2 inch seam allowance and stitch the pieces together. Once done, then turn it right-side out.
While still at the sewing machine with the material right-side out - look underneath the stitching to see the direction in which the under part of the seam is facing. Move it to one side (your choice as to left or right) and put the presser foot down. I chose to push the under part of the seam towards the back part of the hat (left). I then did a topstitch to the left of where the two pieces are joined (see image) while carefully pulling the material so there wouldn't be any bulges. Doing this creates a really nice finished-look for the hat, while also smoothing and flattening out the seams.
Step 3: Finishing Up the Main Part of the Hat


Now set that piece aside for a moment. Take the back crown piece and the back top piece. Lay them out as you see in my images - and pin them together. The back crown piece is the bigger piece. Sew them just as you did with the front crown and top pieces. It will get more difficult to do the top-stiching once you get to this point - so just take your time and be careful with it.
Once done, the four pieces will be connected as follows: front crown piece, front top, back top and back crown piece. The crown pieces are larger. Try the hat on to see how it fits and lies on your head. If you prefer how it looks as it is - great. You may find that if you flip it so the back crown piece is in the front that you like how it looks that way - either way is fine. The main hat base is now completed!
Also, if for some reason the hat is slightly more snug than you prefer - you can get it damp (spray the inside with water) and put it on your head to sort of re-form it and stretch it a little bit.
Step 4: Adding the Brim


For this step, cut out the pattern piece for the brim. Have a pin ready as well as a needle and thread. Fold the tapered end in half (see image) and then in half again and pinch and pin it. Then sew that little end up - an inch and a 1/2 starting at the end. Then get more pins ready and start at one side of the hat. I started at the right front side of the hat and began pinning the brim on. It helps to pin the very end on first and then try the hat one and move the brim around to see how you like it. Some people may like it lower and others higher. Pin and try it on before your final pinning. Once you like the placement, then you'll need to sew it on. As you can see in the photos, you are only sewing it on from the top part of the brim. The bottom part will fold up.
The end of the brim will not be totally secured down. So you can also move it around how you like it and if you like, do just one or two small stitches to secure it onto the hat. I think it looks better this way - otherwise it may stick out awkwardly.
Step 5: Sewing the Flowers On


Now for the fun part! Time to cut out flowers and get them ready and then sew it on. I basically tried the hat on again after sewing the flowers and held the flowers to the side to determine where to pin it on. Once pinned and I was happy with the placement, I then hand-sewed them onto the side. If you didn't download the pattern for the flowers, it is available on Joy Kelley's website here - thank you Joy!
Next, before I forget to add this - you can fold the back side under about 1/2 inch or less and sew it under. It's also fine if you leave it un-sewn - that is up to you.
Now for the last step - if you have some starch to spray onto your hat to stiffen it up a little bit, that will help the hat keep its shape and stability.
Step 6: Finished Product


The cloche hat doesn't take too long to make. Once you have the basic hat shape - the fun thing is that you have unlimited options for customizing it the way you like it! It's fun wearing it too because you don't see these hats everyday - a lot of people have complimented. But my son still says he doesn't like it and it's not my style! I think it is - and I love it! :) Time to make some more...:)


