

Introduction: How to Tie a "Cobb & Co" Hitch


When I was growing up I had the privilege of living in the Australian bush and getting to know some true bushmen. People with the skills and resourcefulness that allowed them to thrive in an environment that would leave most city people helpless.
One of essential skills for anyone living and working a long long way from town is the ability to fix just about anything with fencing wire and a pair of pliers. For this you need at least to know how to tie a "Cobb & Co Hitch". This probably has other names in other places, but I like Cobb & Co because the name is from one of Australia's pioneering transport companies.
The Cobb & Co Hitch is very simple, and very effective. It uses only fencing wire to make a very tight lashing for joining anything you like. Mostly it is used to join timber.
In this ible I will try to show how to tie a "Cobb & Co. Hitch". I will just tie some sticks together to show how it's done.
Step 1: Assemble Materials

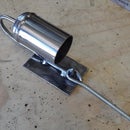
You will need something to cut wire with. Pliers are the best. Sadly I no longer have my trusty old fencing pliers, but these red ones will do.
You will also need something to use as a lever to twist the wire and crank up the tension. Here I have used a bolt, If your pliers have plane steel handles they are even better. Whatever you use must not get thicker at the end or it will get stuck when you tighten the hitch.
Most important of all you will need wire. If you are in a rural area it shouldn't take too much scouting around to find some old fencing wire. Don't cut it off a fence though; that would be stupid and thoughtless.
Step 2: Now for the Hitch


- Cut yourself a bit more than twice the length of wire to go around the job.
- Fold the wire in half.
- Pass the folded part (bight) of the wire around the job.
- Put your lever (my bolt in this case) through the bight.
- Use the lever to drag the bite around the other parts of the wire (this isn't easy to describe; hopefully you can see what I mean in the pictures). NB Start the twist as close as possible to the job or you will twist the wire off before it's tight.
- Keep twisting the bight around the wire. The lever allows you to apply a lot of force and you will probably notice the wire cutting into the timber. If you go too far at this point you will break the wire and will have to start again.
- When you are happy with the tension and the shape, cut the scratchy excess wire ends off to make it a bit safe.
Step 3: The Result


Here I've simply tied three sticks together to make a very rigid structure. It took all of about three minutes to complete.
This process can be scaled up to build all sorts of things: sheep yards, roof trusses, etc. or scaled down using tie-wire to repair tools, furniture, etc.
I hope you enjoyed my Instructable. If you have any comments or questions please post them.
And I would be really interested to read what this is called in your part of the world.
Cheers,
Cammers


